How to Make Your Website Available Over Tor : A Complete Guide To EOTK, The Enterprise Onion Toolkit
A guide to using EOTK (The Enterprise Onion Toolkit) to make websites available over the Tor Network as a Onion Service.


Introduction
Hello there. My name is Shen, and I'm a Philosophy and Computer Science student. I write articles about Metaphysics and Ontology. Recently, a reader contacted me about making my website available as an Onion Service over the Tor Network. Using EOTK (the Enterprise Onion Toolkit), I was able to mirror my blog as a .onion site, and make it accessible to users over Tor.
This article is a guide to the process of using EOTK to mirror an existing website as an Onion Service. It is be applicable to any small website, whether a static site, or one running common Content Management System like WordPress, Drupal, or Ghost. Both this guide, and EOTK in general are designed to be self-contained, and "drop-in" – you do not need to modify your existing website configuration.
This guide is suitable for the intermediate Linux user or hobbyist web admin. You do not need to know any technical details about Tor. My intended audience is someone who is comfortable managing a WordPress site on the command line, or self-hosting a webapp using a VPS, but otherwise does not know about Unix sockets, Nginx modules, or advanced networking.
What Is Tor? What Are Onion Sites?
The Tor Network is a free and open source volunteer network that mitigates against tracking, surveillance, and internet censorship. Users connect to the Tor Network using the Tor Browser, which lets them browse websites anonymously. Tor users are often people with advanced privacy and security needs – such as journalist, whistleblowers, and citizens of politically oppressive regimes.
People can visit regular internet websites (i.e. the "clearnet") using the Tor Browser, but there are special sites called onion sites, that are only visible using Tor. These Onion Services provide the highest degree of anonymity and protection for Tor users. This is why many news organisations run onion sites. The New York Times, Washington Post, BBC, and others all maintain onion sites for users in countries where internet censorship is pervasive and freedom of speech is limited. Even Facebook and Twitter have onion sites. One can think of an onion site as the "shortwave radio" equivalent of a regular internet website.
Why Should I Make My Website Available as an Onion Site over Tor?
Onion sites are typically used by people with exceptional privacy and cybersecurity requirements. These users may come from politically oppressive regimes, or marginalised communities where surveillance is widespread and dangerous. By making your regular, "clearnet" website accessible as a onion site, you can help readers and visitors who may otherwise be unable to reach your content. I believe that even if only a single individual benefits from the onion mirror of my blog, it would be all worth it – because the pursuit of Philosophy is a universal, human activity – that should be accessible to all.
What Is the Difference between Making My Website an Onion Site, and Visiting My Website over Tor?
For Tor Network users, native onion sites offer far better security, privacy, as well as performance – than simply visiting a clearnet website over Tor. In order for a Tor Network user to visit a clearnet site, her connection must exit the Tor Network through an Exit Node, which makes the final connection over the Internet to the clearnet website. This last step can be subject to surveillance and monitoring, as well as interception if the clearnet site does not use TLS (i.e. SSL, HTTPS). Finally, the capacity of the Tor Network's exit nodes is limited – congestion at Exit Nodes typically make visits to clearnet web pages slow.
Alec Muffet, the creator and maintainer of EOTK has made a video comparison on the performance between visiting Facebook over Tor, and Facebook as a native Onion Service. The Facebook Onion Service loads around an order of magnitude faster.
Making an Existing Website Available as an Onion Site
We now begin the technical portion of the guide. We will be using Alec Muffet's EOTK (The Enterprise Onion Toolkit) to create a transparent mirror for our existing clearnet website. EOTK is a best-in-class, industry standard toolkit for creating onion sites for existing clearnet websites. It has been used by the BBC, the Intercept, and many other large organisations. This tutorial will guide you in deploying EOTK for your existing website, to create a secure and low-maintenance onion mirror. This tutorial will also guide you in the process of generating a "vanity" .onion domain name using mkp224o, adding a Onion-Location header for your clearnet site, and installing signed TLS certificates with HARICA.
As an overview, the process of making a onion mirror will be as follows:
- Generate a "vanity"
.oniondomain name usingmkp2240.
We do this first because it can take a long time – this task can run in the background while you complete the subsequent steps. - Install and configure EOTK on our remote web server.
This step will include daemonising the process and running via systemctl. - Install trusted TLS certificates from HARICA into EOTK.
This step is optional. It is only applicable if you decide to purchase signed certificates from the HARICA certificate authority. - Configure the
Onion-Locationheader in Nginx for our clearnet site.
This better facilitates discovery for your onion site.
This process will take roughly 2 hours to complete. It is a good choice for a weekend-project for the hobbyist web admin. We will begin with the first step of the process, by using the mkp2240 tool to generate a vanity onion domain name.
Using mkp224o to Generate “Vanity” Onion Domain Names
 cathugger
Link to the mkp224o Github Repository
The Tor Network is a decentralised network. As a result, there is no central authority to issue or register .onion domain names. Rather, all .onion domain names consist of a 56 character-long hash of letters and numbers, which is the base32 encoding of the site's public key. In practice, this means typical onion domain names look something like this:
http://5ekxbftvqg26oir5wle3p27ax3wksbxcecnm6oemju7bjra2pn26s3qd.onion/The Onion Site Domain of the Debian Project (debian.org)
This is of course, rather ugly and entirely unmemorable. But it is possible to generate partially human-readable onion domain names, by repeatedly creating many candidate domain names, and filtering them for patterns. This is how organisations like Twitter, or the New York Times have .onion domains which look like this:
https://twitter3e4tixl4xyajtrzo62zg5vztmjuricljdp2c5kshju4avyoid.onion/Onion Site Domain of Twitter (twitter.com)
https://nytimesn7cgmftshazwhfgzm37qxb44r64ytbb2dj3x62d2lljsciiyd.onion/Onion Site Domain of the New York Times (nytimes.org)
These are called "vanity" onion domain names, and the brute-force process to create them is analogous to cryptocurrency mining – since we are repeatedly making many hashes, and filter them according to an arbitrary criteria.
Security Considerations of Using Vanity .onion Domain Names
Although vanity .onion domain names are more recognisable, they may also have potential security disadvantages. If your users become accustomed to simply remembering your domain name as name<random-hash>.onion, an attacker may potentially impersonate your site by generating a similar onion domain name – relying on how users will likely only glance at the first part of the domain name and ignore the unreadable hash. For instance, the following two domain names look indistinguishable at the first glance.
legiteun3agp5zpw2zgcrjih4flq4ipp4dbpveqhlcyuas67wfqwmmyd.onion
legiteun3abbemz2u6zkfhiqemr6gurrekbjfppmdg2ud57sz6dr4mqd.onion
Which is the "legit" onion site?
Hence, it is up to the implementer to decide whether or not the user-friendliness of a vanity .onion domain name will outweigh the small, but possible security disadvantage. I personally believe that the risk is quite small, so I choose to use a vanity .onion domain name – but it is important to make an informed choice.
We can generate these vanity onion domain names using a tool called mkp224o (Github Link). We will do this step first, since it can take some time – we can run it in the background while we accomplish the subsequent steps.
Downloading mkp2240
Let us download and compile mkp224o from its authors Github Repository. You'll want to do this on a local machine (i.e. your desktop), preferably one which has a powerful, multi-core CPU.
git clone https://github.com/cathugger/mkp224o.gitCloning from git repository
The utility is a C program, which we must configure and then compile on our machine. First, let us download some tools necessary to compile it:
sudo apt install gcc libsodium-dev make autoconfDownloading compiler tools
Now we run ./autogen.s in order to generate a ./configure autoconf script. ./configure is the script which generates the Makefile that allows us to compile the C program.
cd mkp224o
./autogen.s
Configuring and Compiling mkp224o with Optimal Settings
This is the point where we must consider carefully the different configuration options that we can compile the program with. The options are documented in the OPTIMISATIONS.txt file available in the project root (here's a link to it on Github).
The mkp224o program is essentially an "onion miner" which mines onion domain names. We must ensure that we compile it with the optimal options, so that it performs as fast as possible. Specifically, mkp224o uses a library from NaCl to generate Ed25519 signatures very quickly. This library (called SUPERCOP) has different versions (i.e. implementations) that are better optimised for different CPU architectures. The mkp224o tool supports the following implementations:
| Implementation | Enable Flag | Notes (from the maintainer) |
|---|---|---|
| ref10 | --enable-ref10 |
SUPERCOP' ref10, pure C, very portable, previous default |
| amd64-51-30k | --enable-amd64-51-30k |
SUPERCOP' amd64-51-30k, only works on x86_64 |
| amd64-64-24k | --enable-amd64-64-24k |
SUPERCOP' amd64-51-24k, only works on x86_64 |
| ed25519-donna | --enable-donna |
based on amd64-51-30k, C, portable, current default |
| ed25519-donna | --enable-donna-sse2 |
uses SSE2, needs x86 architecture |
The author offers advise and a discussion of the various options in OPTIMISATIONS.txt. In practical terms, if you are using a modern, 64-bit (x86_64) Intel or AMD CPU, you should use the --enable-amd64-30k configure flag. If you don't know what x86_64 means, you should certainly use --enable-amd64-30k.
Likewise, there are an additional set of configure options for mkp224o's filtering algorithm. The options are described in detail in OPTIMISATIONS.txt – and a proper selection is important, if you have hundreds of filters. However, if you are using only a few, the following flag will suffice:
--enable-intfilter=nativeThis enables simple integer filters, which is fastest if you have only a dozen filters.
We the above considerations in mind, we can now configure mkp224o with the following flags:
./configure --enable-amd64-51-30k --enable-intfilterConfiguring mkp224o with optimal feature flags for a modern CPU
Now we run make to compile the program, and now mkp224o should be available as a native binary within the git repository.
make

# Run mkp224o and print help
./mkp224o -h
Compiling mkp224o and running the compiled binary
Mining Onions with mkp224o
Now we are ready to mine onions with mkp224o! This process is CPU bound, so more threads your CPU has, the faster your process is. Before we begin, make sure to check out all the available options for mkp224o by running ./mkp224o -h. In particular, we'll be using the following flags:
| Flag | Description |
|---|---|
-f filename |
Specify filter file which contains filters separated by newlines |
-d dirname |
Output directory |
-B |
Use batching key generation method (>10x faster than -z, current default) |
-s |
Print statistics each 10 seconds |
-p passphrase |
Use passphrase to initialize the random seed with |
--checkpoint filename |
Load/save checkpoint of progress to specified file (requires passphrase) |
First, we'll create a ./my-filters.txt file with a list of "filters" that we want our onion domain to be. For my website https://shen.hong.io/, my filters were the following:
hongonion
shenhong
hongblog
shenblog
shensite
hongio
shenio
Example my-filters.txt file for https://shen.hong.io/
With these filters, you will be able to find candidate onion domain names like:
hongio267dx4o2ofkn4ddsztu4ok2vq4euc7sxumbi7kcfd64ije62ad.onionThis is the domain name for my real onion site
Alec Muffet, the Facebook Engineer who created EOTK, has written some excellent advise about the process of mining and choosing onions. For inspiration and guidence, I highly recommend checking out his post (available as within the EOTK git repository as docs.d/TIPS-FOR-MINING-ONIONS.md).
Create a directory called ./candidates/ which will contain all the matching domains. We will also specify a --checkpoint and a passphrase -p. This is to allow us to cancel and resume the search process conveniently. For the passphrase, make sure it is a long, > 64 character random string. We will need it to resume the search! Finally, we will be using the -B flag to enable batched mode, which speeds up performance significantly. With the above settings, we may begin the search process with the following command:
./mkp224o -s --checkpoint checkpoint.txt -d candidates -f my-filters.txt -B -p PASSPHRASEYou are now mining onions! Candidate domain names which match your filter criteria will be stored in the ./candidates/ directory. Depending on how many characters your filters are, this process can take a long time. Keep it going in the background, while we continue the rest of the tutorial.
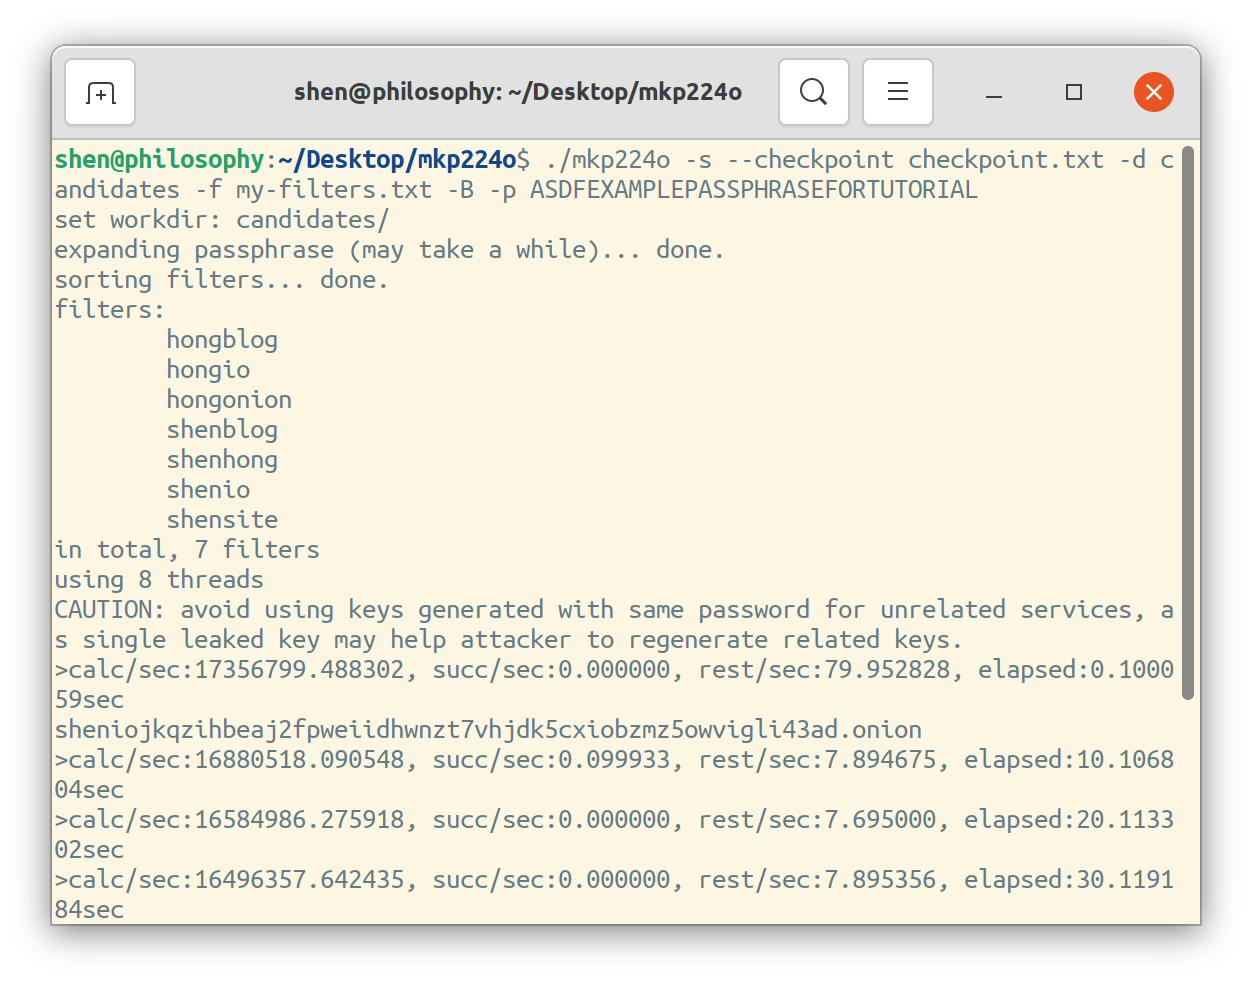
mkp224o in action. Note the onion domain names it already discovered!How Long Does It Take to Find a Onion Domain Name of a Given Length?
I'm glad you asked! There is a very informative discussion in the Issues section of mkp224o's Github page, which essentially asks the same question. As one commentor has presented, number of calculations (hashes) \(t\) needed to find an onion address with \(n\) characters with probability \(p\) is governed by the following equation:
\[t = \frac{\log(1-p)}{\log(1-\frac{1}{32^n})}\]
Each additional character in our vanity onion domain increases the term \(32^n\), where 32 is the base32 encoding of a onion domain. When we run ./mkp224o, it outputs its own performance statistics, including its calc/sec rate which represents the number of hashes \(t\) which it performs every second. Hence, given the calc/sec value, you will know the \(t\) that your computer is capable of performing every second.
I've recreated a table of \(t\), given some values of \(n\) and \(p\):
| n | p=0.50 | p=0.75 | p=0.90 |
|---|---|---|---|
| 1 | 22 | 44 | 73 |
| 2 | 709 | 1419 | 2357 |
| 3 | 22713 | 45425 | 75450 |
| 4 | 726817 | 1453634 | 2414434 |
| 5 | 23258160 | 46516319 | 77261934 |
| 6 | 744261118 | 1488522235 | 2472381917 |
| 7 | 23816355774 | 47632711548 | 79116221364 |
| 8 | 762123384785 | 1524246769571 | 2531719083689 |
| 9 | 24387948313146 | 48775896626291 | 81015010678099 |
| 10 | 780414346020670 | 1560828692041339 | 2592480341699210 |
Here are some typical values of \(t\) which I have measured:
- Framework Laptop with 11th Gen Intel Core i7-1185G7 (8 threads): \(\approx 13,417,732\) calc/sec.
- Hetzner Dedicated CPU Server with AMD EPYC 7003 Milan (48 threads): \(\approx 93,313,394\) calc/sec.
(Feel free to contact me if you have your own measurements! I'll add them to this list)
As you can see, for a 75% chance to "mine" a single 8-character vanity onion domain name, you will need approximately 31 hours on a modern Intel i7 CPU. That same 8-character vanity onion domain name will take less than 5 hours on a high-end AMD EPYC 7003 server CPU with 24 cores. But even that same powerful server CPU will take more than 4 days to mine a 9-character onion, and more than 191 days to mine a 10-character onion!
Hence, keep your onions mining, while we proceed on to the next part of the guide: installing and configuring EOTK.
Introduction to EOTK: The Enterprise Onion Toolkit
alecmuffettLink to the EOTK Github Repository
We'll be using Alec Muffet's EOTK in order to make our website available transparently over the Tor Network. This section of the guide will introduce EOTK, install it on the server, and go through common configuration options and settings.
EOTK is the best approach to making an existing clearnet website available as an onion site. It offers the following advantages:
- It is a transparent, drop-in solution: You do not need to alter your existing web app configuration or stack.
- It is widely used and actively developed: The toolkit has been deployed by the BBC, The New York Times, and other large organisations. The Git project has a consistent history of commits.
- It packages the tor service with it: You do not need to separately install and configure tor. The solution installs a standalone tor service that is preconfigured with secure defaults.
Hence, we will use EOTK to make our website available over the Tor Network as an onion site.
How EOTK Works
EOTK works as a man-in-the-middle rewriting proxy. It accepts inputs from the Tor Network, rewrites them for your web application, and then sends them to the application itself. Likewise, when the application responds, it will rewrite the response and then route it to the correct user in the Tor Network. Essentially, EOTK serves as a translator which allows Tor Network users to visit your site as an onion site, and for your site to respond as an onion site.
Here's a diagram of a regular web setup, where you have the web application behind a Nginx reverse proxy. The web application can be any CRM such as WordPress, Drupal, or Ghost – and the Nginx reverse proxy performs traditional tasks such as compression and TLS.

When we install and configure EOTK successfully, it sits between our Nginx reverse proxy, and the Tor Network.
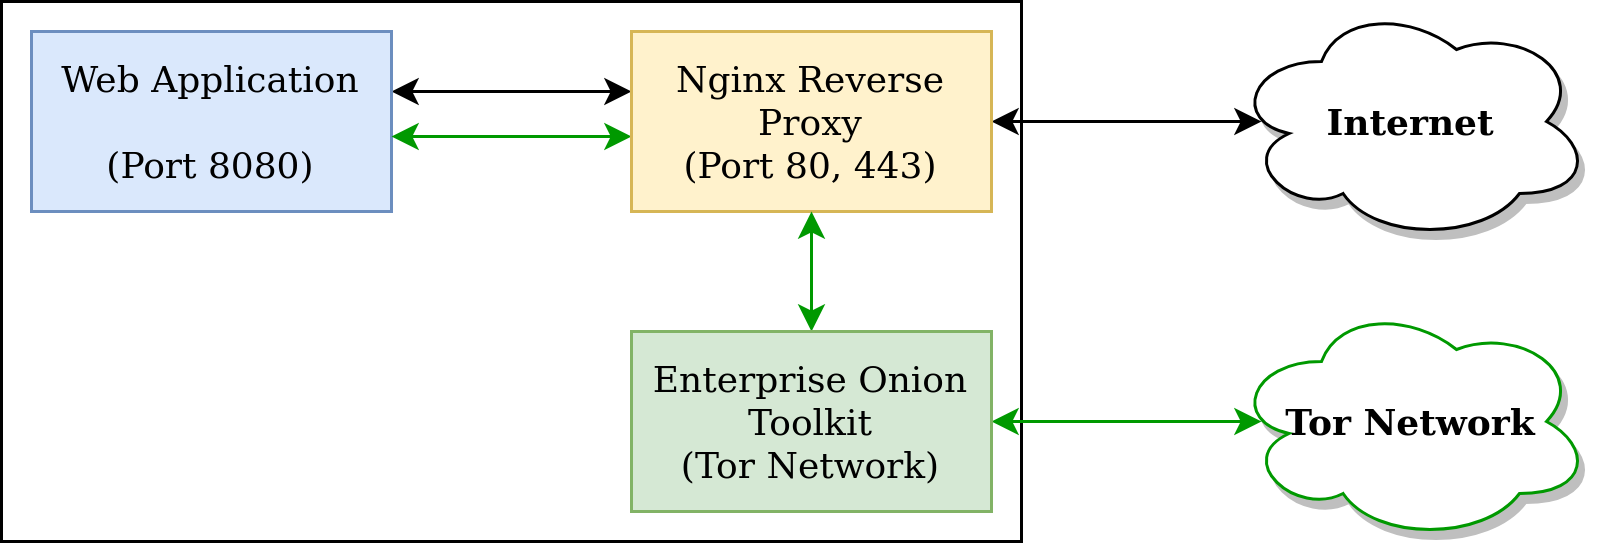
Note the substantive similarity between the role and position of EOTK, and our regular "clearnet" Nginx reverse proxy. EOTK is effectively a modified Nginx reverse proxy, which "translates" requests between the Tor Network, and your application's regular reverse proxy. In fact, we will also have to install TLS certificates at the EOTK level, in order to allow our onion sites to be served over HTTPS. But also observe that the connection between EOTK and your Web Application is not direct, but rather EOTK is a layer "on top of" your regular Nginx reverse proxy. This means that all the benefits and optimisations from your regular Nginx configuration is preserved. For example, if you configured Nginx to use compression, your site will likewise be compressed as an onion site.
Now that we understand the the architecture of EOTK within our existing web stack, let us begin with the installation process.
Installing EOTK on Ubuntu
EOTK's installation instructions are available within the ./docs.d folder of its git repository (link here). The toolkit is available on a variety of different platforms, such as Ubuntu, Debian, CentOS, Mac OS, and FreeBSD. We'll be following the latest Ubuntu 20.04 instructions. First, clone the EOTK repository onto your remote webserver.
git clone https://github.com/alecmuffett/eotk.git
Cloning the EOTK from its git repository
Be very mindful where you place the ./eotk directory. The folder is not disposable, but rather it will serve as the root which all of our site-specific configuration will reside. The ./eotk directory that we just cloned is analogous to our /etc/nginx directory – it will later contain all of our site-specific configuration, TLS certificates, and .onion site keys. Make sure to move it to a safe place! Consider placing it in /etc/.
Once you are ready, we run the included build script.
cd ./eotk
./opt.d/build-ubuntu-20.04.sh
Run the EOTK build script for Ubuntu 20.04
This build script does the following:
- It first downloads and installs a set of platform-specific build dependencies, such as
build-essential,libssl-dev, andcurl. - It then calls out to the
./opt.d/lib.shscript, which contains instructions common to all platforms. - Within the
./opt.d/lib.shscript, it downloads, configures, and builds two programs. Thetordaemon itself (which provides us access to the Tor Network), as well as OpenResty, a Nginx plugin that provides Lua scripting support for Nginx configuration. OpenResty is the core of the EOTK – we use OpenResty to "translate" requests to and from the Tor network for our web application.
The build process can take some time. Once it is complete, you should have a ~/eotk/eotk binary that is ready to use, as well as a directory structure that is populated like this:
root@remotehost:~/eotk# tree -L 3
.
│   # Directories
├── demo.d
├── docs.d
├── lib.d
├── opt.d
├── projects.d
├── secrets.d
├── templates.d
├── tools.d
│   ├── openresty.d
│   ├── tor -> /root/eotk/opt.d/tor.d/bin/tor
│   └── tor.d
│
│   # Executables
├── eotk
├── eotk-housekeeping.sh
├── eotk-init.sh
│
│   # Other files
├── LICENSE
├── Makefile
└── README.md
Directory tree of the ./eotk folder
EOTK Directory Structure and Reference
Here's a brief explanation of the EOTK directory structure. Many of the directories are only generated once you build the eotk binary.
| Directory | Contents |
|---|---|
demo.d |
Example site configuration files for demonstration. The wikipedia.conf file is a good source of inspiration (Github Link) |
docs.d |
Documentation (GitHub link) |
lib.d |
Shell and Perl scripts used by the eotk binary. |
opt.d |
Contains the Tor daemon, and OpenResty binaries. |
projects.d |
This is equivalent to your /etc/nginx/sites-available/ folder. All of your site configuration, and TLS keys will be held here. |
secrets.d |
This directory exclusively holds the public-key pairs for your .onion domain. We will be copying our mined onion files here. |
templates.d |
Using in the building process of the eotk binary, as well as to generate project configuration files. |
tools.d |
Contains tools. |
Out of all of these directories, the most relevant are the projects.d and the secrets.d folders. These will contain the configuration files for your site, and the public key pair for your onion domain name. Every website you choose to make available as an onion site will have its own folder within projects.d:
projects.d
├── website1.com.d # Includes all subdomains of website1.com
├── website2.net.d
└── website3.org.d
Example of the projects.d directory. These folders are created automatically by the eotk binary once we configure a project.
Now that our EOTK binary is built and available, we are ready to make our website available on Tor.
Understanding the EOTK Binary and Command Reference
The EOTK binary, available within its folder as ./eotk is equivalent to our nginx command. Just as you might run nginx -t to test your nginx configuration file, you will run ./eotk -a to check your EOTK configuration. However, it is important to note that you must always run EOTK locally, within the root folder (e.g. ~/eotk/eotk, or /etc/eotk/eotk), because unlike the nginx executable, ./eotk is not available globally. The entirety of our EOTK installation is self-contained within its folder, and we must always be inside that folder when we interact with it.
For a full listing of the available commands, run ./eotk -h. Partial documentation for the command syntax is also available at eotk/docs.d/EOTK-COMMAND-SYNTAX.md (Github link). For our purposes, the most relevant and common commands will be the following:
| Command | Explanation |
|---|---|
./eotk config <website.com.conf> |
Generates a Nginx configuration file from a given EOTK configuration file. |
./eotk syntax <project> |
Checks the configuration syntax of a given project. Analogous to nginx -t. |
./eotk nxreload <project> |
Reloads the configuration file of a given project. Analogous to systemctl reload nginx. |
./eotk status <project> |
Displays the status of a given project. To list the status of all projects, call with -a. |
./eotk start <project> |
Starts a given project. Analogous to linking a Nginx file from /etc/nginx/sites-available to /etc/nginx/sites-enabled. |
./eotk restart <project> |
Restarts a given project. Analogous to systemctl restart nginx. |
./eotk stop <project |
Stops a given project. Analogous to systemctl stop nginx. |
./eotk projects |
Lists all projects. |
As you can see, there is a strong similarity between EOTK and our regular Nginx reverse proxy. And just like Nginx, every website (and its subdomains) begin as a configuration file. The websites that we wish to make available over Tor are projects, in EOTK's terminology. Given a website example.com with its subdomains www.example.com, blog.example.com, portal.example.com, we must create a EOTK configuration file called example.com.conf, within which we will configure all the details.
Creating EOTK Configuration Files for Projects
Within the main ~/eotk/ folder, create a .conf file with the name of your project. Your project can be anything, but I suggest naming it after the domain name of your clearnet website. I will use the domain name example.com for the purpose of our tutorial. Within the file, write:
set project example.comContents of the example.com.conf EOTK configuration file.
The set project directive is essential for EOTK to know which project this configuration file belongs to. EOTK will use the value we set to create a folder within ~/eotk/projects.d/, such as ~/eotk/projects.d/example.com.d. Save and exit out of that file for now, we are not done with it.
We must next configure a series of hardmap directives to map our .onion domain name to the clearnet domain and subdomains of our website. But before we can do that, we must install the cryptographic keys of our vanity onion domain name, which we just mined. At this point, hopefully you have already mined some memorable vanity onion domain names!
Installing Mined Vanity Onion Domain Names
Back on your local (and powerful) machine, you should stop mkp224o (Ctrl + C) and examine the candidates/ directory. It should contain folders with the name <domain>.onion/, each one being a domain name which matches your filters. Select one which you wish to keep, and move the folder to a safe place.
Within it, you will find the following files:
hostname
hs_ed25519_public_key
hs_ed25519_secret_key
The hostname is a text file containing your .onion domain name (in case you forget it). The hs_ed25519 files are the public key pairs of your domain. Make sure to protect these files. If you lose your hs_ed25519_secret_key, you will effectively lose control over your domain name. Do not under any circumstances lose or publish the hs_ed25519_secret_key. If an adversary obtains your private (secret key), they will be able to take over your domain name.
We will need to upload both the public key, and the private key to our remote web server (where we installed EOTK). A simple and secure way to do this is to use rsync. On your local machine, where these files are located, run:
rsync -a hs_ed25519_*_key username@remote:/path/to/destinationCommand to upload file from local machine to remote.
This command will let rsync to upload both files to your remote machine to a destination of your choice. Once they are on your remote machine, we must rename them and move them to the ~/eotk/secrets.d directory.
Note: If you have been following this guide along with the EOTK project documentation (~/eotk/docs.d/HOW-TO-INSTALL.md, Github link), please note that as of 2022-03-26 (commit e4a4ca4), the instructions for installing pre-mined onion domain keys are incorrect. Until the documentation is updated, follow the instructions given here.
We must take the hs_ed25519_public_key and hs_ed25519_secret_key files, and move them into the ~/eotk/secrets.d directory, with the following names:
- Rename
hs_ed25519_public_keyto<domain>.v3pub.key - Rename
hs_ed25519_secret_keyto<domain>.v3sec.key
The <domain> must be your onion domain name without the .onion suffix. For example, if the vanity onion domain of your site was exmple27tdg5nesxaao6khfuk5ac723n7tpqkzhyytnjm2ltt6tgkhyd.onion, then your ~/eotk/secrets.d directory looks like this:
secrets.d
├── exmple27tdg5nesxaao6khfuk5ac723n7tpqkzhyytnjm2ltt6tgkhyd.v3pub.key
└── exmple27tdg5nesxaao6khfuk5ac723n7tpqkzhyytnjm2ltt6tgkhyd.v3sec.key
Contents of ~/eotk/secrets.d.
The ~/eotk/secrets.d/ directory will contain the public-key pairs of all of your onion domain names for all of your projects, in the forms of <domain>.v3pub.key and <domain>.v3sec.key files. If you wish to commission any future sites, simply mine the onion domain names with mkp224o and install them in ~/eotk/secrets.d. We are now ready to go back to our project configuration file ~/eotk/example.com.conf, and map our domain name to the project.
Configuring Hardmaps for EOTK Projects
Move back to our main ~/eotk/ folder, and reopen the example.com.conf EOTK configuration file. We will now define a hardmap which maps the onion domain name to our clearnet domain. Fun fact: according to Alec Muffet, the main developer of EOTK, the reason that the mapping directive is called hardmap is due to reasons of backward compatibility:
'Hardmap' originally was just 'map' and expected a filename, and then 'softmap' arrived and took just an onion address ... which is nicer; but I don't want to change the code very much, so if you are 'hardmap' and specify only an onion address, let's fill in the filename and then continue by stripping it away again. Now we just clean it up and assume the key materials are in secrets.d; le huge sigh, hindsight is 20-20.
– Alec Muffet,~/eotk/lib.d/do_configure.plcomments (Source).
The hardmap directive takes the following form:
hardmap <onion domain> <clearnet domain> <subdomains>Where the <onion domain> is the domain name (including the .onion TLD) of your newly mined vanity domain name. Hence, our project configuration file will look like:
set project example.com

hardmap exmple27tdg5nesxaao6khfuk5ac723n7tpqkzhyytnjm2ltt6tgkhyd.onion example.com
Contents of example.com.conf EOTK configuration file. With hardmap to example.com, and no subdomains.
Subdomains are listed after the clearnet domain, seperated by whitespace. If our example.com website has www, blog, and portal as subdomains, then our example.com.conf file will look like the following:
set project example.com

hardmap exmple27tdg5nesxaao6khfuk5ac723n7tpqkzhyytnjm2ltt6tgkhyd.onion example.com www blog portal
Contents of example.com.conf EOTK configuration file. With hardmap to example.com, and www, blog, and portal as subdomains.
An individual project configuration file may contain multiple hardmap directives, potentially mapping multiple different .onion domain names to the same, or different clearnet domain names. The ~/eotk/demo.d directory (Github link) contains multiple example configuration files. In particular, the wikipedia.conf file has an example with multiple hardmaps.
The above example.com.conf EOTK configuration file is now sufficient for us to bring our onion site online.
Activating, Deactivating, and Reloading EOTK configuration
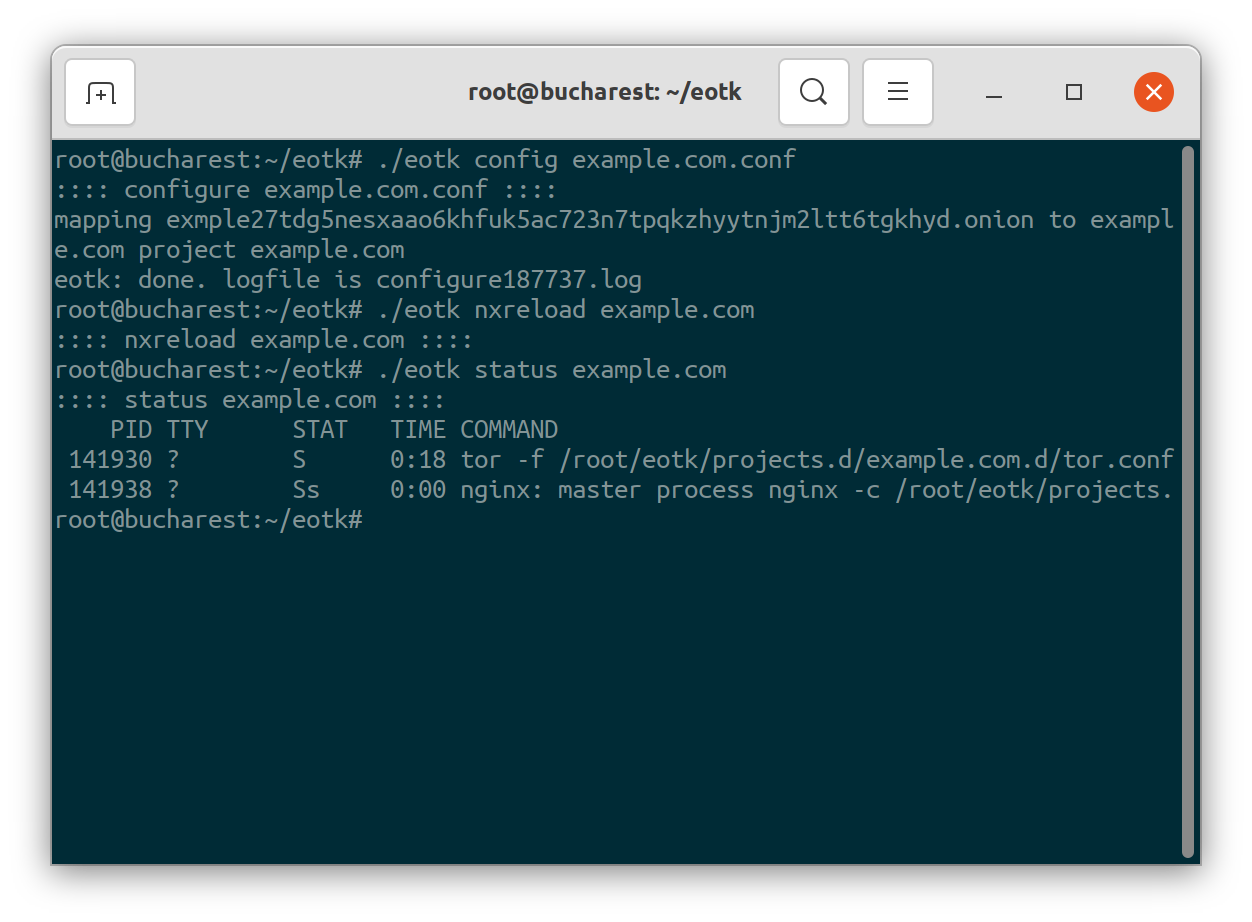
We will now generate our example.com project from the example.com.conf file. This is where the magic happens. Run the following:
./eotk config example.com.confThe EOTK binary will now parse the provided project configuration file, and setup the project. It will do the following:
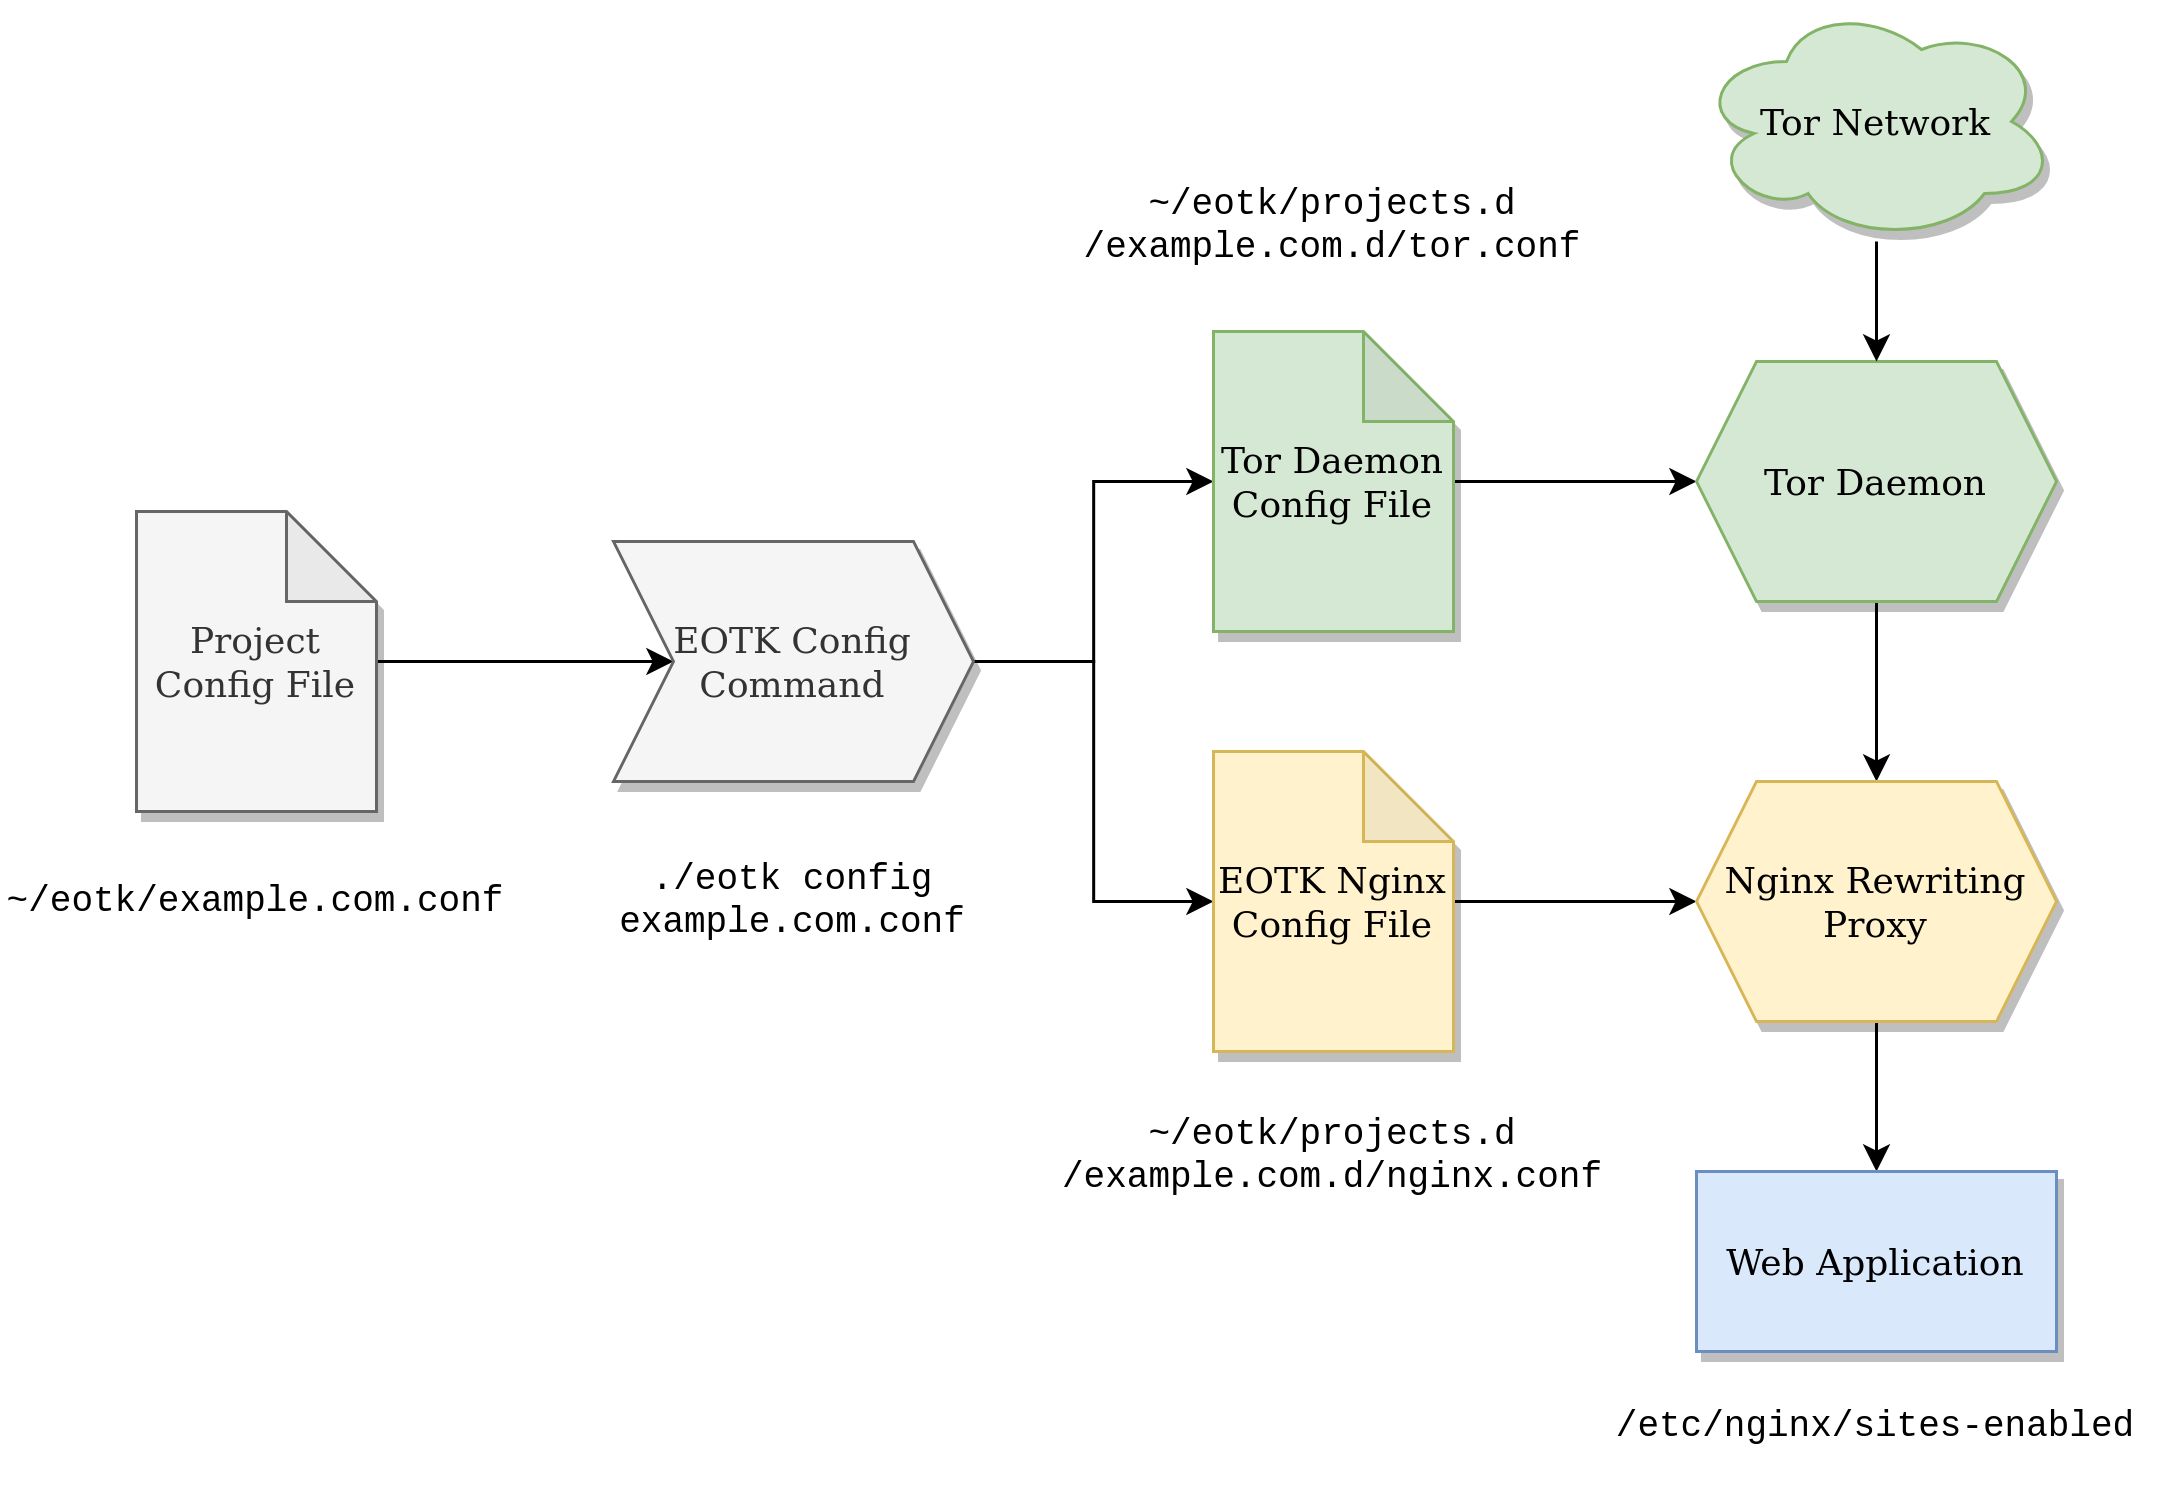
./eotk config example.com.conf command does. When we execute the command, EOTK generates a tor.conf and nginx.conf file for us, then uses them to configure our project-specific EOTK Tor and Nginx daemons.- EOTK will create a directory in
~/eotk/projects.dnamedexample.com.d, which will contain all our project-specific configuration, and startup/shutdown scripts. - EOTK will instantiate a project-specific Nginx instance, with an autogenerated Nginx configuration file at
~/eotk/projects.d/example.com.d/nginx.conf. This configuration file will contain the OpenResty rewriting rules that "translate" our clearnet site to an onion site, and vice versa. - EOTK will configure the tor daemon service with the provided onion domain keyfiles, to create a hardmap to our EOTK Nginx instance. It will autogenerate a Tor configuration file at
~/eotk/projects.d/example.com.d/tor.conf. Incoming Tor Network requests for our onion site will be handed over to the EOTK Nginx instance, translated, and passed through to our regular Nginx instance (and vice versa).
Now our example.com project is ready! To start it, all we have to do is to run:
./eotk start example.comStarting the example.com project
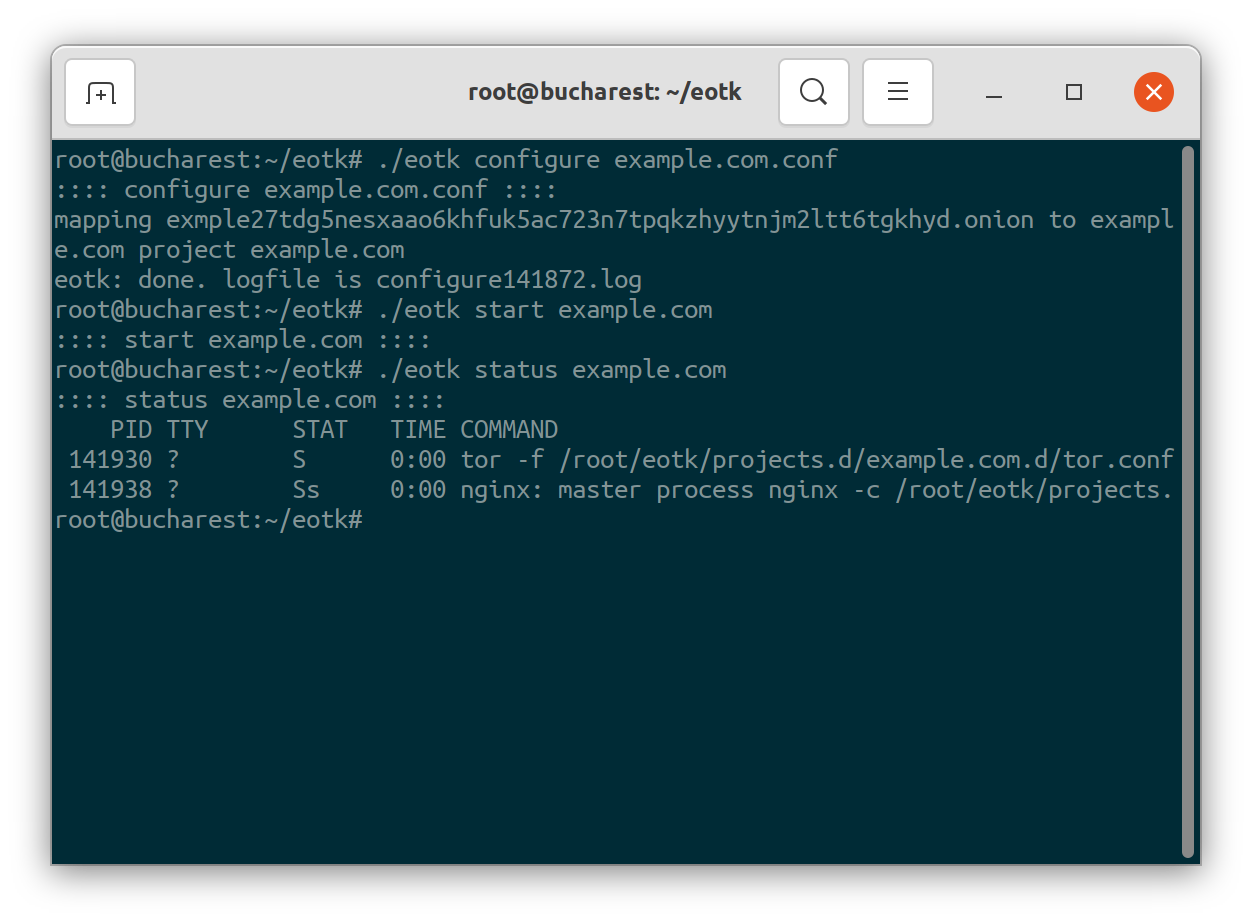
./eotk configure example.com.conf, starting, and checking the status of the resulting example.com project.And our project is live! All you have to do is to navigate to the resulting .onion URL in the Tor Browser, and after accepting the self-signed certificate warning, you will be able to see the site. In the case of our tutorial, I actually deployed a real onion mirror for the IANA Example.com site. If you visit the following link on the Tor Browser, you can see that it is live!
https://exmple27tdg5nesxaao6khfuk5ac723n7tpqkzhyytnjm2ltt6tgkhyd.onion/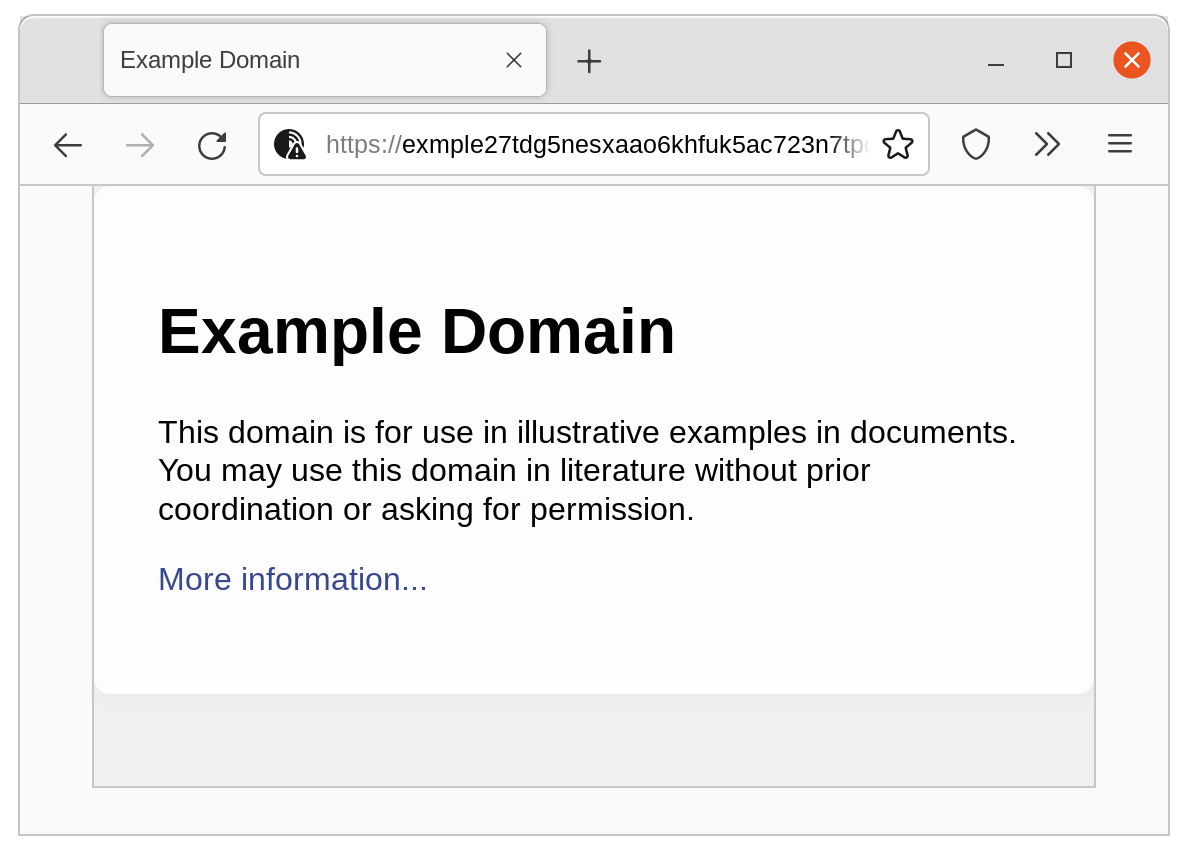
But Wait, How Did You Deploy an Onion Mirror for IANA’s Example.com?
Recall that EOTK functions by essentially running a tor service, in conjunction with a Nginx rewriting proxy. This makes EOTK analogous to an open proxy server which translates requests between a Tor Network client, and any remote host. You may in fact point EOTK to any clearnet website, and it will be able to translate requests from your hardmapped onion domain name to the clearnet domain.
In practice, you should almost never deploy EOTK to websites or web applications that you do not own. For one, an EOTK installation on a different host from the clearnet service will achieve lower performance, as proxied requests must traverse through the open internet, instead of only internally. Secondly, your EOTK server will function effectively as an open proxy for Tor users, and you will be responsible for any malicious traffic which passes through your EOTK deployment. In fact, your server will be the source of all Tor traffic, malicious or otherwise. And of course, it will be impossible to find the ultimate source of any malicious Tor traffic, since the very nature of the Tor Network makes Tor clients anonymous.
Dealing with potentially malicious Tor traffic is an important consideration with any EOTK deployment. In particular, we would want to protect the administrative portions of our website, and render them inaccessible via Tor. We will discuss how to accomplish this with EOTK in the following section.
Whitelisting, Blacklisting, and Access Control with EOTK
Our website (example.com) is now accessible on its onion domain over the Tor Network. EOTK seamlessly and transparently translates requests back and forth between Tor Network users and our webserver. However, oftentimes we do not wish to make the entire functionality of our website available over Tor. For example, we may not want to expose our admin login portal to the Tor Network, as it will be impossible to ban malicious login attempts. There may be certain subdomains that contain functionality (typically relating to CORS (cross-origin resource sharing) that will not function once rewritten.
EOTK comes with a set of whitelisting and blacklisting directives that will allow us to selectively manage access to our site from the EOTK project configuration file (e.g. example.com.conf). EOTK provides three different types of syntax for access control,:
- Blacklist: Denies access to the specified resources. Blocked resources will return a
500 Internal Server Errorresponse code. - Whitelist: Allows access only to the specified resources. If you add whitelist directives, all requests that do not fit the whitelist will be rejected with a
500 Internal Server Errorresponse code. - Block: Rejects specified resources with a
403 Access Forbiddenresponse code. They allow the admin to specify ablock_errmessage which will be displayed on the blocked request. However, block directives can only accept a single value.
I don't recommend using block directives, as the EOTK project maintainer states:
The [block] variables are single-valued so be careful of polluting multiple projects. If your site needs different blocking for different onions, consider splitting your config into multiple files and using "foreignmap" to stitch the hostname rewrites together.
– Alec Muffet,~/eotk/demo.d/example.tconfcomments (Source).
Instead, we will use the blacklist and whitelist directives, which perform the same function, and as they take multiple values, are much more powerful.
Block, blacklist, and whitelist directives allow the administrator to specify matches based upon multiple criteria. The following three are probably the most useful and relevant:
- Host: A HTTP Header. The requested domain name or subdomain. We will specify host directives if we want to whitelist/blacklist domain names or subdomains.
- Parameter: The HTTP query string (i.e. what comes after a
?symbol in the requested URL. - Path: The path of the requested resource.
Furthermore, EOTK also provides the additional criteria, which are probably less applicable.
- Origin: A HTTP Header. The origin of the request. This is rarely useful, unless you are working with CORS, e.g. loading resources over a onion CDN.
- Referer: A HTTP Header. This is rarely useful for the purpose of access control, since the Referrer header is easily spoofed.
- User-Agent: The User-Agent. This is likewise rarely useful, since the User-Agent can be easily spoofed.
All of these directives also have an alternate form with the _re suffix, which accepts regular expressions as a matching parameter.
In summary, the EOTK blacklist and whitelist access control directives are:
EOTK Blacklist Directives
| Directive | Explanation |
|---|---|
set host_blacklist <value> |
Blocks request based on host header. |
set host_blacklist_re <regexp> |
Blocks request based on host header (regular expression). |
set param_blacklist <value> |
Blocks request based on parameter/query string. |
set param_blacklist_re <regexp> |
Blocks request based on parameter/query string. (regular expression). |
set path_blacklist <value> |
Blocks request based on path. |
set path_blacklist_re <regexp> |
Blocks request based on path (regular expression). |
set origin_blacklist <value> |
Blocks request based on origin header. |
set origin_blacklist_re <regexp> |
Blocks request based on origin header (regular expression). |
set referer_blacklist <value> |
Blocks request based on referer header. |
set referer_blacklist_re <regexp> |
Blocks request based on referer header (regular expression). |
set user_agent_blacklist <value> |
Blocks request based on user agent header. |
set user_agent_blacklist_re <regexp> |
Blocks request based on user agent header (regular expression). |
EOTK Whitelist Directives
| Directive | Explanation |
|---|---|
set host_whitelist <value> |
Accepts requests only with host header. |
set host_whitelist_re <regexp> |
Accepts requests only with host header (regular expression). |
set param_whitelist <value> |
Accepts requests only with the parameter/query string. |
set param_whitelist_re <regexp> |
Accepts requests only with the parameter/query string (regular expression). |
set path_whitelist <value> |
Accepts requests only with the path. |
set path_whitelist_re <regexp> |
Accepts requests only with the path (regular expression). |
set origin_whitelist <value> |
Accepts requests only with the origin header. |
set origin_whitelist_re <regexp> |
Accepts requests only with the origin header (regular expression). |
set referer_whitelist <value> |
Accepts requests only with the referer header. |
set referer_whitelist_re <regexp> |
Accepts requests only with the referer header (regular expression). |
set user_agent_whitelist <value> |
Accepts requests only with the user agent header. |
set user_agent_whitelist_re <regexp> |
Accepts requests only with the user agent header (regular expression). |
Keep in mind that all of the above whitelist and blacklist directives accept multiple values, separated by a whitespace. Value lists can also be split over multiple lines using the \ character. With the above directives as a reference, let us take a look at an example configuration.
Example Access Control Configuration for Example.com
Let us go through a practical example of using the EOTK access control directives to limit our website's exposure over Tor. Given our example.com project, let us suppose our website exposes the following sensitive functionality:
- An admin portal at
admin.example.comandremote.example.com - A staff-only login page at
example.com/login/ - A rate-limited API at
example.com/api/
We can blacklist all of the above by writing the following in our EOTK configuration file. Note that we may split parameters over separate lines using the forward slash (escape) character: \:
set project example.com

set host_blacklist \
admin.exmple27tdg5nesxaao6khfuk5ac723n7tpqkzhyytnjm2ltt6tgkhyd.onion \
remote.exmple27tdg5nesxaao6khfuk5ac723n7tpqkzhyytnjm2ltt6tgkhyd.onion

set path_blacklist /login/ /api/

hardmap exmple27tdg5nesxaao6khfuk5ac723n7tpqkzhyytnjm2ltt6tgkhyd.onion example.com www blog portal
Contents of example.com.conf EOTK configuration file. Using access control directives
Observe carefully how the set host_blacklist parameter must accept full host strings, in the form of <subdomain>.<onion domain>.onion. As the blacklist functions based on matches from the Host header in the incoming request, specifying only the subdomain will not work. This was an unexpected source of confusion when I implemented hong.io's onion mirror.
# set host_blacklist admin             # WILL NOT WORK
# set host_blacklist admin.example.com # WILL NOT WORK

# Only the following works
set host_blacklist admin.exmple27tdg5nesxaao6khfuk5ac723n7tpqkzhyytnjm2ltt6tgkhyd.onion
Illustration of a confusing idiosyncrasy in how we must specify host_blacklist (and host_whitelist directives.
After making these changes, we must regenerate our configuration by running ./eotk configure <filename.conf>, and then reload the built-in Nginx server in EOTK using ./eotk nxreload <project name>:
./eotk configure example.com.conf
./eotk nxreload example.com
Regenerate our newly modified example.com.conf file, and then reload the project.
Be sure to not forget to configure and then nxreload every time you make changes in your project configuration file. Otherwise, whatever modifications you have made will not take affect! Likewise, carefully note that the ./eotk nxreload command takes the project name as its argument, not the configuration file name. The project name is defined by the set project <projectname> directive in your configuration file!
Now that we have implemented blacklist directives for our mirror, whenever a Tor Network client attempts to visit one of the specified resources, EOTK will reject the request with a 500 Internal Server Error response code. This will yield the following error page:
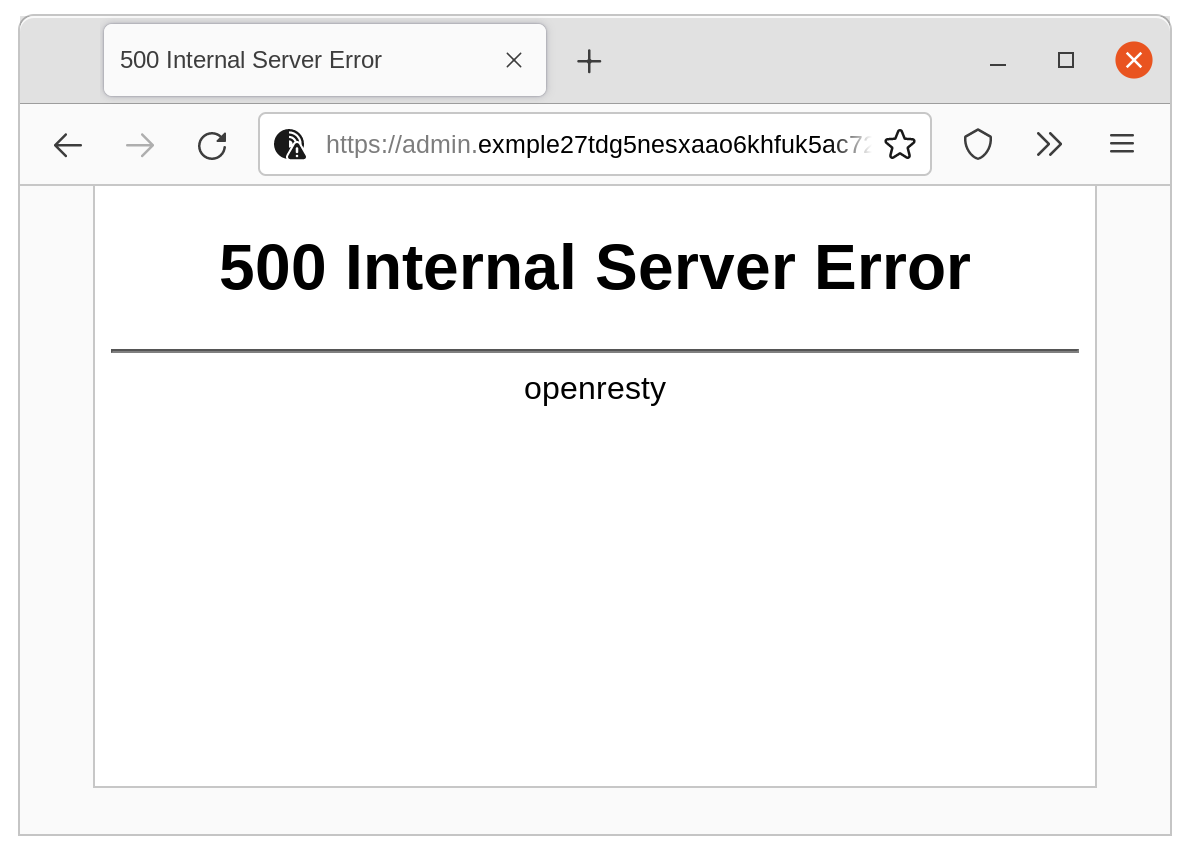
You may attempt to visit those links yourself. Open the Tor Browser, and try navigating to the following addresses. They will all result in a 500 Internal Server Error response!
https://admin.exmple27tdg5nesxaao6khfuk5ac723n7tpqkzhyytnjm2ltt6tgkhyd.onion/
https://remote.exmple27tdg5nesxaao6khfuk5ac723n7tpqkzhyytnjm2ltt6tgkhyd.onion/
https://exmple27tdg5nesxaao6khfuk5ac723n7tpqkzhyytnjm2ltt6tgkhyd.onion/login/
https://exmple27tdg5nesxaao6khfuk5ac723n7tpqkzhyytnjm2ltt6tgkhyd.onion/api/
Examples of blacklisted resources from example.com's onion mirror.
As per the reason why blacklisted resources return a 500 Internal Server Error response code, we may view Alex Muffet's explanation, located once again as a comment in the EOTK git repository:
[Access] failures are generally 500 because it presents the least attack surface to a penetration tester.
– Alec Muffet,~/eotk/demo.d/example.tconfcomments (Source).
Host-based whitelisting and Allowing only HTTP GET Requests
In its default configuration, EOTK naively forwards all requests with the specified hardmap domain name, regardless of subdomain. When we configure our example.com website with the hardmap directive:
hardmap exmple27tdg5nesxaao6khfuk5ac723n7tpqkzhyytnjm2ltt6tgkhyd.onion example.com www blog portalWe would have expected only requests to example.com, and the subdomains www, blog, and portal be forwarded on to our web application. However, in my testing, this was not the case – but instead, EOTK translates all requests made to *.example.com. Hence, all services available as a subdomain under example.com will be available as an onion site on the Tor Network – even if these services are hosted on entirely different servers.
This default behaviour may be undesirable, particularly if you only intend to expose one service as an onion site. In order to prevent this behaviour, we must explicitly whitelist subdomains using the host_whitelist directive. Here is a modified example.com.conf file which uses the host_whitelist directive:
set project example.com

set host_whitelist \
exmple27tdg5nesxaao6khfuk5ac723n7tpqkzhyytnjm2ltt6tgkhyd.onion \
www.exmple27tdg5nesxaao6khfuk5ac723n7tpqkzhyytnjm2ltt6tgkhyd.onion \
blog.exmple27tdg5nesxaao6khfuk5ac723n7tpqkzhyytnjm2ltt6tgkhyd.onion \
portal.exmple27tdg5nesxaao6khfuk5ac723n7tpqkzhyytnjm2ltt6tgkhyd.onion

set path_blacklist /login/ /api/

set suppress_methods_except_get 1

hardmap exmple27tdg5nesxaao6khfuk5ac723n7tpqkzhyytnjm2ltt6tgkhyd.onion example.com www blog portal
Contents of example.com.conf EOTK configuration file. Explicitly whitelisting hosts.
Make sure that the list of whitelisted hosts matches the list of subdomains in the hardmap directive. Finally, do not forget to add the root (subdomain-less) host to the whitelist as well!
There is one final EOTK directive that is relevant for some use-cases. On line 9, we added set suppress_methods_except_get 1. This effectively makes our onion site a read-only mirror of our clearnet website. It informs EOTK to only allow HTTP GET requests. This will disable any functionality on the website which takes user input, such as search bars, file uploads, and form submissions. This directive will only make sense if your website does not require any server-side interaction at all for Tor Network clients.
In my use case, I know for certain that the administrative interfaces of my blog will never be accessed over the Tor Network. Hence, I set suppress_methods_except_get to 1 for my blog.
No matter your choices, remember to run ./eotk config <filename.conf> on your configuration file, followed by ./eotk nxreload <projectname>. Now your changes are live!
Other EOTK Configuration Options
As of the time of this article's writing (2022-03-28), the EOTK configuration file documentation is incomplete. A listing and partial explanation of the different options can be found in the ~/eotk/demo.d/example.tconf file (Github link). I have gone through the directives with the most common use-cases in this article, but I highly encourage any administrator to review the example.tconf file for further information.
Some interesting, and potentially useful options that this article does not cover include:
- Injecting request headers for upstream use.
- Managing the rewriting process, mangling SRI tags.
- Caching requests, redirects, and Nginx tuning.
Note: Do not worry about the TLS-related directives for now. This tutorial will also present a complete guide to purchasing, and installing a TLS certificate later.
Activating EOTK as a Systemd Service and Starting Automatically on Boot
By following the above instructions, you should have a secure, nearly-production-ready Onion version of your website, accessible over a custom vanity .onion domain over the Tor Network. We must make sure that our EOTK service runs automatically as a Systemd daemon, which will ensure that it always starts up when our server boots, and restarts if the service stops or crashes.
We do this by generating, and then installing the EOTK startup scripts. These scripts are generated with each installation, because they contain hardcoded paths to our EOTK binary. To generate them, simply run:
./eotk make-scriptsGenerate installation-specific startup and housekeeping scripts
This will create the eotk-init.sh and eotk-housekeeping.sh files in the same location as your ./eotk binary. The eotk-init.sh file is a System V-style init script which we can move to the /etc/init.d directory, and then convert it automatically into a Systemd-style service unit. To do this, run:
cp eotk-init.sh /etc/init.d
update-rc.d eotk-init.sh defaults
Installing the System V style init script for EOTK
Now, all we have to do is to start it via Systemd.
systemctl start eotk
systemctl status eotk
Start the daemonised EOTK service.
The status for the eotk-init.service should show as active (running) with a green status semaphore. Now we are certain that our EOTK installation will autostart on boot, and always be available. We can still manage our specific EOTK projects using ./eotk start <project> or ./eotk stop <project> within the /eotk directory, and our workflow for updating project-specific configuration files is the same.
Note that we do not do systemctl enable eotk as we might with a native Systemd service unit. start-ing the service is enough to have it autostart on boot, since the EOTK is using a System V-style init script which is only managed by Systemd through a compatibility layer.
Our EOTK installation is almost production-ready. We only have one last task left, which is purchasing, and installing a TLS certificate.
Purchasing, and Installing a Trusted TLS Certificate
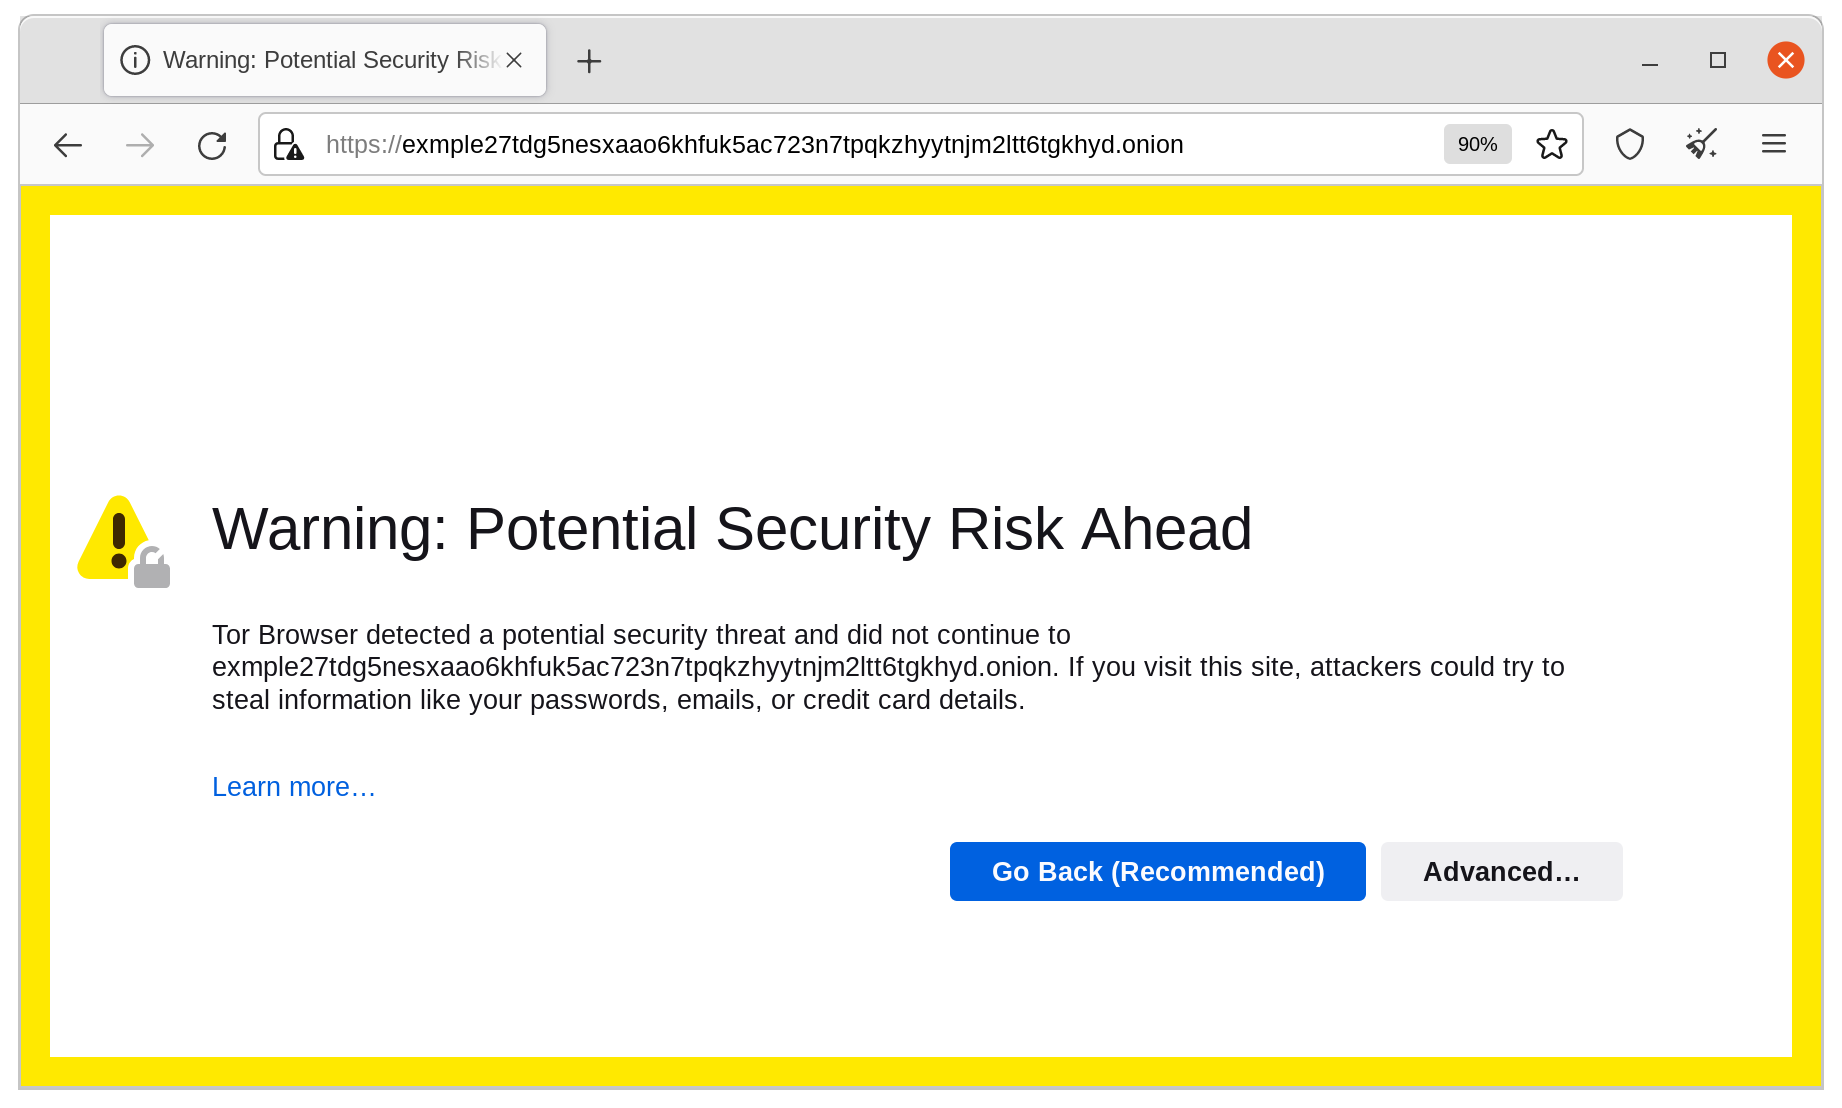
By now, your website's .onion mirror is nearly production-ready. However, we must address one final issue. EOTK creates self-signed TLS certificates by default, which are not trusted by the Tor Browser. When any visitor visits your website's .onion link, they will be greeted with a prominent certificate warning. This warning persists upon every restart of the Tor Browser, even if the user accepts to continue.
Self-Signed TLS Certificates Break Cross-Domain Resource Loading
The warnings prompted by the self-signed certificate are not just cosmetic in nature, but can signifcantly break site functionality. If your website loads resources for any subdomain (such as static.example.com), then resources from the subdomain will not load unless the user manually navigates to the subdomain, and adds an exception. This means that an onion site mirror with self-signed certificates can present a broken experience, with images, scripts, and resources not loading at all.
Hence, for any production-quality onion mirror, we must deploy a signed TLS certificate for use with EOTK.
There Are Only Two Options for Trusted TLS Certificates
Unfortunately, as of the time of this article's writing (March 2022), LetsEncrypt does not support TLS certificates for .onion domain names. Hence, we must purchase a commercial TLS certificate. As of March 2022, there are only two commercial certificate vendors which provide TLS certificates for .onion domain names:
- DigiCert: Offers only Extended Validation (EV) Certificates (Link to Press Release)
- HARICA: Offers Domain Validation (DV) Certificates, including wildcard Certificates (Link to Press Release).
DigiCert only offers EV certificates, which must be purchased via an order form, and are only available to registered organisations. Although the cost is not stated, EV certificates generally cost thousands of dollars per year. This makes DigiCert generally inaccessible to small websites and hobbyists like myself.
The only vendor of DV certificates is HARICA, which is a much more accessible and affordable option. HARICA has been featured on the Tor Project's blog as an option for .onion TLS certificates, and we will be using them for this tutorial. Note: I do not have any affiliation with HARICA, and this article is not sponsored by them in any way.
About the HARICA Certificate Authority

HARICA is a Greek-based Certificate Authority founded by a non-profit civil organisation. HARICA is an acronym which stands for the Hellenic Academic and Research Institutions Certification Authority. They seem to be active in the Greek academic sector and work with Greek Universities. Although there are not any choices, I felt comfortable about using HARICA as a certificate authority, because they come from a familiar academic background.
Purchasing a Onion TLS Certificate from HARICA
I'll take us on a quick walkthrough of the process it takes to purchase, validate, and install a TLS certificate from HARICA. I have documented this process in unusual detail, because it was entirely unfamiliar to me. I'm young enough that I only ever used Lets Encrypt, so I never had the experience of purchasing and deploying a commercial TLS certificate – I grew up using Let's Encrypt's certbot tool. For other hobbyist web admins who are likewise unfamiliar with the certificate purchasing process, I hope the following guide will be helpful.
All screenshots were taken on March 2022.
First, the user must navigate to HARICA's website, and register for an account. Once registration is complete, you will be directed to login to the HARICA CertManager (direct link). Before you begin, make sure to check your settings and enable Two Factor Authentication (2FA), which is good practice for any important service.
Next, you'll want to create a Certificate Request for a "Server Certificate," which is HARICA's term for a server-side TLS certificate. It will present a screen where you can add domain names. Simply paste in the .onion domain name directly. You can add additional domain names, as well as wildcard domains:
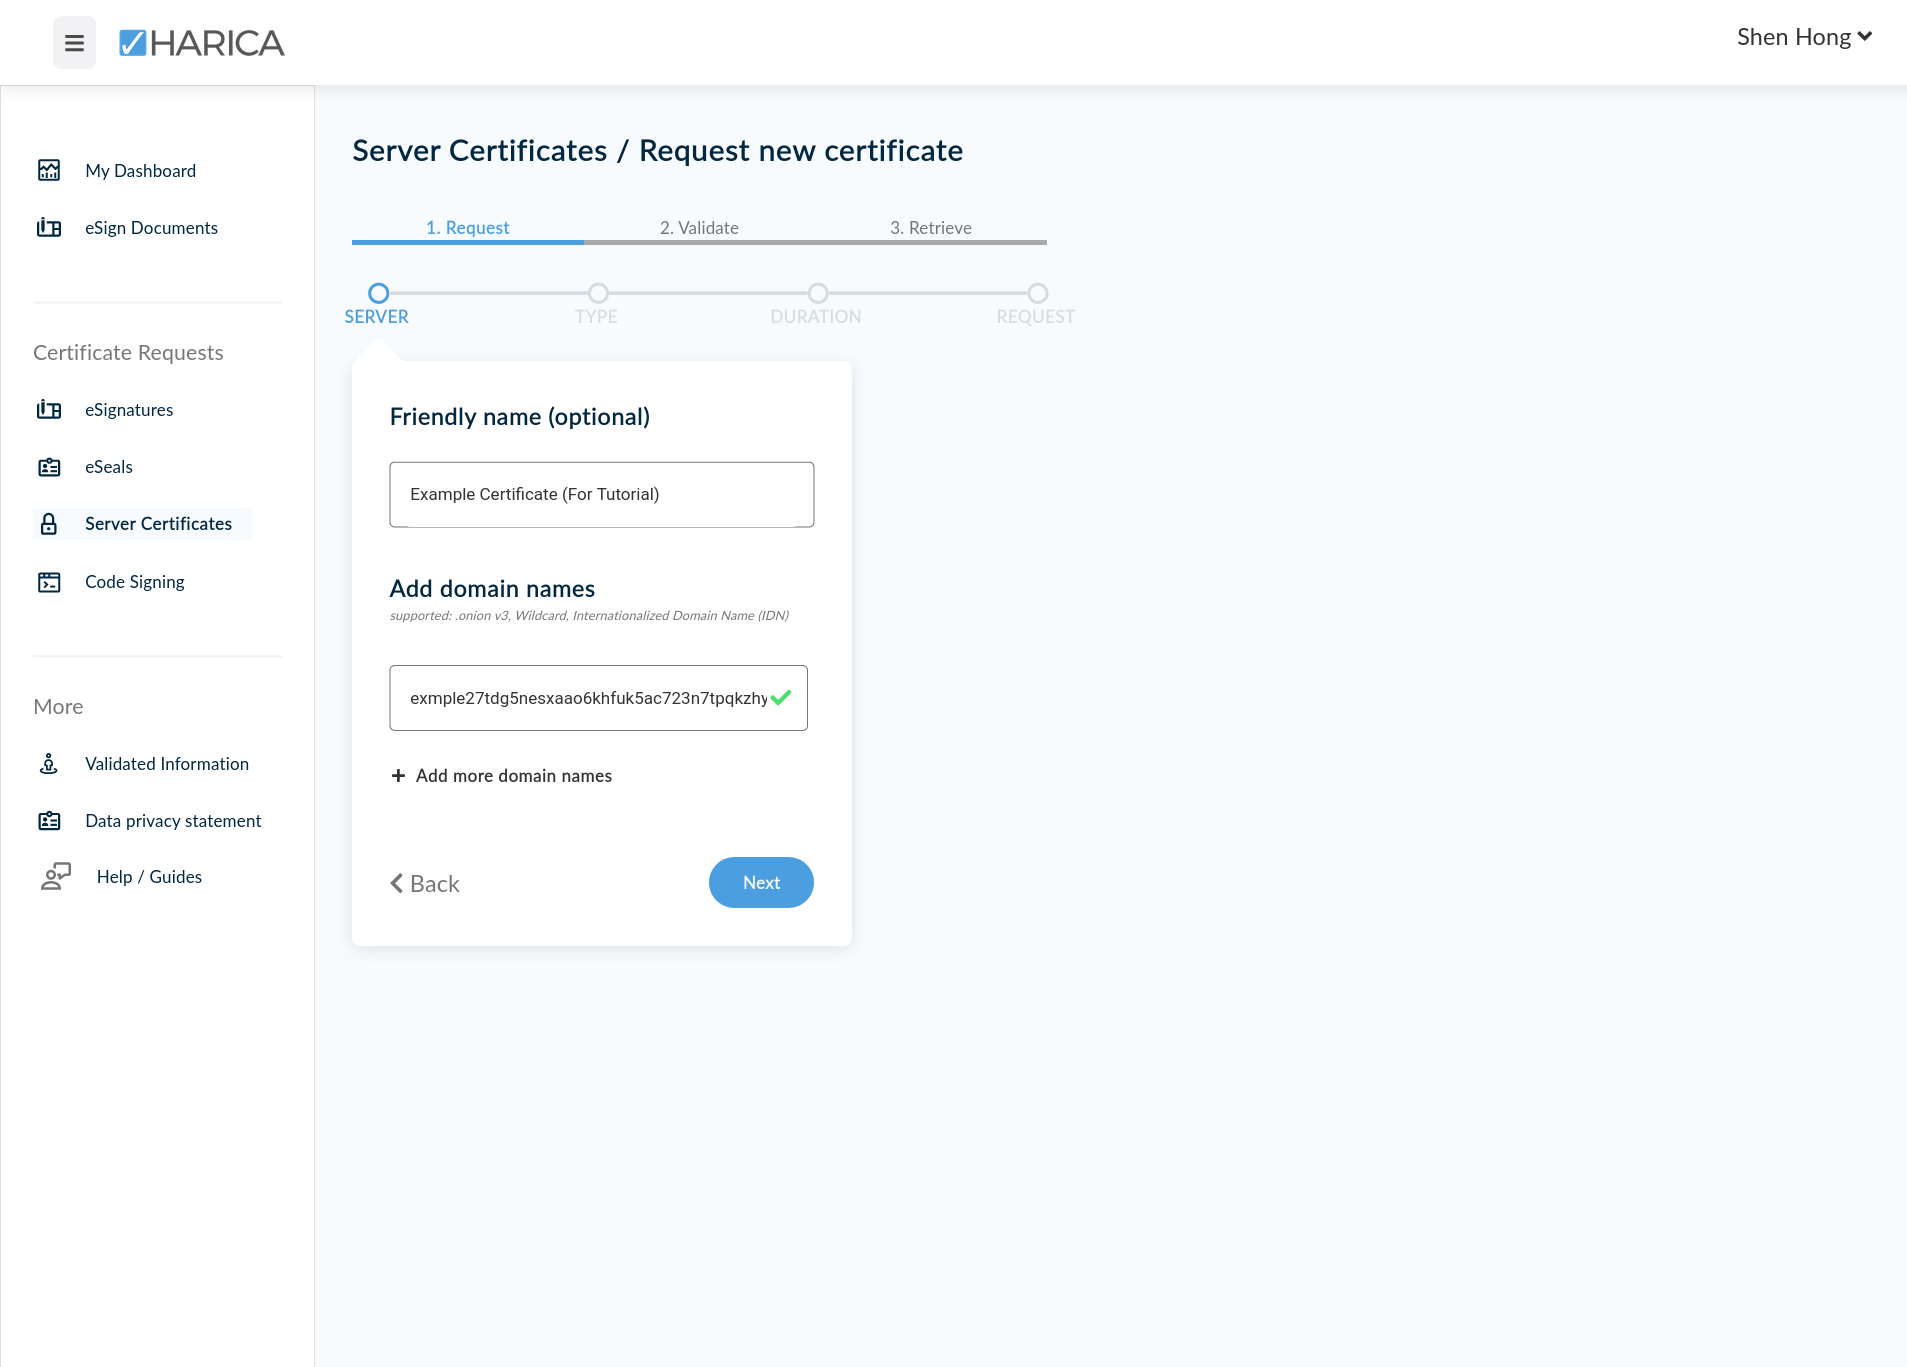
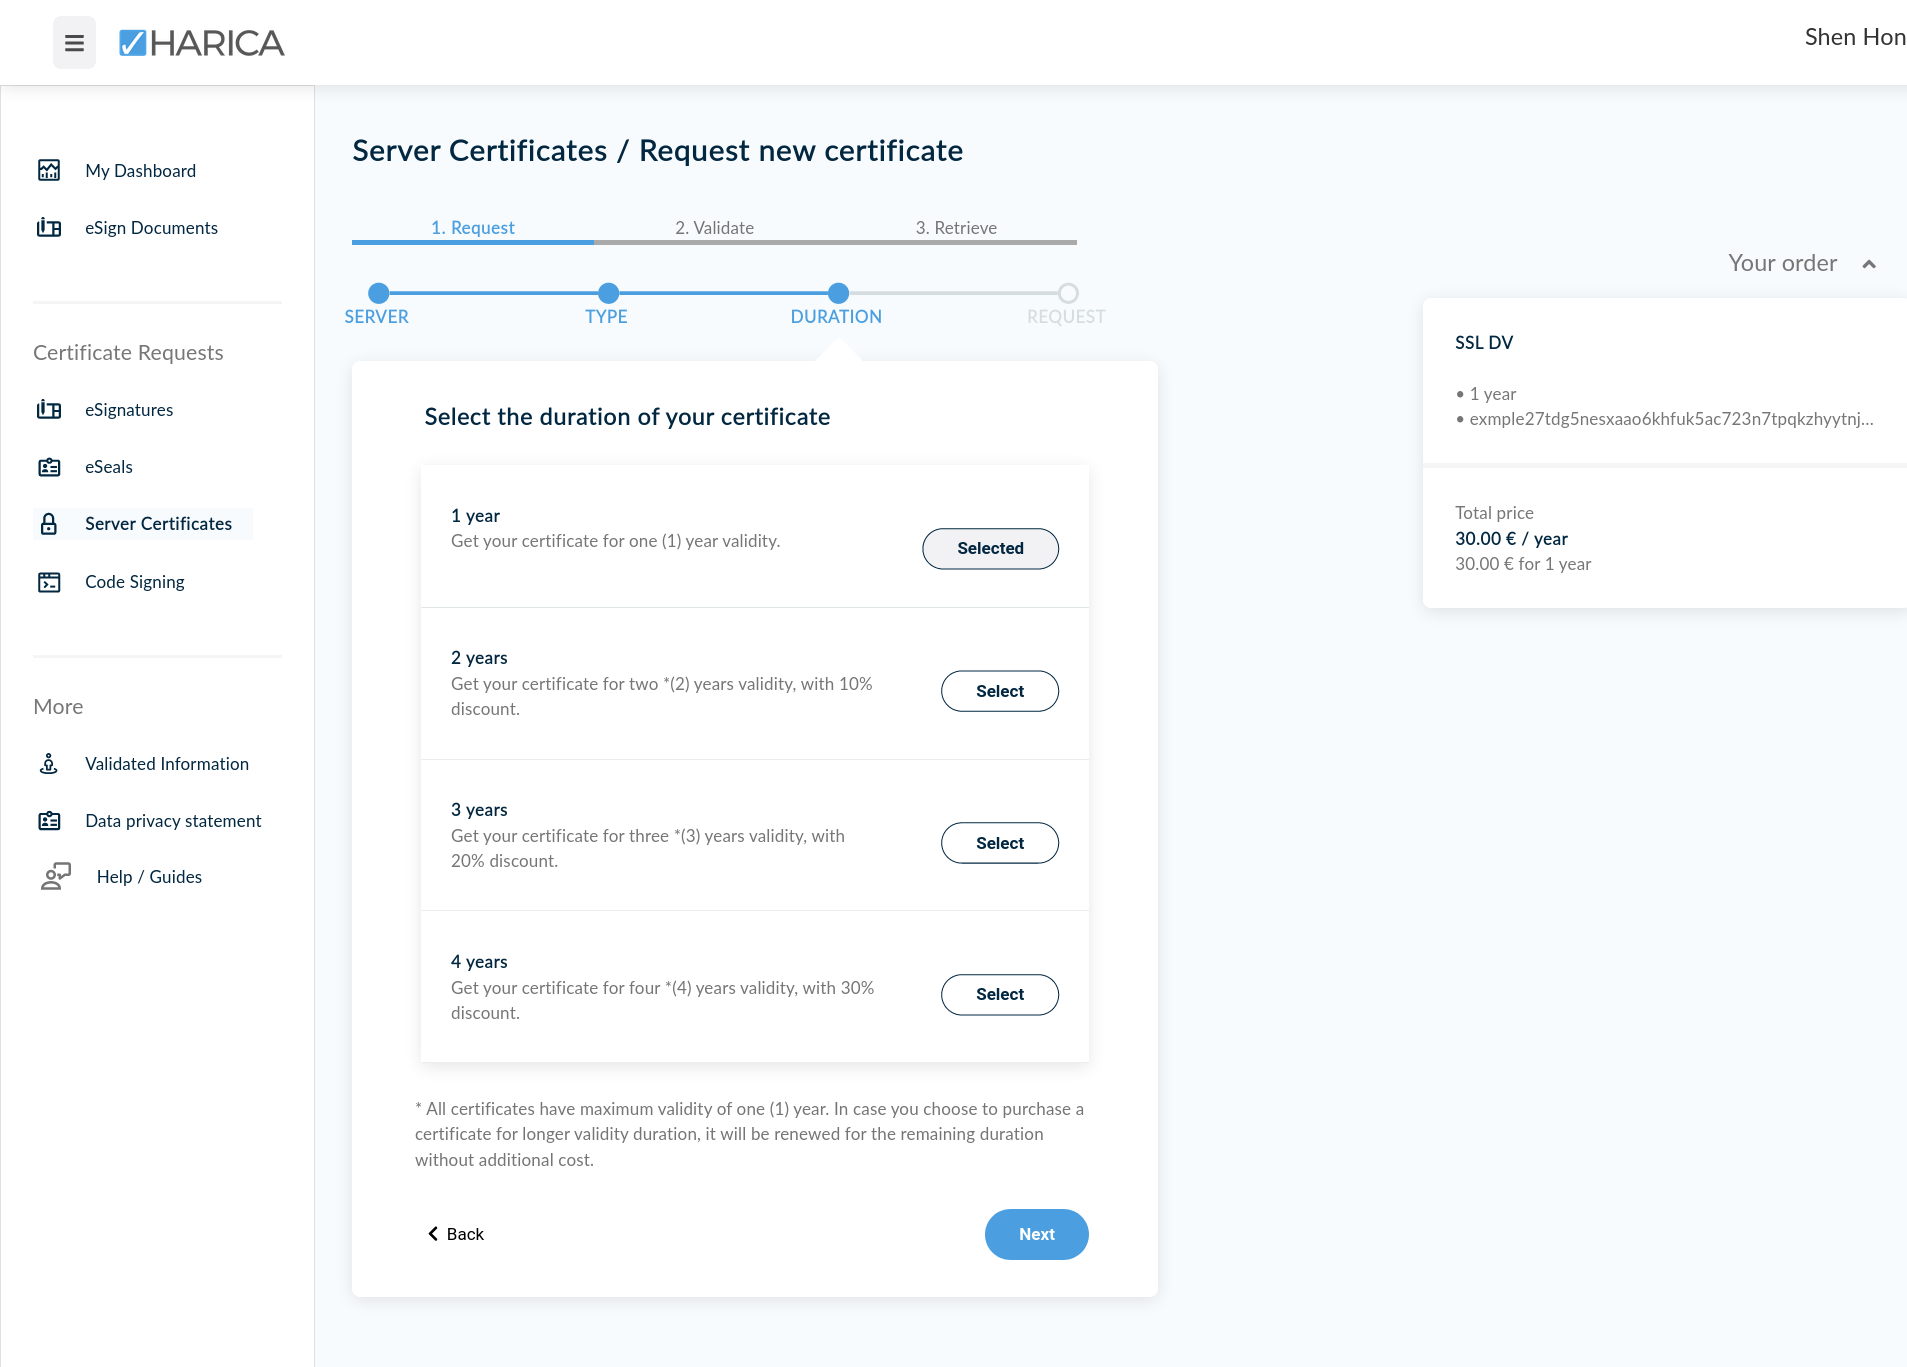
HARICA does not seem to have a public pricing page. Prices are displayed in the requesting process. As of March 2022, the pricing for DV TLS Certificates appear to be the following:
- DV Certificate: €30.00 EUR per year.
- DV Wildcard Certificate: €150.00 EUR per year
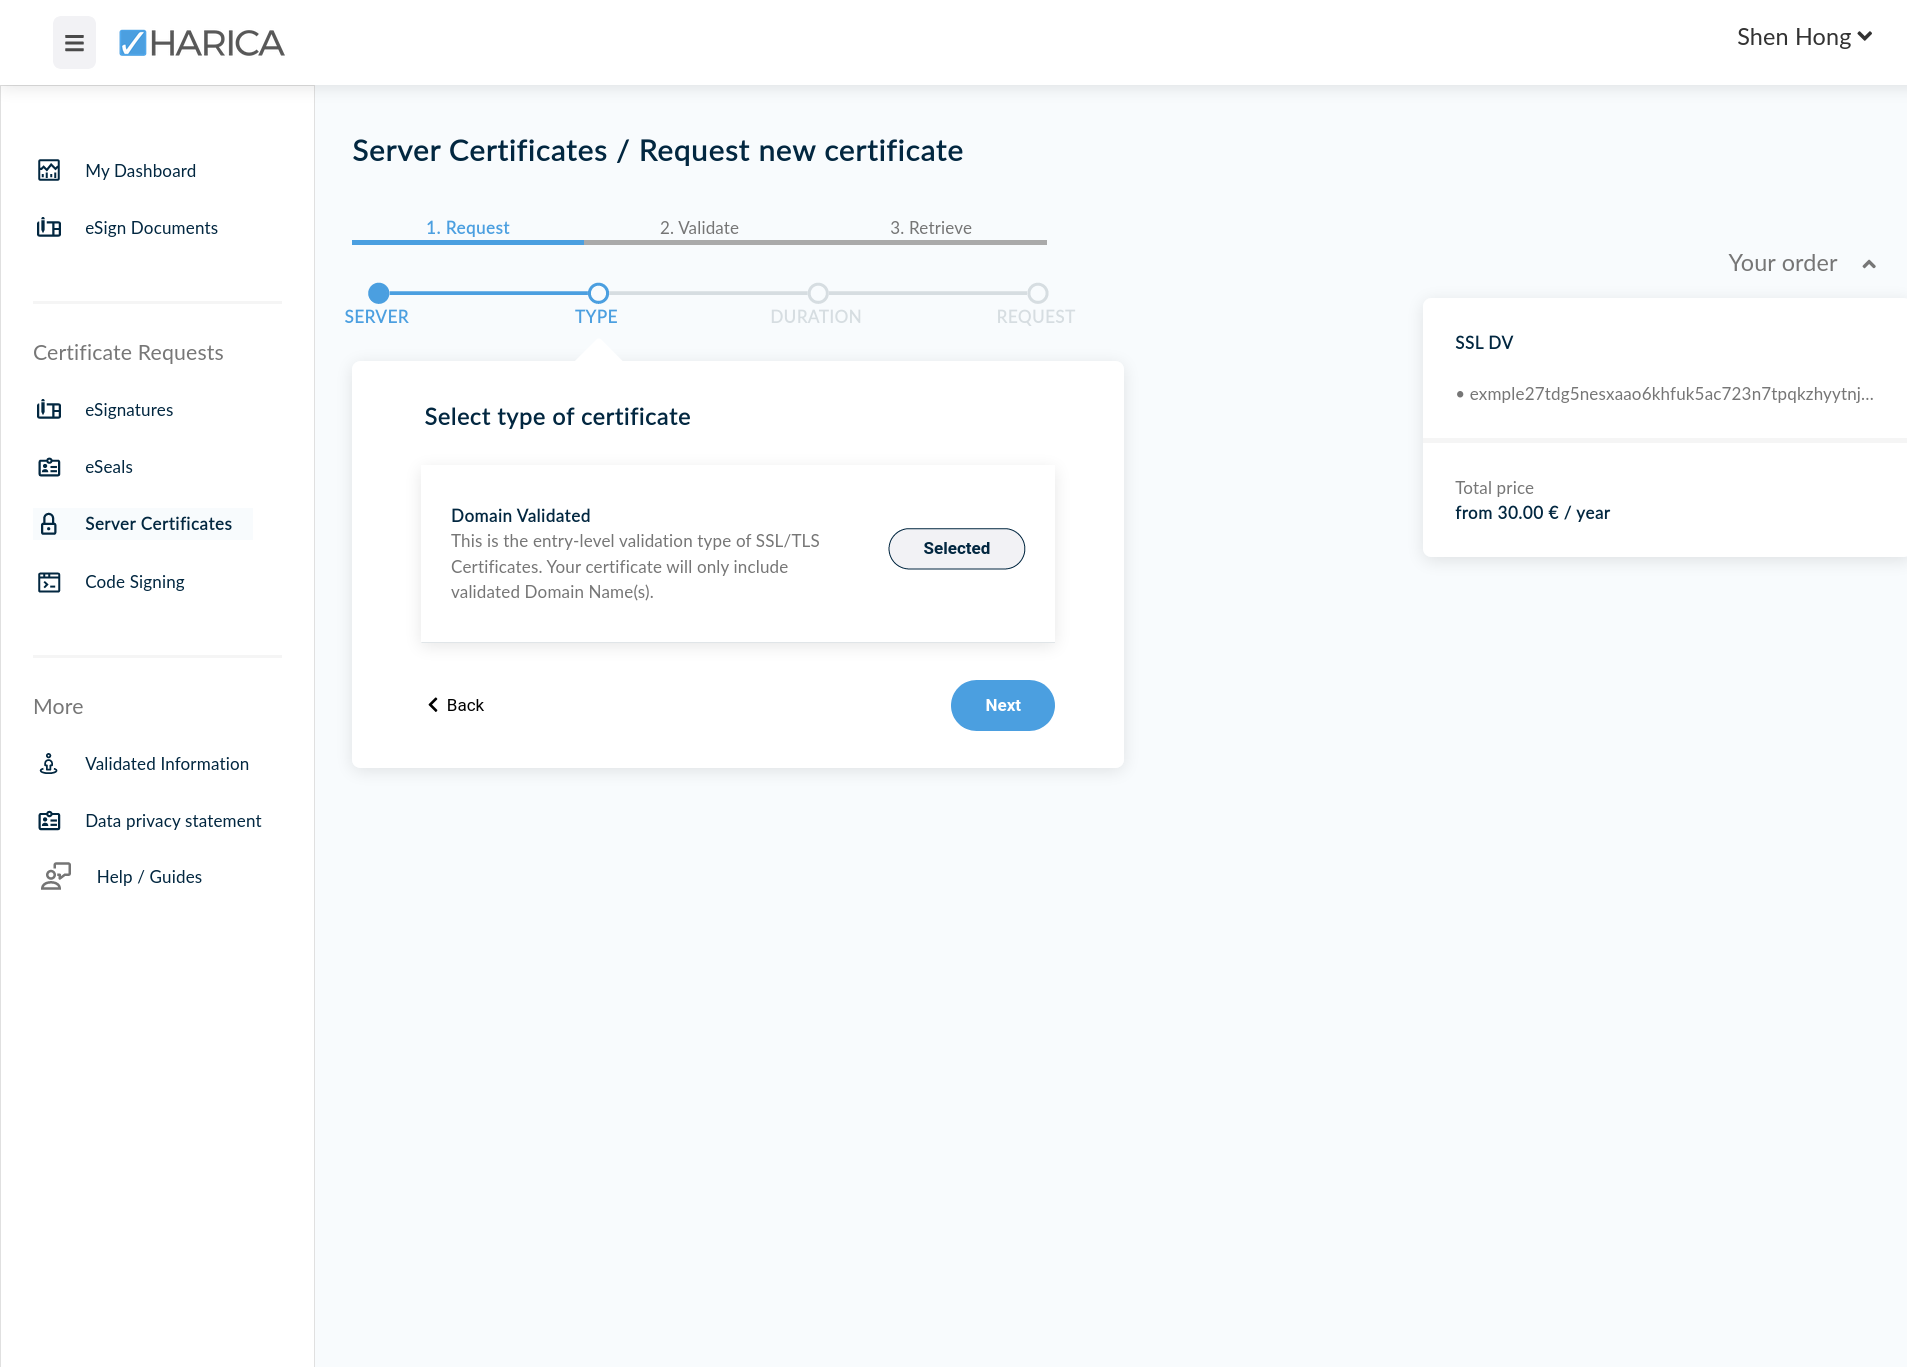
They offer an additional 10% discount for every additional year, up to 4 years (30% discount).
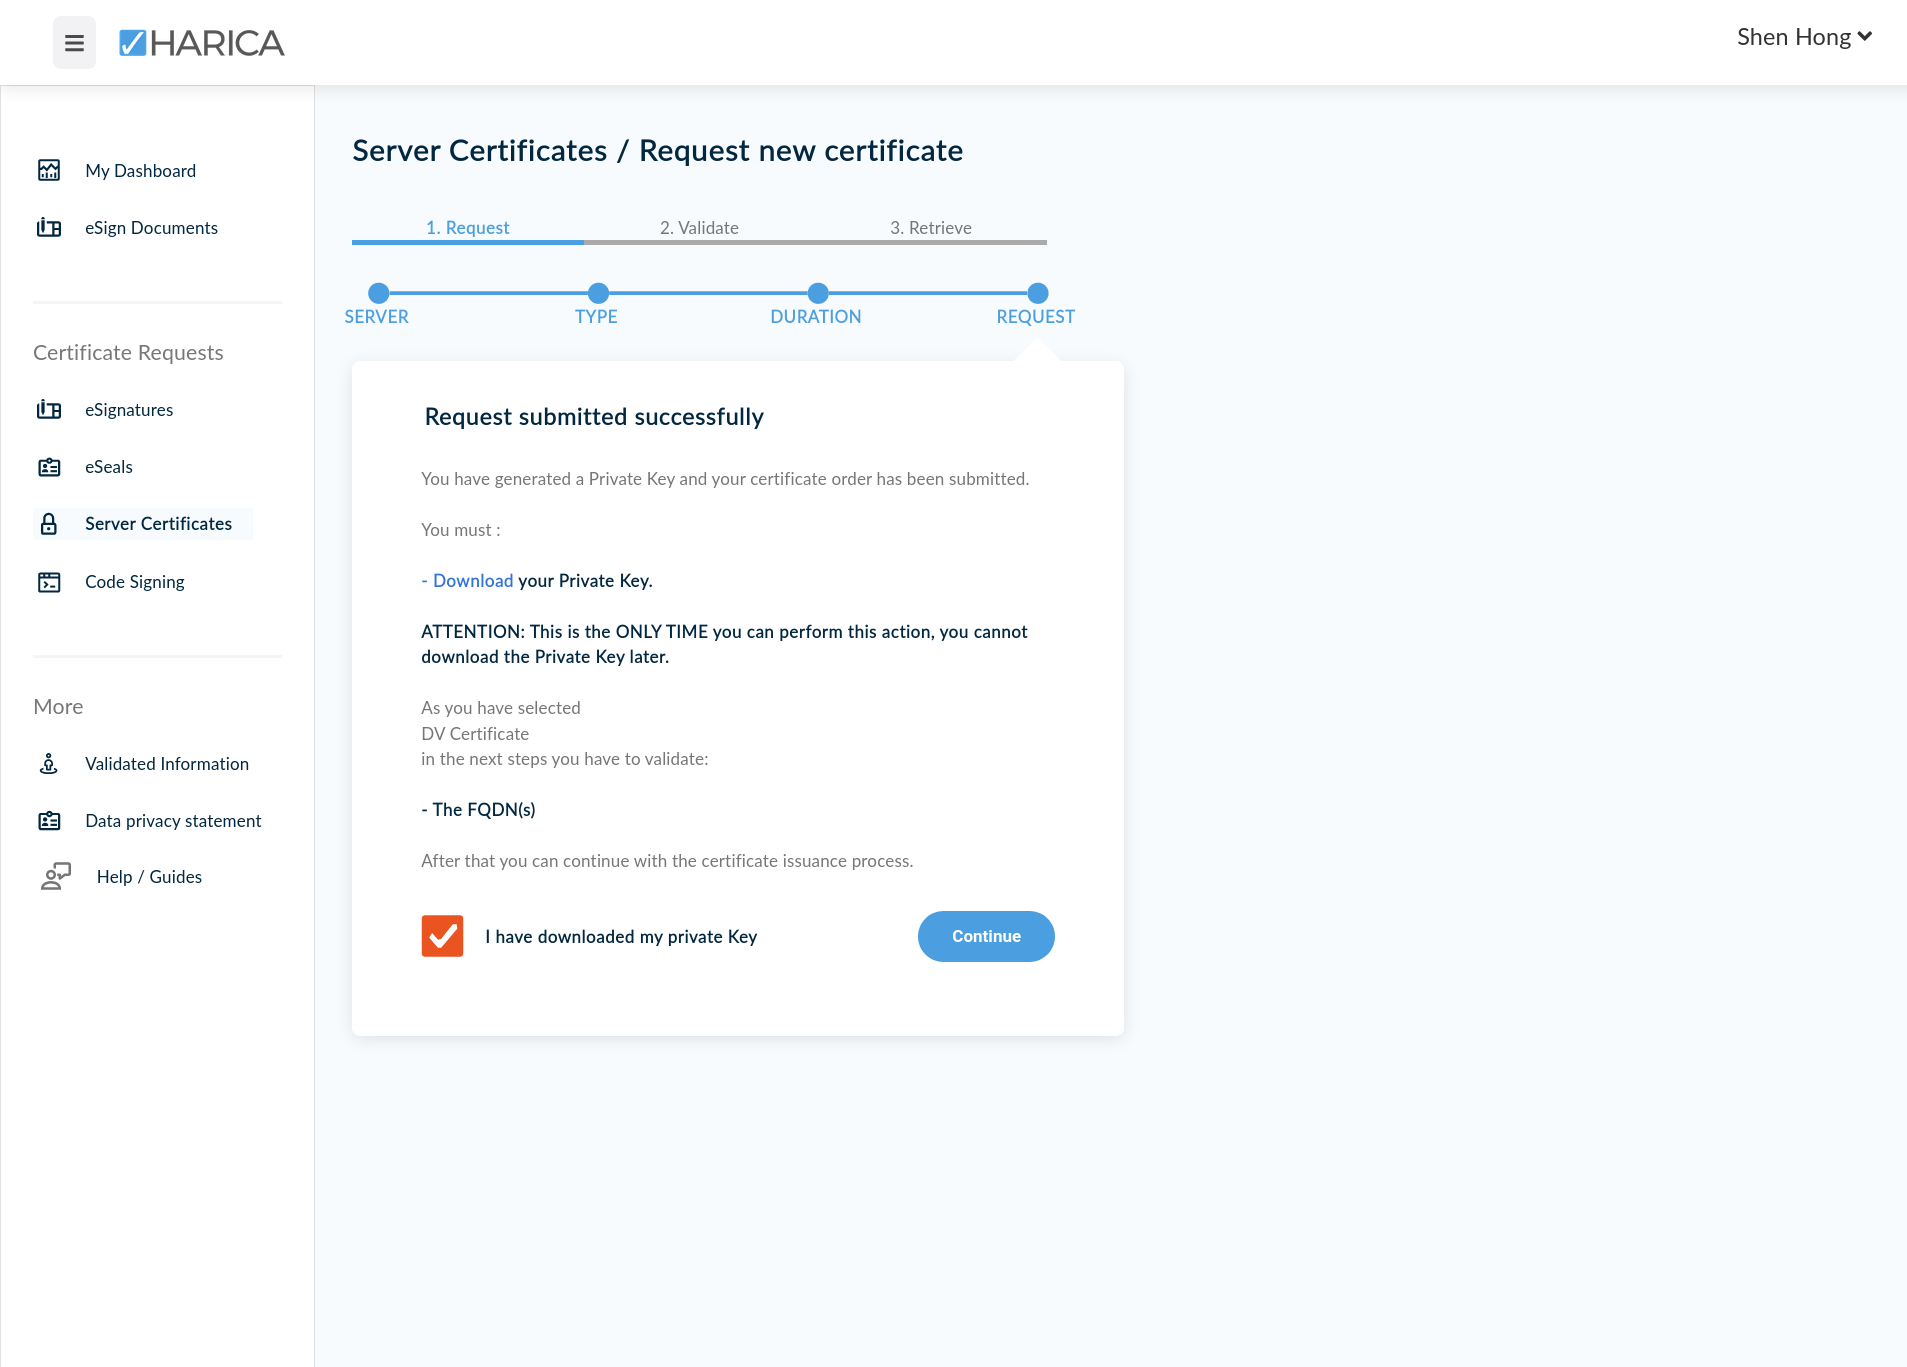
Next, you'll be asked to either generate, or submit a Certificate Signing Request (CSR). This is a text file which contains the information about your certificate, such as the Common Name, Organisational Name, et cetera. These were the questions that Let's Encrypt's certbot tool would ask, when you provision a new certificate. We will select the Auto-generate CSR option. This will instruct HARICA to generate a CSR in your browser, using a private key for your certificate that it will also create.
For the private key, it is important to choose ECDSA as your algorithm, and 384 as your key size. These are the most secure options, followed by RSA with 4096 key size. Between ECDSA and RSA, you should always choose ECDSA which is the more secure option, especially since you don't have to worry about backward-compatibility as all recent versions of Tor Browser support ECDSA.
You will also be prompted for a passphrase used to encrypt your certificate's private key. This is similar to the kind of passphrase that you might set for your SSH key. Set a long passphrase, and keep it safe – we will need it later when we install these certificates.
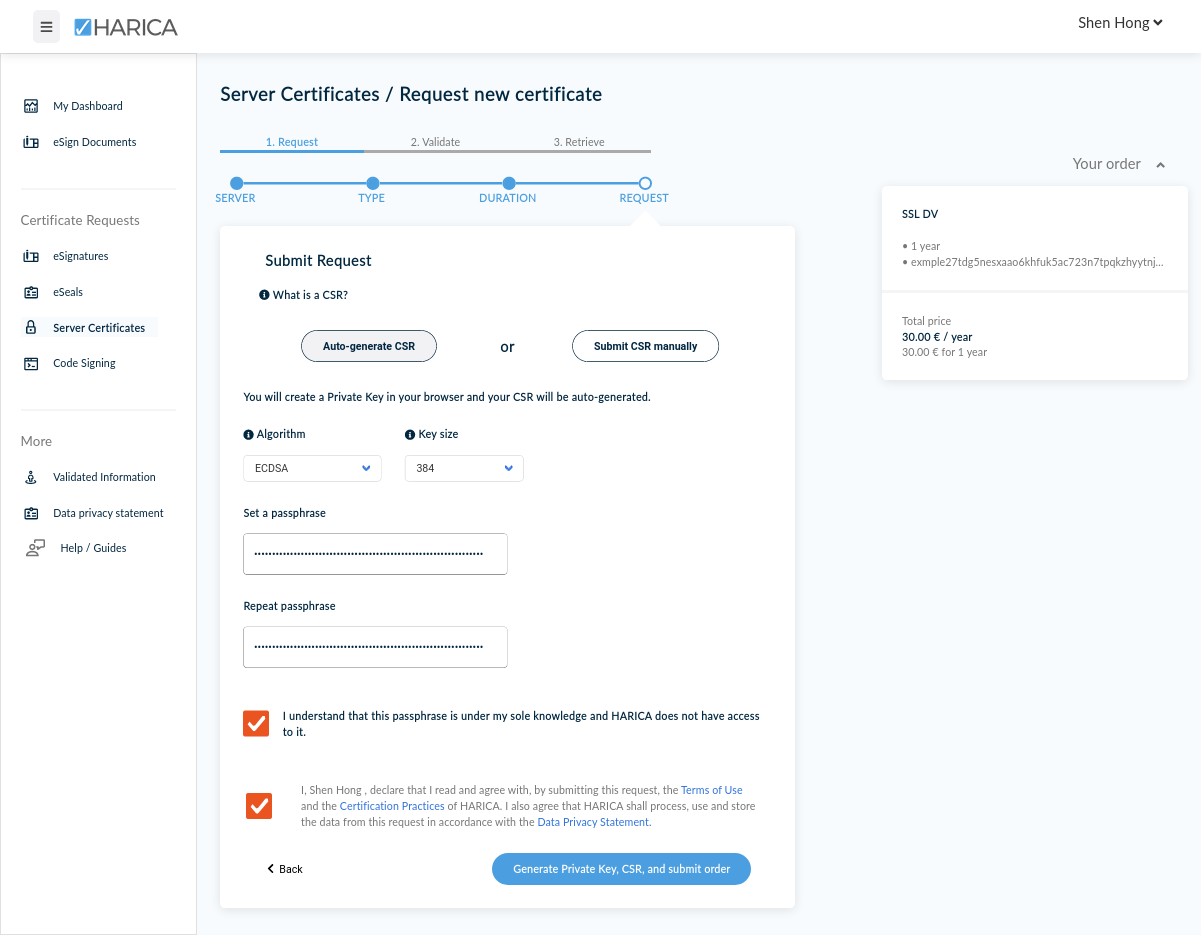
384 bit key size, or RSA with an 4096 bit key size. For maximum security, go with ECDSA and 384 bit.Your browser will freeze for a few seconds, as it generates the CSR and a private key. Then, you will be prompted to download your private key, as a privateKey.pem file. Make sure to save this file – we will need it when we install the certificate into EOTK. Protect your private key carefully – losing it will allow your certificate to be compromised!
We have now successfully submitted a request for a DV TLS Certificate. Now we must prove to HARICA that we own and control the .onion domain name. This is the next step.
Obtaining an Onion Domain Proof of Ownership
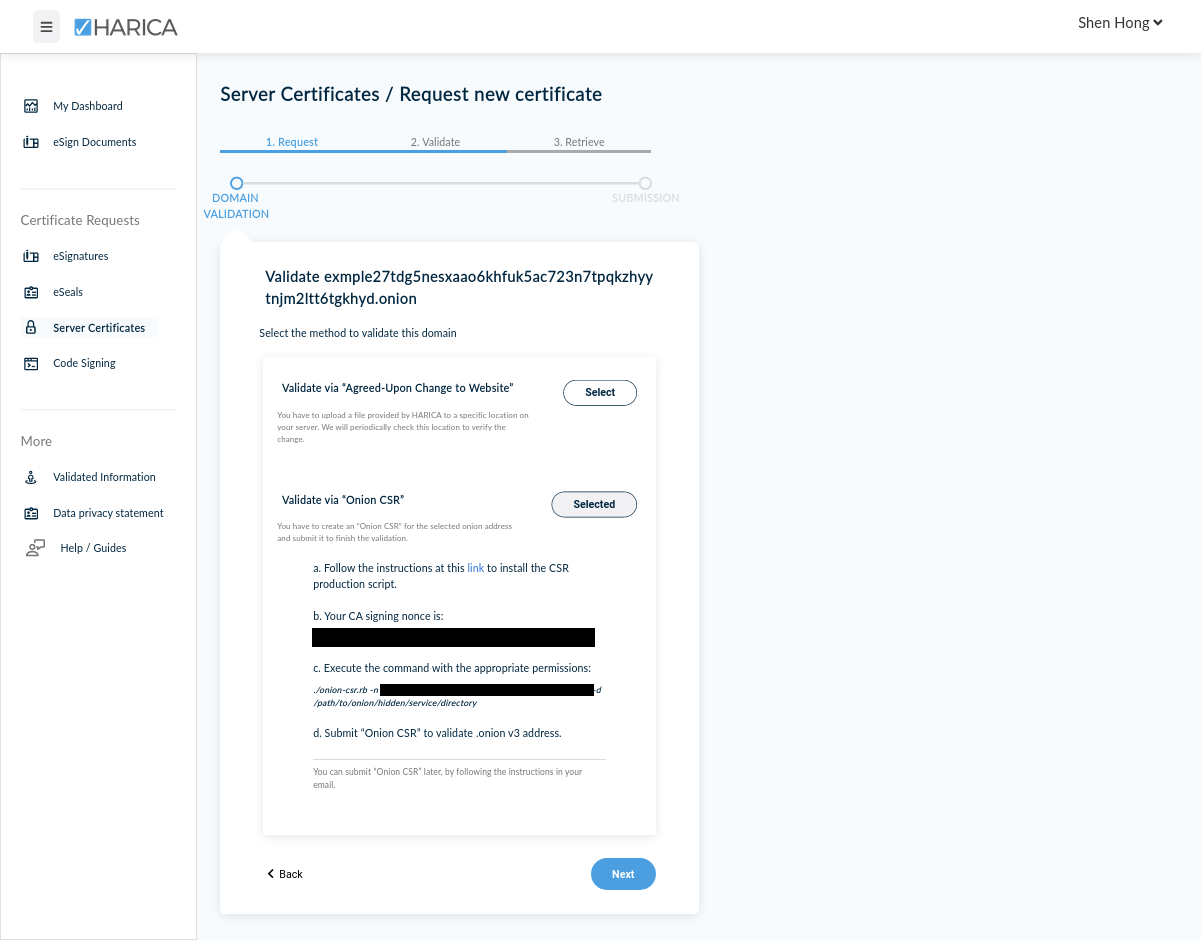
When using Let's Encrypt, domain ownership is proven automatically when certbot places a file in the ./well-known (defined by the RFC 5785 IETF standard). With HARICA, the process is a little different. You may either manually place a file in a similar location, which is the Validate via "Agreed-Upon Change to Website," or use the Validate via "Onion CSR" option.
We will go with the second Validate via "Onion CSR" option. This is because if you are attempting to purchase a certificate with multiple subdomains, the first validation option will not be available anyways. Likewise, the first option is not available for wildcard certificates. Finally, it requires making modifications to our EOTK project config (e.g. ~/eotk/example.com.conf) which may be annoying, if you have multiple projects.
When we do this, we will be asked to confirm and submit our validation request. Then, we must download and compile a tool called onion-csr from the official HARICA Github repository.
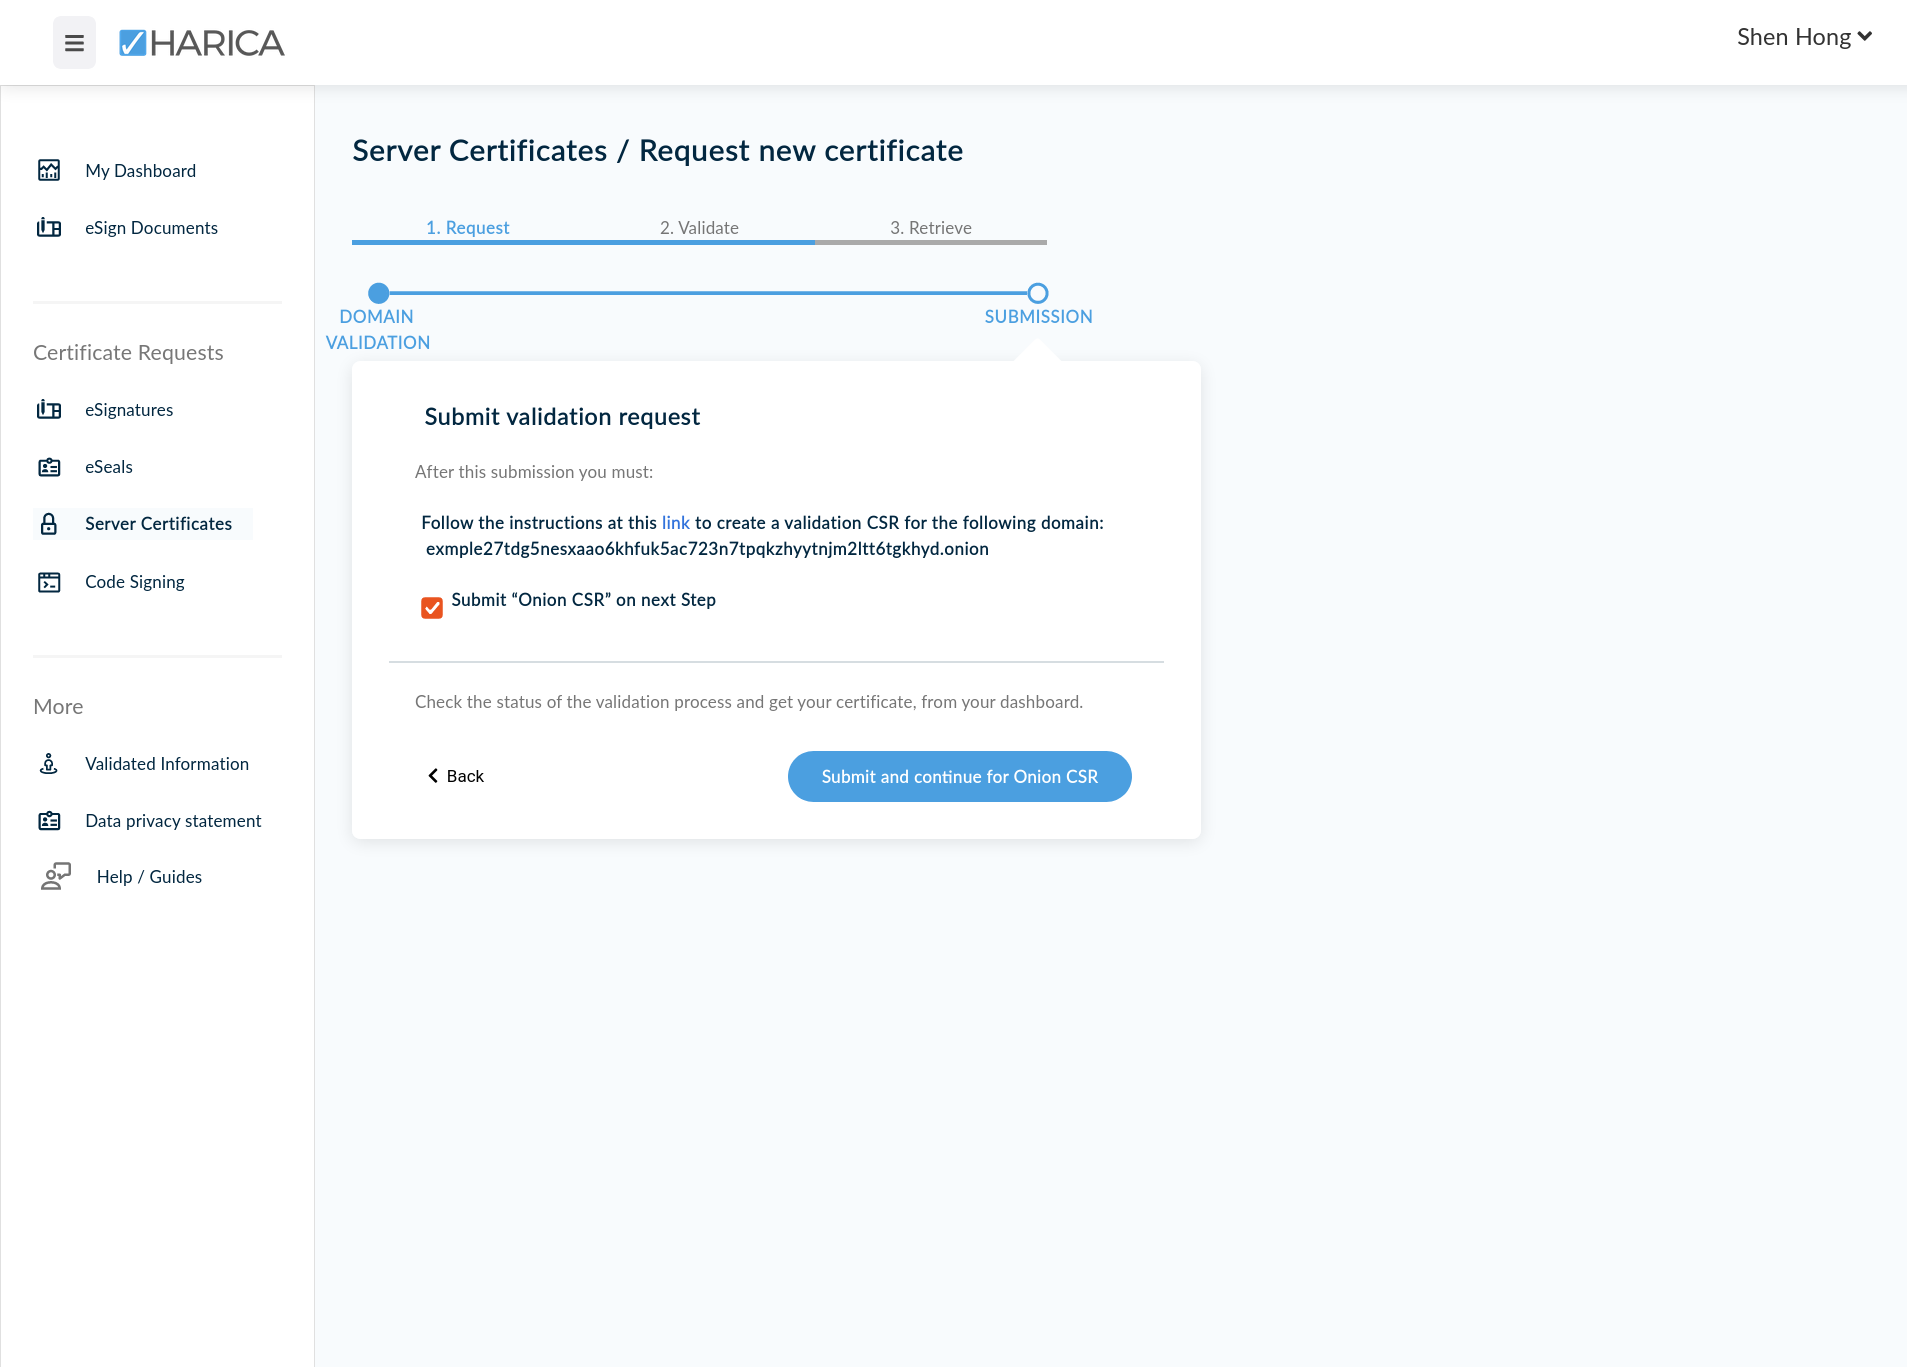
We will do this in the following section.
Cloning and Building HARICA's Onion CSR Tool
HARICA-officialLink to the onion-csr tool from HARICA
We must download and build the onion-csr tool. We must do this on the remote machine, where we run EOTK. This is a source-available Ruby script which essentially creates and signs a CSR using the private key of your .onion domain name. By signing the CSR using your .onion domain's private key, HARICA can confirm that you possess ownership over the domain by verifying it using the domain's public key.
The entirety of onion-csr's source code is located in the onion-csr.rb file (Github link). The code is only 100 lines long, and is understandable enough to be audited and read. The instructions for using the tool are included in the README.md file of the repository (Github link), but I will present the process here in this guide as well.
First, we install dependencies for the onion-csr tool. This is only the ruby intepreter, and some compilation dependencies. We will need build-essential because we will build the ED25519 library from the original C source code.
apt install ruby build-essentialInstall dependencies for HARICA's onion-csr tool
Fun fact: the ED25519 library that we will be building is actually the same library that was used by mkp224o from earlier! HARICA's onion-csr repository includes it as a submodule which will also be downloaded when we clone the repository. The ED25519 library can be found here (Github link), and if desired the code can be audited as well.
git clone --recurse-submodules https://github.com/HARICA-official/onion-csr.git
cd onion-csr
gem install ffi
gcc -shared -o libed25519.so -fPIC ed25519/src/*.c
Clone and build the onion-csr tool
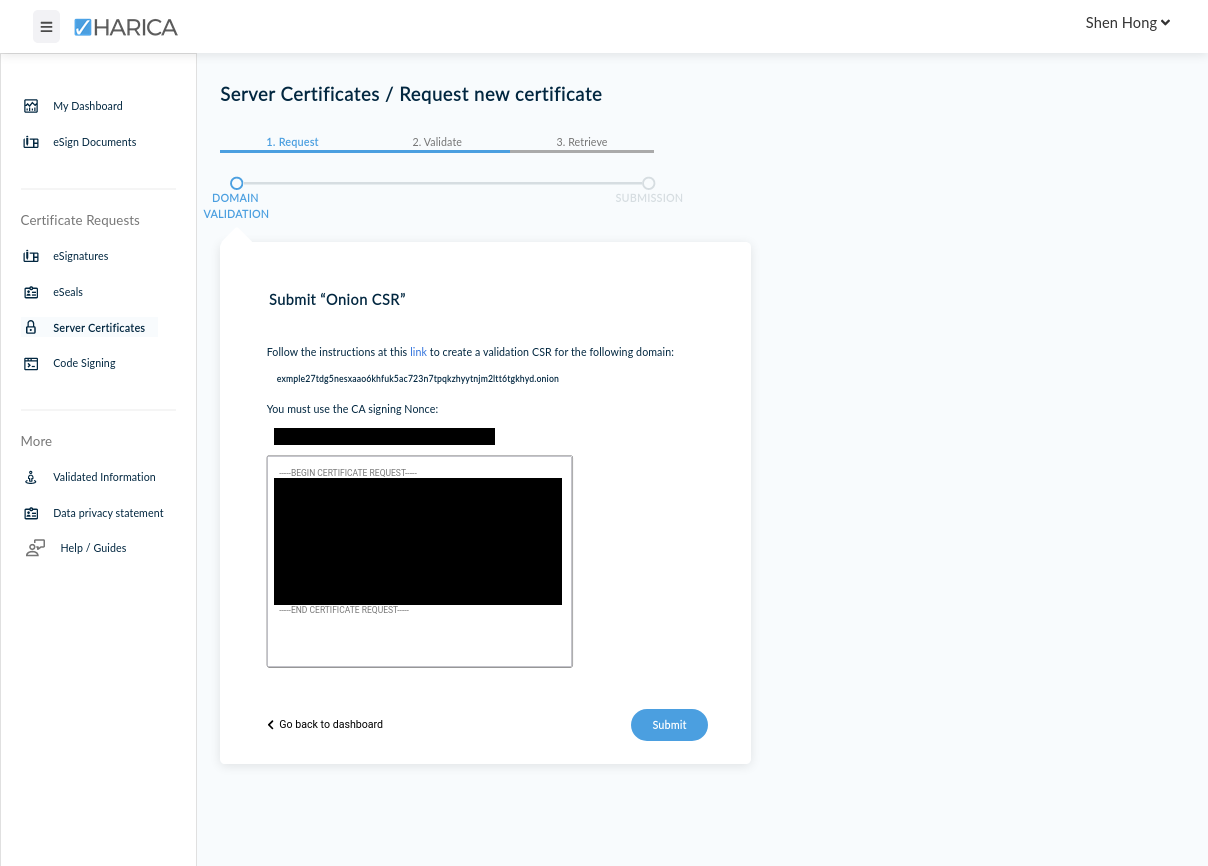
We are done. All that we need now is to run ./onion-csr.rb with the appropriate CA Signing Nonce, that is provided by HARICA in the preceding step. Likewise, we specify the path to our tor directory. EOTK creates project-specific tor directories at the following location:
~/eotk/projects.d/<projectname>.d/<truncated onion domain>-v3.d/Location of the tor directory in EOTK
For our example.com project, we would run the following command:
./onion-csr.rb -n <NONCE> -d ~/eotk/projects.d/example.com.d/exmple27tdg5nesxaao6-v3.d/Generate the "onion CSR" file by running the executable with the HARICA-provided CSR nounce, and the path to EOTK's project-specific tor service directory.
The utility should immediately output the onion CSR to the screen. We copy this and submit it to HARICA. When pasting the onion CSR, make sure that there are no extra newlines at the end, which will cause it to be rejected.
Once our "Onion CSR" is submitted, domain ownership validation is complete. All that's left is to accept the certificate, make payment, and then download the signed TLS certificate files.
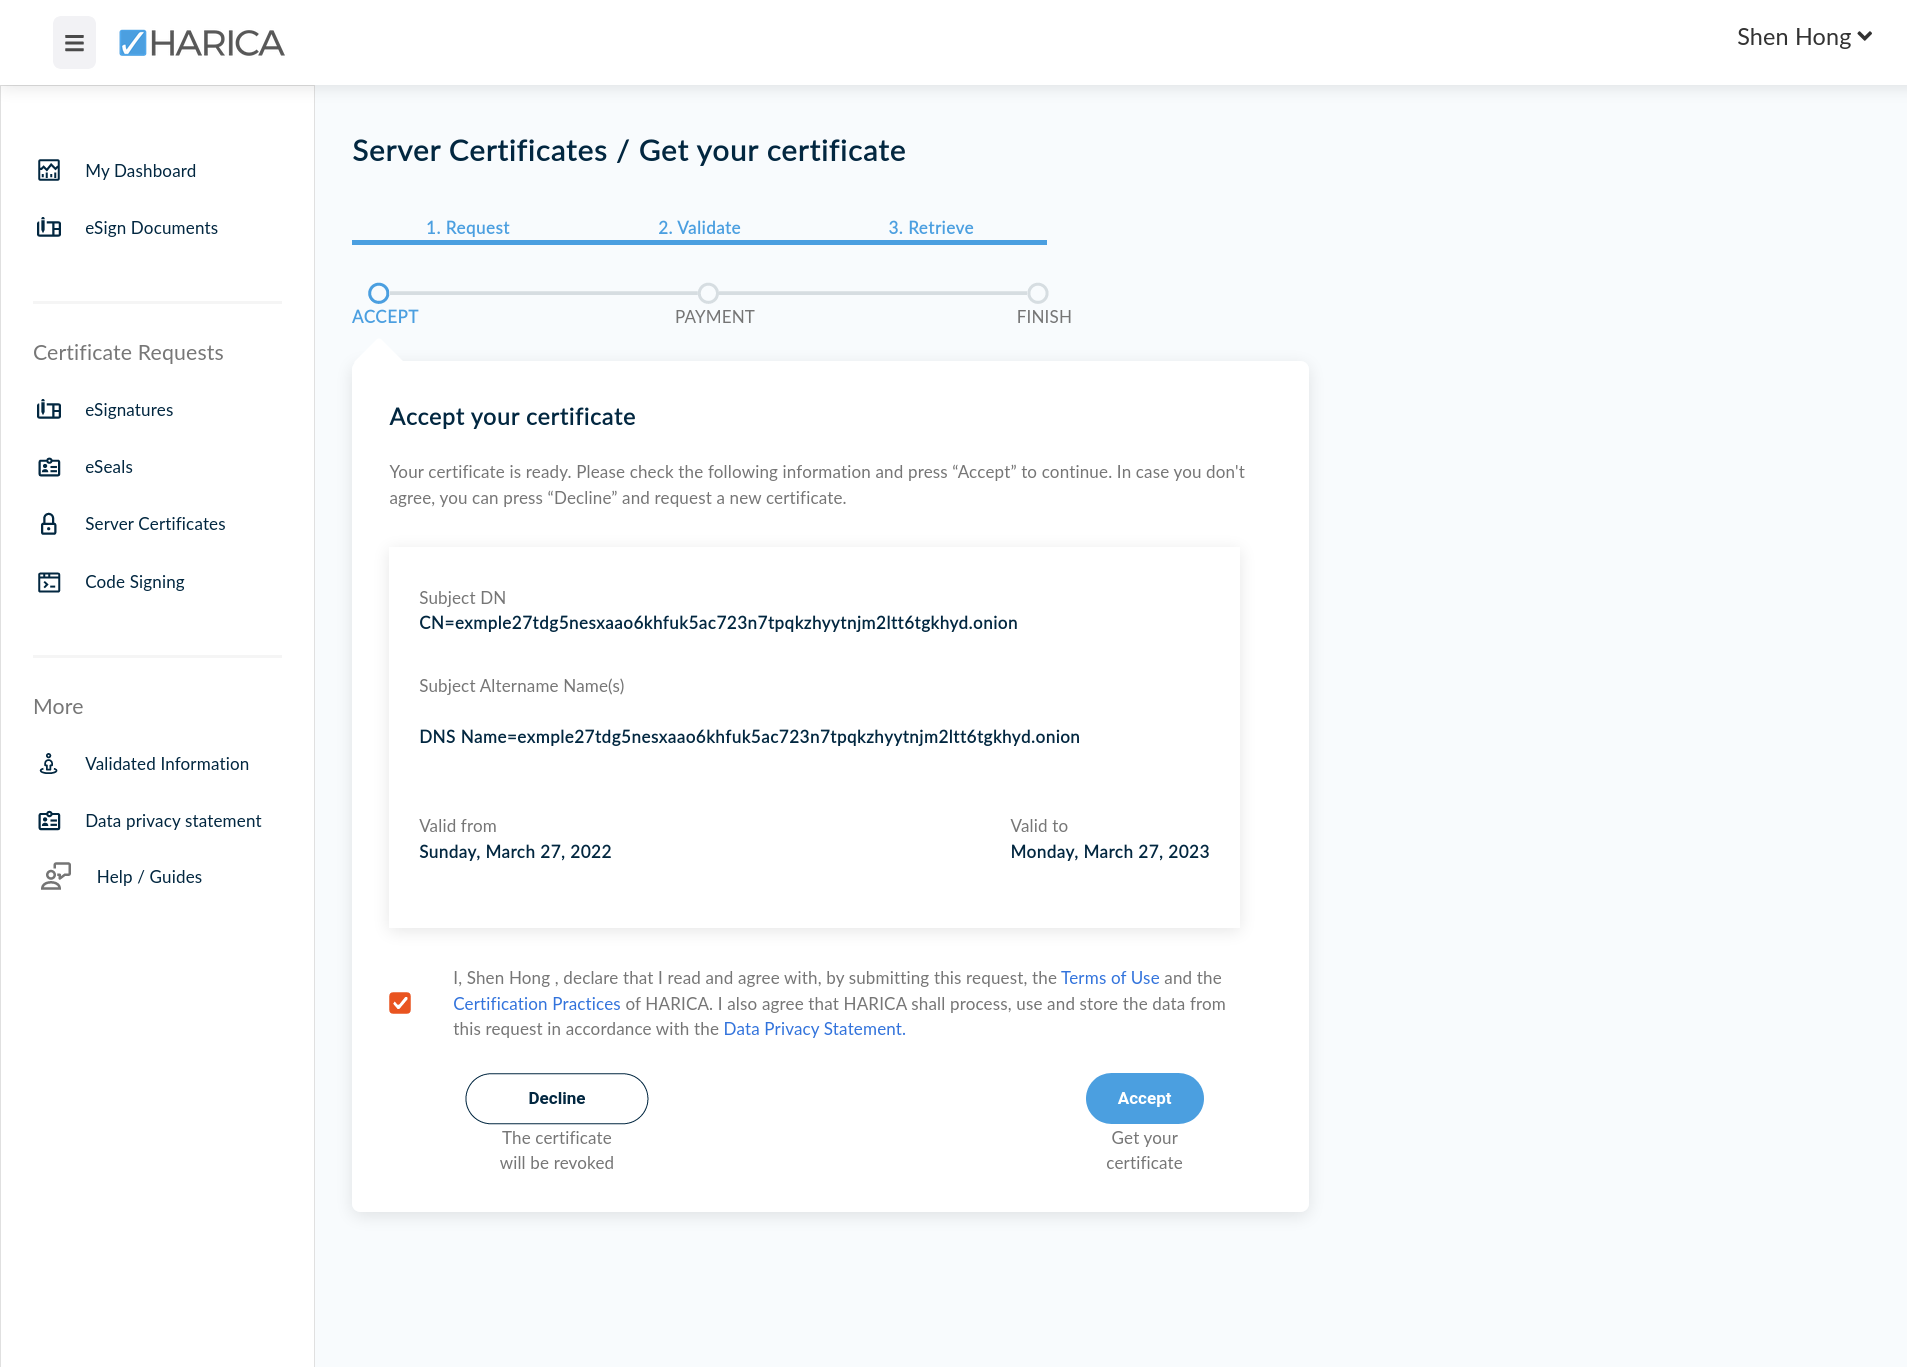
.pem files will be available for download.Naturally, I pressed "decline" at this stage, since I was going through the process only for example. But once you click accept, you'll be able to pay for, and then download the certificate – which will be made available as a certificate.pem file.
We will now go through the final step of this guide, which is installing these signed, trusted TLS certificates into EOTK.
Installing Signed TLS Certificates into EOTK
You should have the signed certificate available as a .pem file. It will have a 32-digit hexidecimal name like AF6EC6C9FEE27EB9769B47B040A71832.pem (a random example, not a real key). I'll call it certificate.pem for easier reference. You should also have a password-protected private key file named privateKey.pem. We must first transfer both of these files to our remote server:
rsync -a certificate.pem username@remote:/path/to/destination
rsync -a privateKey.pem username@remote:/path/to/destination
Transfer the newly-purchased certificate and its corresponding (password-protected) private key .pem files to the remote server.
These files must be installed within the ssl.d folder of our EOTK project directory. These files must be renamed to the truncated 20-character long onion domain name, followed by the -v3 suffix. Your public key must be given the .cert file ending, and the private key must be given the .pem file ending. The specific naming of these files is important – if you misname them, EOTK will not be able to use them!
The best way to not mess up is to simply copy them on top of (i.e. replace) the existing self-signed TLS certificates which EOTK automatically generates. We can do this with our certificate file first:
cp certificate.pem eotk/projects.d/example.com.d/ssl.d/exmple27tdg5nesxaao6-v3.certInstall the certificate (i.e. public key) for our onion domain.
Our privateKey.pem is passphrase protected. Before we copy it, we must first unlock it with our passphrase. We do this by using the openssl command to create an unlockedKey.pem file. The command will prompt you for your passphrase.
openssl ec -in privateKey.pem -out unlockedKey.pem
# Enter private key passphrase
Unlock the passphrase protected private key file.
Once that's done, we can copy unlockedKey.pem on top of the existing self-signed private key.
cp unlockedKey.pem eotk/projects.d/example.com.d/ssl.d/exmple27tdg5nesxaao6-v3.pemInstall the certificate private key for our onion domain.
Now, our signed TLS certificates are installed! In order for them to take effect, all we have to do is to instruct EOTK to reload its internal Nginx server:
./eotk nxreload example.comInstruct EOTK to reload the Nginx configuration for the example.com project.
Now navigate to our .onion domain in the Tor Browser. As you can see, there are no longer any certificate warnings, and our connection is verified by the Hellenic Academic and Research Institution Cert. Authority.
Now, with a trusted TLS certificate installed, your website's Onion Service is truly production-quality. By using EOTK, you have made your website available as a native onion site using the same framework that large organisations and media outlets use!
Configuring the Onion-Location Header in Nginx
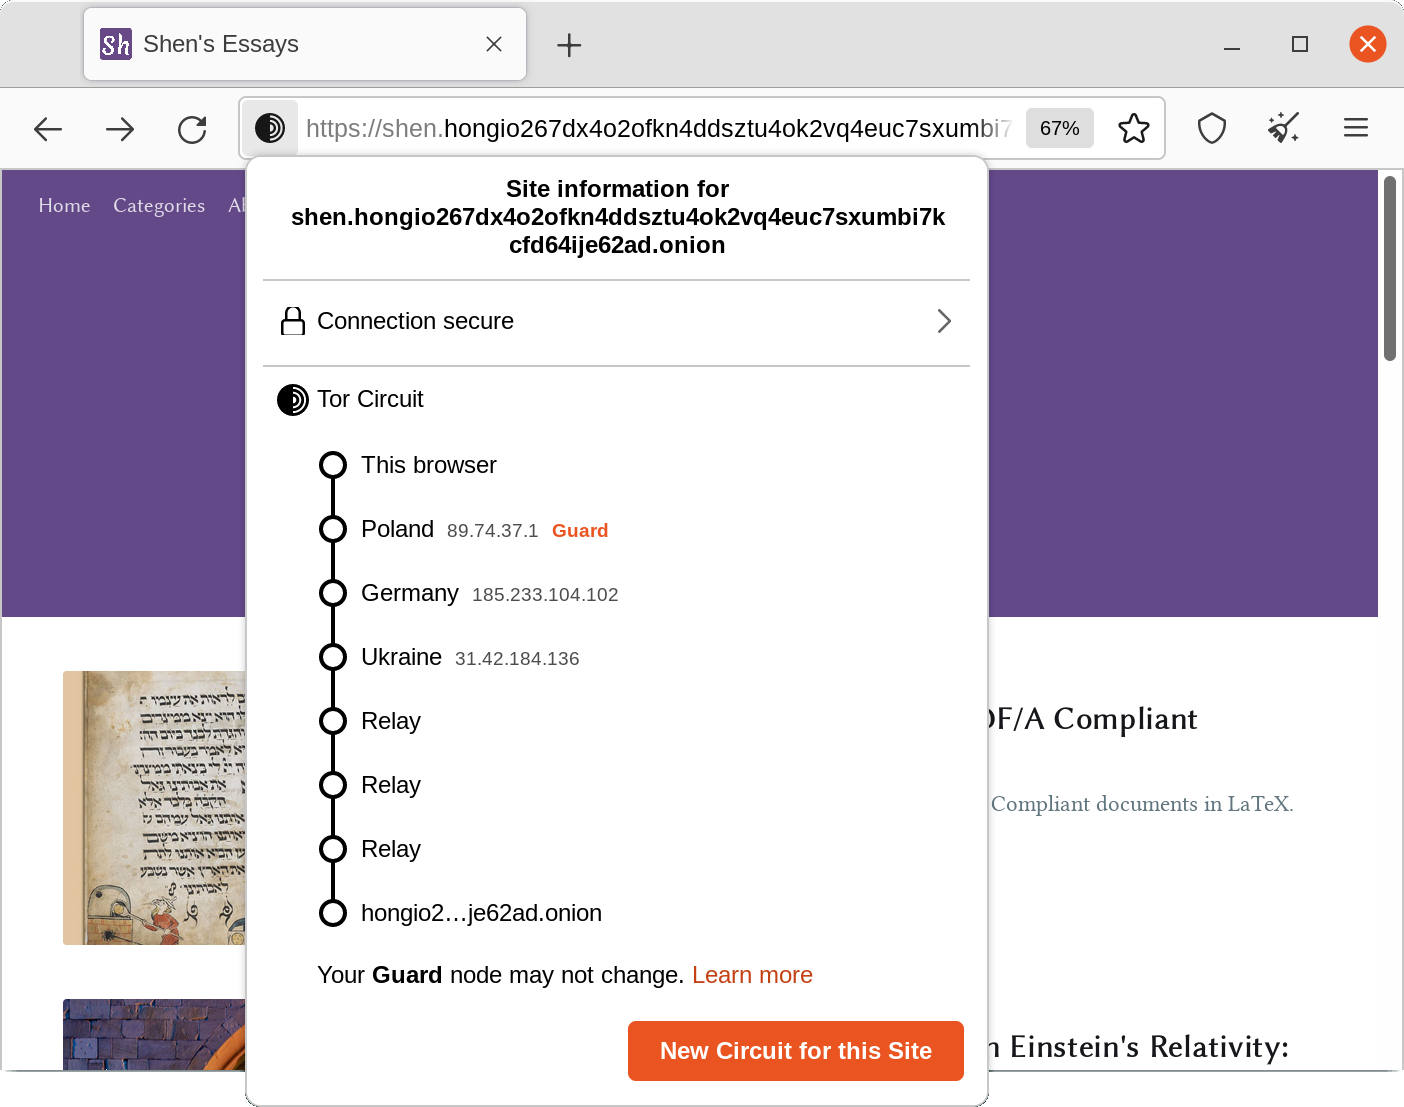
One last fun step. Now that your website is available as an Onion Service, how do you publicise this information? You can put a link in the footer of your website (as I have done), but there exists a standard called the Onion-Location header. You can configure your clearnet website to pass the Onion-Location header with every request. Browsers which know how to inteprete the header (such as the Tor Browser, and the Brave Browser), will detect the header and inform the user that an .onion link is available.
The Tor Project maintains instructions for both Nginx and Apache. For Nginx, all you have to do is to add the following directive to your clearnet nginx.conf file:
add_header Onion-Location https://<your-onion-address>.onion$request_uri;Likewise, you can also add a <meta> tag to your website's HTML code, should that be more convenient:
<meta http-equiv="onion-location" content="https://<your-onion-service-address>.onion" />Make sure to specify the protocol as https://, since EOTK always enforces TLS connections. No matter the method, when a user navigates to your website using either the Tor Browser or Brave, they will see the following button:

Onion-Location header in action. Observe the purple button in the upper-right corner of the address bar.Congratulations, now your website's Onion Service is complete!
Conclusion
By following this guide, you should have been able to create a production-quality mirror which enables you to make your website available as a native Onion Service over the Tor Network. The Onion Service mirror will allow users to access your website securely and anonymously, delivering your content to audiences that are previously inacessible.
For me, I know that on a practical sense, few readers will access my blog over the Tor Network. After all, my website is a small, independent blog dedicated to Philosophy (and the odd Computing article), with a readership measuring in the dozens. But I believe in empowering my readers whenever I can, and even if a single reader is to benefit from my Onion Service, all this effort will have been worth it. For the pursuit of philosophy is an universal activity, among the characteristic activities of the human being.
I hope this guide has been useful to you, and that it was able to help you deploy your own instances of EOTK. More Onion Service sites will help empower users, especially those who face censorship and oppression.
Thank you for reading my tutorial. For further content, feel free to subscribe to my RSS feed. If you have any thoughts, feedback, or got stuck in any way, feel free to contact me. I always enjoy meeting interesting strangers! Be sure to check out my other content: I also write about Galileo, Special Relativity, and NixOS.