Guide to Workflow Automation: How I use Firefly III, Paperless-ngx, and n8n to Painlessly Manage Receipts
A tutorial on using n8n to automate the uploading of receipts from Firefly III to Paperless-ngx.


.jpg)
Have you ever had a repetitive task, which involves downloading files from one location, and uploading them to another? Are there "computer chores" in your routine, which simply consists of being the intermediary between two different online services? Whether it's entering spreadsheets from one program into another, or catching the output of one website and reformatting it for another tool – the proliferation of online services which do not talk to each other means that humans are left to fill the gaps. But we are more than glorified data-pipelines: to shuttle files from one place to another is the characteristic activity of an USB, not a human being. Thankfully, we can automate these tasks away using workflow automation software.
My name is Shen, and I am a Philosophy student. In this tutorial, I showcase n8n: an open source (Github link), self-hosted workflow automation platform. I will walk us through the process of authenticating with a REST API, setting up Webhooks, and finally the automation code in n8n itself. Although this tutorial is specifically concerned with two tools (Firefly III and Paperless-ngx), the general concepts are universal and broadly applicable. By automating the mundane, repetitive tasks of uploading receipts, I can devote more time to Philosophy. And it is my hope that by sharing this knowledge, you too will find more leisure to devote to contemplation.
My Receipt Management Workflow
I use two tools regularly to keep track of my spending, and to manage paper documents in general:

- Firefly III: an open source, self-hosted personal finance tool. I use this to keep track of my financial transactions and daily spending.
- Paperless-ngx: an open source, self-hosted document management platform. It offers powerful search, categorisation, and OCR capabilities that I utilise to manage all my paper documents.
Whenever I get home from the day, I scan and digitise the receipts that I have accrued. Then I enter their transaction information into Firefly: adding the description and value, before finally attaching the PDF of the relevant receipt into the transaction. Afterwards, I upload again the PDFs into Paperless, making sure once again to give them the correct description. Having to upload and enter the transaction information twice was repetitive and time consuming, and I quickly started wondering if there was some way to have the two systems talk to each other.
Was there any way to integrate Firefly with Paperless-ngx? What could I do, so that every time I uploaded a new transaction on Firefly, it automatically sent the information and attached PDF to Paperless-ngx?
Both Firefly and Paperless-ngx are open source tools, with well-documented APIs. Surely it wouldn't be too difficult to create an integration, I thought. My first approach was to open a suggestion on the Firefly III Github page. James Cole, the maintainer of Firefly III responded, declining to add a native integration due to maintenance concerns. However, he encouraged me to build my own – and with that suggestion, I stumbled upon n8n.
Why I Choose to Use n8n
n8n (pronounced as "n-eight-n") is an open source workflow automation tool. It allows one to "glue" together different services, automating the transfer of information between tools. n8n uses a visual, flow-chart-like metaphor to allow users to easily create workflows (i.e. scripts). n8n is essentially the open source version of Zapier or IFTTT. I decided to use n8n instead of an ad-hoc setup with shell scripts and crontab entries because I wanted something easy to use and understandable at a glance. After all, if you spend much more time automating a task than you'd spend performing it, your efforts would be inefficient. Once I realised it was the tool for me, I quickly installed it on to my server.
Creating an n8n workflow for automatic receipt management
How was it like creating the automation workflow? In my case, there were four steps:
- Generate the API authentication tokens for both services.
- Register Webhooks on Firefly III using the Firefly API.
- Creating the automation workflow on n8n
- Testing, and deploying the workflow to production.
Generating Authentication Tokens
Generally, the first step towards any workflow automation, is to get access to the API of the service(s) that you are trying to use. There is usually some means to authenticate yourself to the API. In my case, both Firefly III and Paperless-ngx support the use of token-based authentication. An API token is essentially a long, computer-memorised password that must be sent along with API requests. Be sure to keep these tokens safe – they allow the bearer to access your account!

We will need API tokens from both Firefly III and Paperless-ngx in order to interact with their APIs. In fact, the next step is for us to register webhooks using the Firefly III API directly.
Registering and Managing Webhooks with Firefly III
Webhooks are the foundation of our automation workflow. A webhook is like a custom function callback: you can give Firefly a special URL that it will send data to upon a certain trigger. The Firefly III documentation page on Webhooks has a more extensive description of the functionality available. We will be creating two webhooks, using the following triggers:
TRIGGER_STORE_TRANSACTION: For when we store a new transaction.TRIGGER_UPDATE_TRANSACTION: For when an existing transaction is updated.
Each time a transaction is added or updated, we want Firefly to take a certain action: namely send the data of the transaction involved to our Webhook URL. This action is defined in Firefly as:
RESPONSE_TRANSACTIONS: Respond to the Webhook URL with the transaction that was added/updated.
Where do we get the Webhook URL? These are provided by n8n! Now is the time to create a new n8n Workflow. Be sure to create two Webhook nodes using the graphical GUI. We will need two, as we want our Workflow to be triggered both when a new transaction is added, and when an existing transaction is updated:
Each of these webhook nodes will give you a unique webhook URL. Save those. Make sure to use the Test URL for now instead of the production URL, while we still build the workflow. With these URLs, it is now time to register the webhooks with Firefly III.
Most applications have an admin page where you will be able to register new webhooks. Unfortunately as of 2022-06-09, Firefly III does not have such a page. Instead, in order to register new webhooks, we must interact directly with it's API. We will be using the CURL command to do so, via the command line. You'll need the following information handy:
[Firefly III domain]: The domain name of your Firefly III installation.[Auth Token]The API Authentication Token for Firefly III.[Webhook URL]: The URL from your webhook nodes. Make sure to use the test URL, I will show you how to switch them later.
Registering Webhooks
We will be registering two webhooks, one for TRIGGER_STORE_TRANSACTION and one for TRIGGER_UPDATE_TRANSACTION, respectively. Here is the command to register the first one:
curl -X POST 'https://[Firefly III domain]/api/v1/webhooks' \
  -H 'accept: application/vnd.api+json' \
  -H 'Authorization: Bearer [Auth Token] \
  -H 'Content-Type: application/json' \
  -d '{
  "active": true,
  "title": "Paperless-ngx Integration (via n8n) On New",
  "trigger": "TRIGGER_STORE_TRANSACTION",
  "response": "RESPONSE_TRANSACTIONS",
  "delivery": "DELIVERY_JSON",
  "url": "[Webhook #1 URL]"
}'
The first webhook, which will fire on new transactions. Make sure to give it the correct webhook URL from the first n8n webhook node!
And the command to register the second one:
curl -X POST 'https://[Firefly III domain]/api/v1/webhooks' \
  -H 'accept: application/vnd.api+json' \
  -H 'Authorization: Bearer [Auth Token] \
  -H 'Content-Type: application/json' \
  -d '{
  "active": true,
  "title": "Paperless-ngx Integration (via n8n) On Update",
  "trigger": "TRIGGER_UPDATE_TRANSACTION",
  "response": "RESPONSE_TRANSACTIONS",
  "delivery": "DELIVERY_JSON",
  "url": "[Webhook #1 URL]"
}'
The second webhook, which will fire on transaction updates. Make sure to give it the correct webhook URL from the second n8n webhook node!
Getting List of Existing Webhooks
Once you have registered both webhooks successfully, you should be able to query the /api/v1/webhooks endpoint to get a list for all of them. Here is the command to list all webhooks.
curl -X GET 'https://[Firefly III domain]/api/v1/webhooks' \
  -H 'accept: application/vnd.api+json' \
  -H 'Authorization: Bearer [Auth Token]' \
  -H 'Content-Type: application/json'
Command to retrieve a list of all webhooks.
Every successful command will return information in the form of an minified json string. You can "prettify" the information using an online tool like json prettify, which will make it easier to read. Next, I will also go through some other useful API calls to manage these webhooks, for future reference.
Updating Existing Webhooks
In order to update an existing webhook, you must make a PUT request towards the correct {id} of the webhook that you want to modify. You can get webhook IDs by using the previous API call to list webhooks.
curl -X PUT 'https://[Firefly III domain]/api/v1/webhooks/{id}' \
  -H 'accept: application/vnd.api+json' \
  -H 'Authorization: Bearer [Auth Token] \
  -H 'Content-Type: application/json' \
  -d '{
  "active": true,
  "title": "Paperless-ngx Integration (via n8n) On New",
  "trigger": "TRIGGER_STORE_TRANSACTION",
  "response": "RESPONSE_TRANSACTIONS",
  "delivery": "DELIVERY_JSON",
  "url": "[Webhook URL]"
}'
Command to update a webhook.
Whatever values you put in -d '{ ... }' field will overwrite existing values. Keep this update command in mind, as we will be using it to set the url to the production webhook URLs later.
Deleting Webhooks
In order to delete a webhook, you simply make a DELETE request towards the {id}.
curl -X DELETE 'https://[Firefly III domain]/api/v1/webhooks/{id}' \
  -H 'accept: application/vnd.api+json' \
  -H 'Authorization: Bearer [Auth Token] \
  -H 'Content-Type: application/json'
Command to delete a webhook.
Saving authentication tokens from Firefly and Paperless-ngx into n8n
Now that we registered the webhooks, Firefly III is able to send information to n8n. But right now, n8n has no way to send or retrieve information from Firefly, nor from Paperless-ngx. In order for n8n to use their respective APIs, we must first save our authentication credentials into n8n. To do this, go to the Credentials tab on the left, and click New. n8n offers some pre-built authentication types to work with popular services, but it does not have one for Firefly III nor Paperless-ngx yet. Hence, we'll use the generic Header Auth credential type.
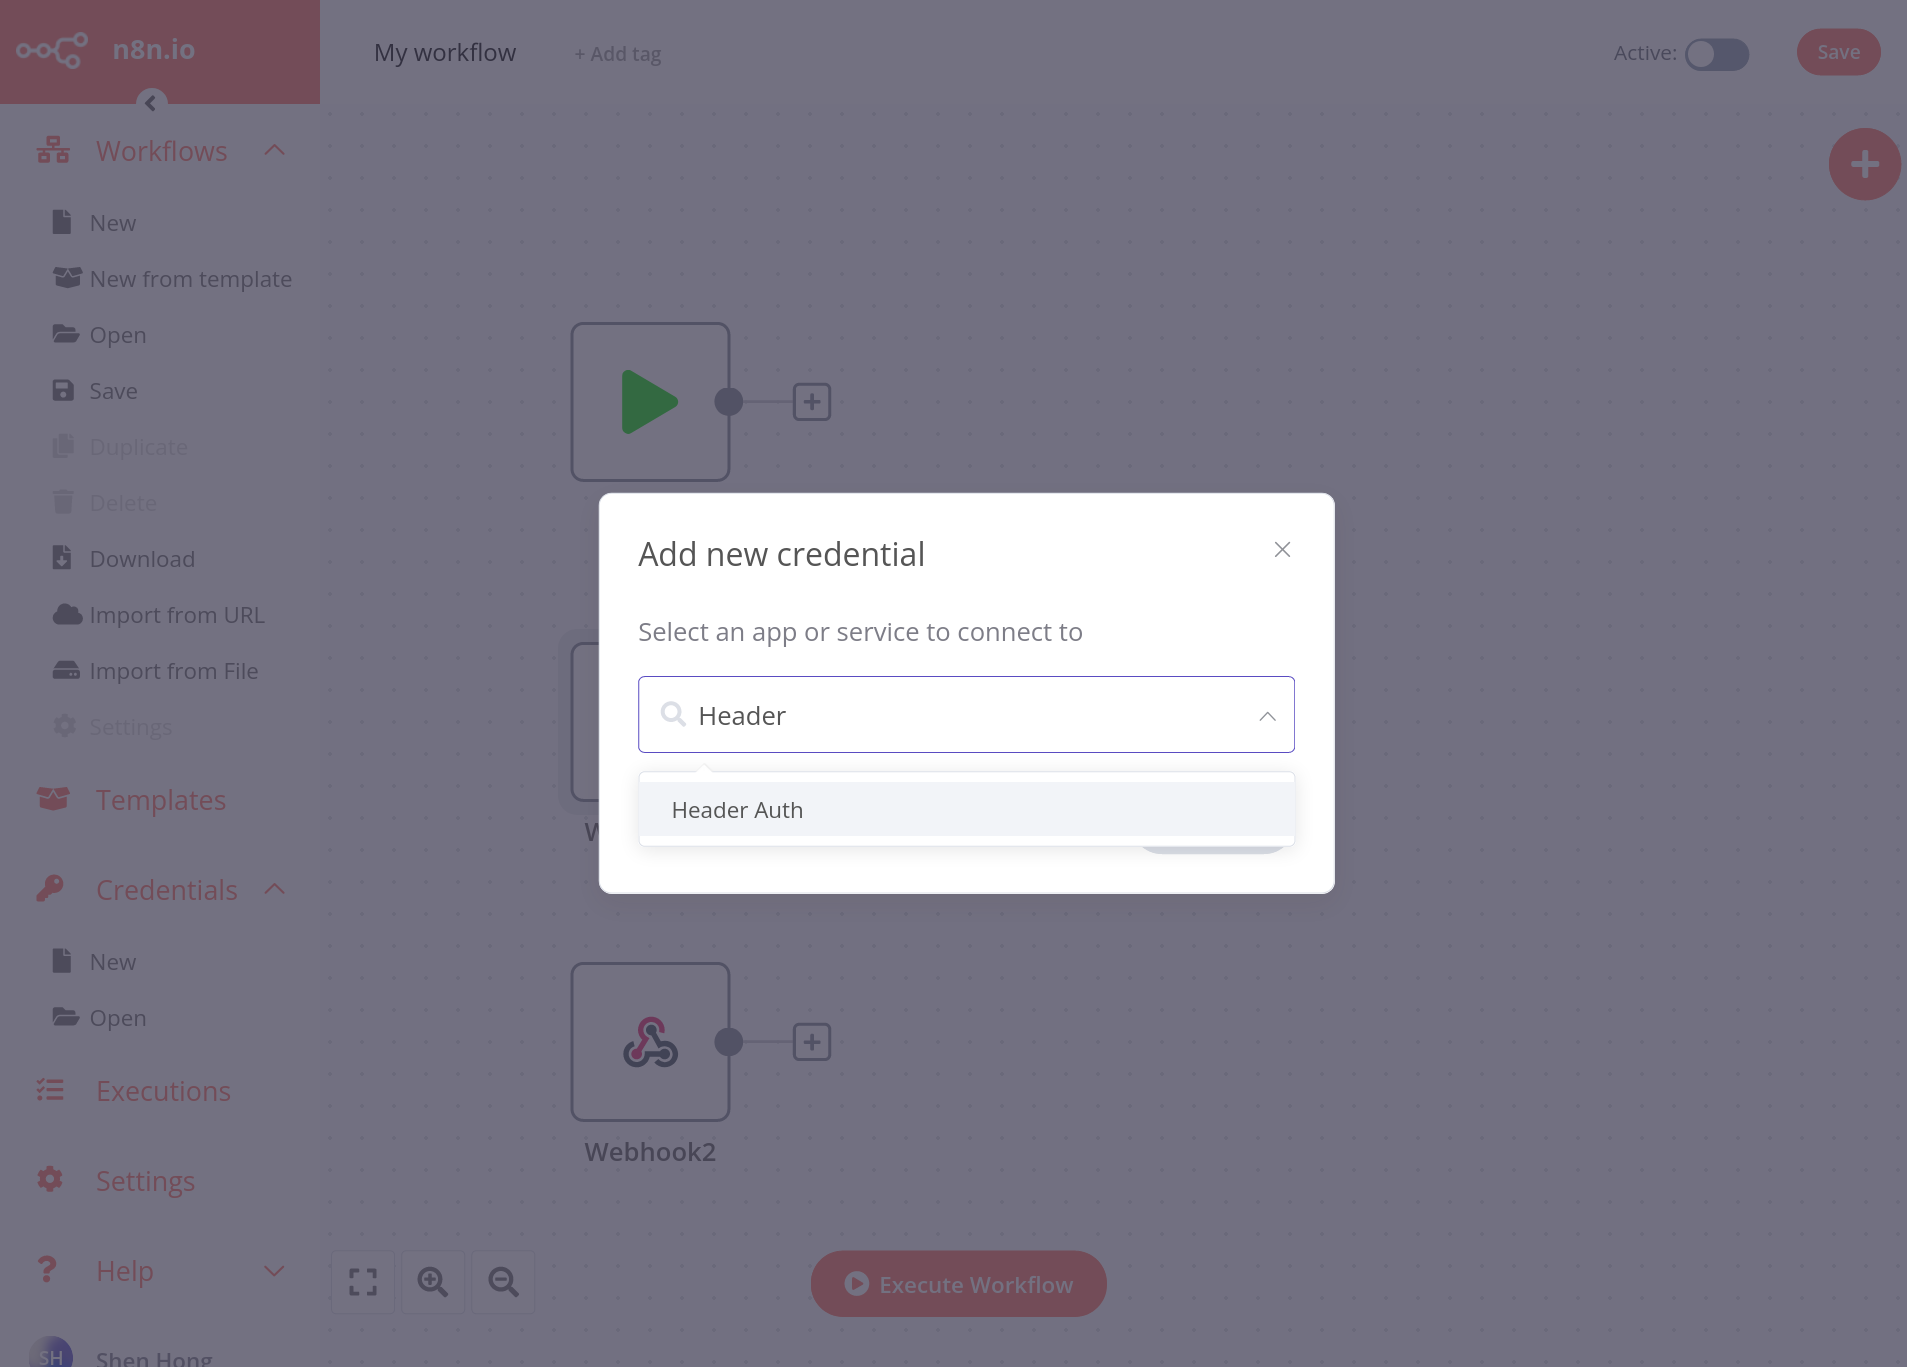
n8n's generic Header Auth credential is a reference to authenticating a HTTP request by using a HTTP Header. Any manner of header can be used, but for both Firefly III and Paperless-ngx, they use the standard HTTP Authorization Header.
Go ahead and name your credential appropriately (e.g. "Firefly III Header Auth"), and add Authorization as the name of the Header used. The value has to be Bearer [Auth Token, which is the string Bearer followed by your authentication token.
![A screenshot of the header auth form in n8n. There are two fields, one called Name with "Authorization" entered within it. The other is called "Value" with "Bearer [Auth Token]".](https://shen.hong.io/content/images/2022/06/image-4.png)
These values in the n8n form correspond to the line -H 'Authorization: Bearer [Auth Token] \ from our earlier CURL commands.
Similarly, we'll have to create another set of Header Authentication credentials for Paperless-ngx. The only difference is that the value of the header is slightly different, as the Paperless-ngx documentation specifies. We will enter Authorization for Name, and Token [Auth Token] for Value. Make sure that you are using the authentication token for Paperless-ngx here, of course!
![A screenshot of the header auth form in n8n. There are two fields, one called Name with "Authorization" entered within it. The other is called "Value" with "Token [Auth Token]".](https://shen.hong.io/content/images/2022/06/image-5.png)
After saving both authentication methods into n8n, we are ready to begin constructing the workflow itself.
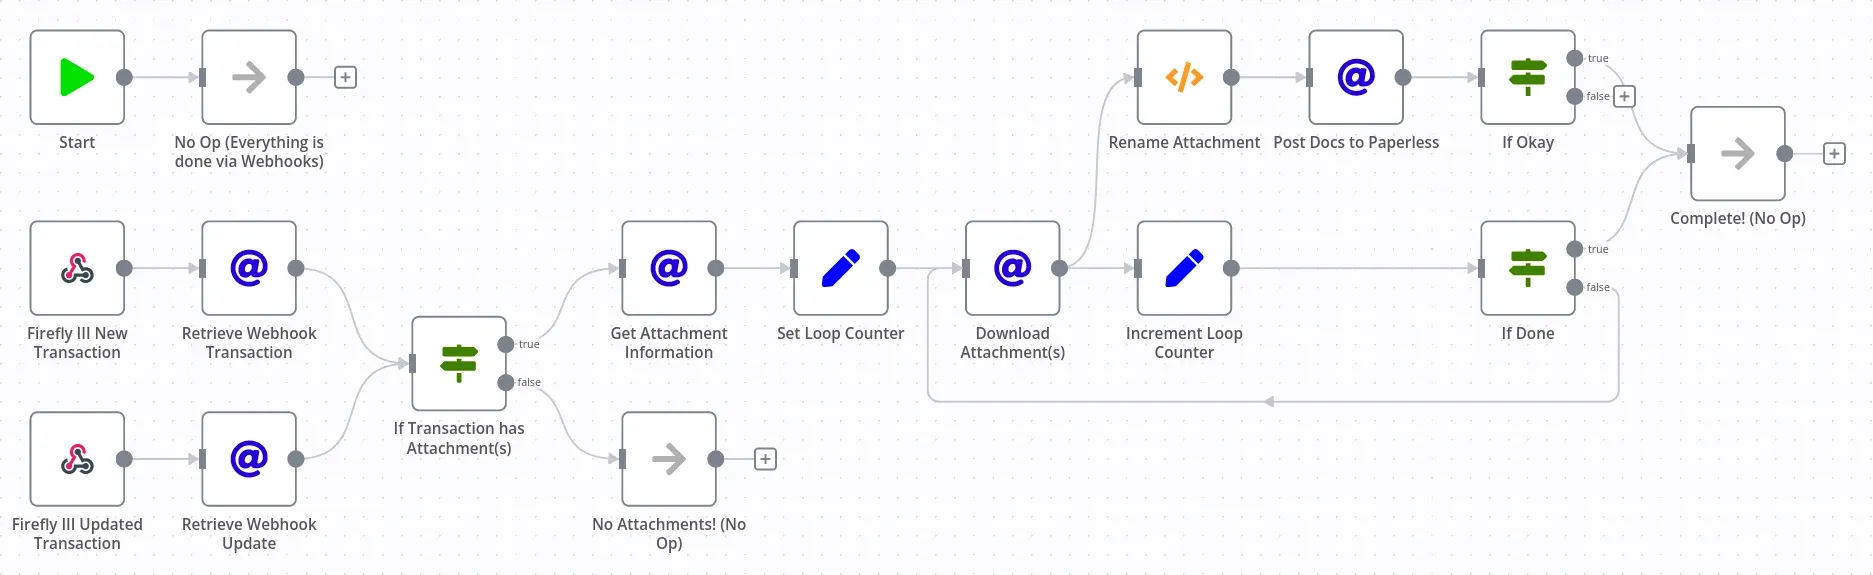
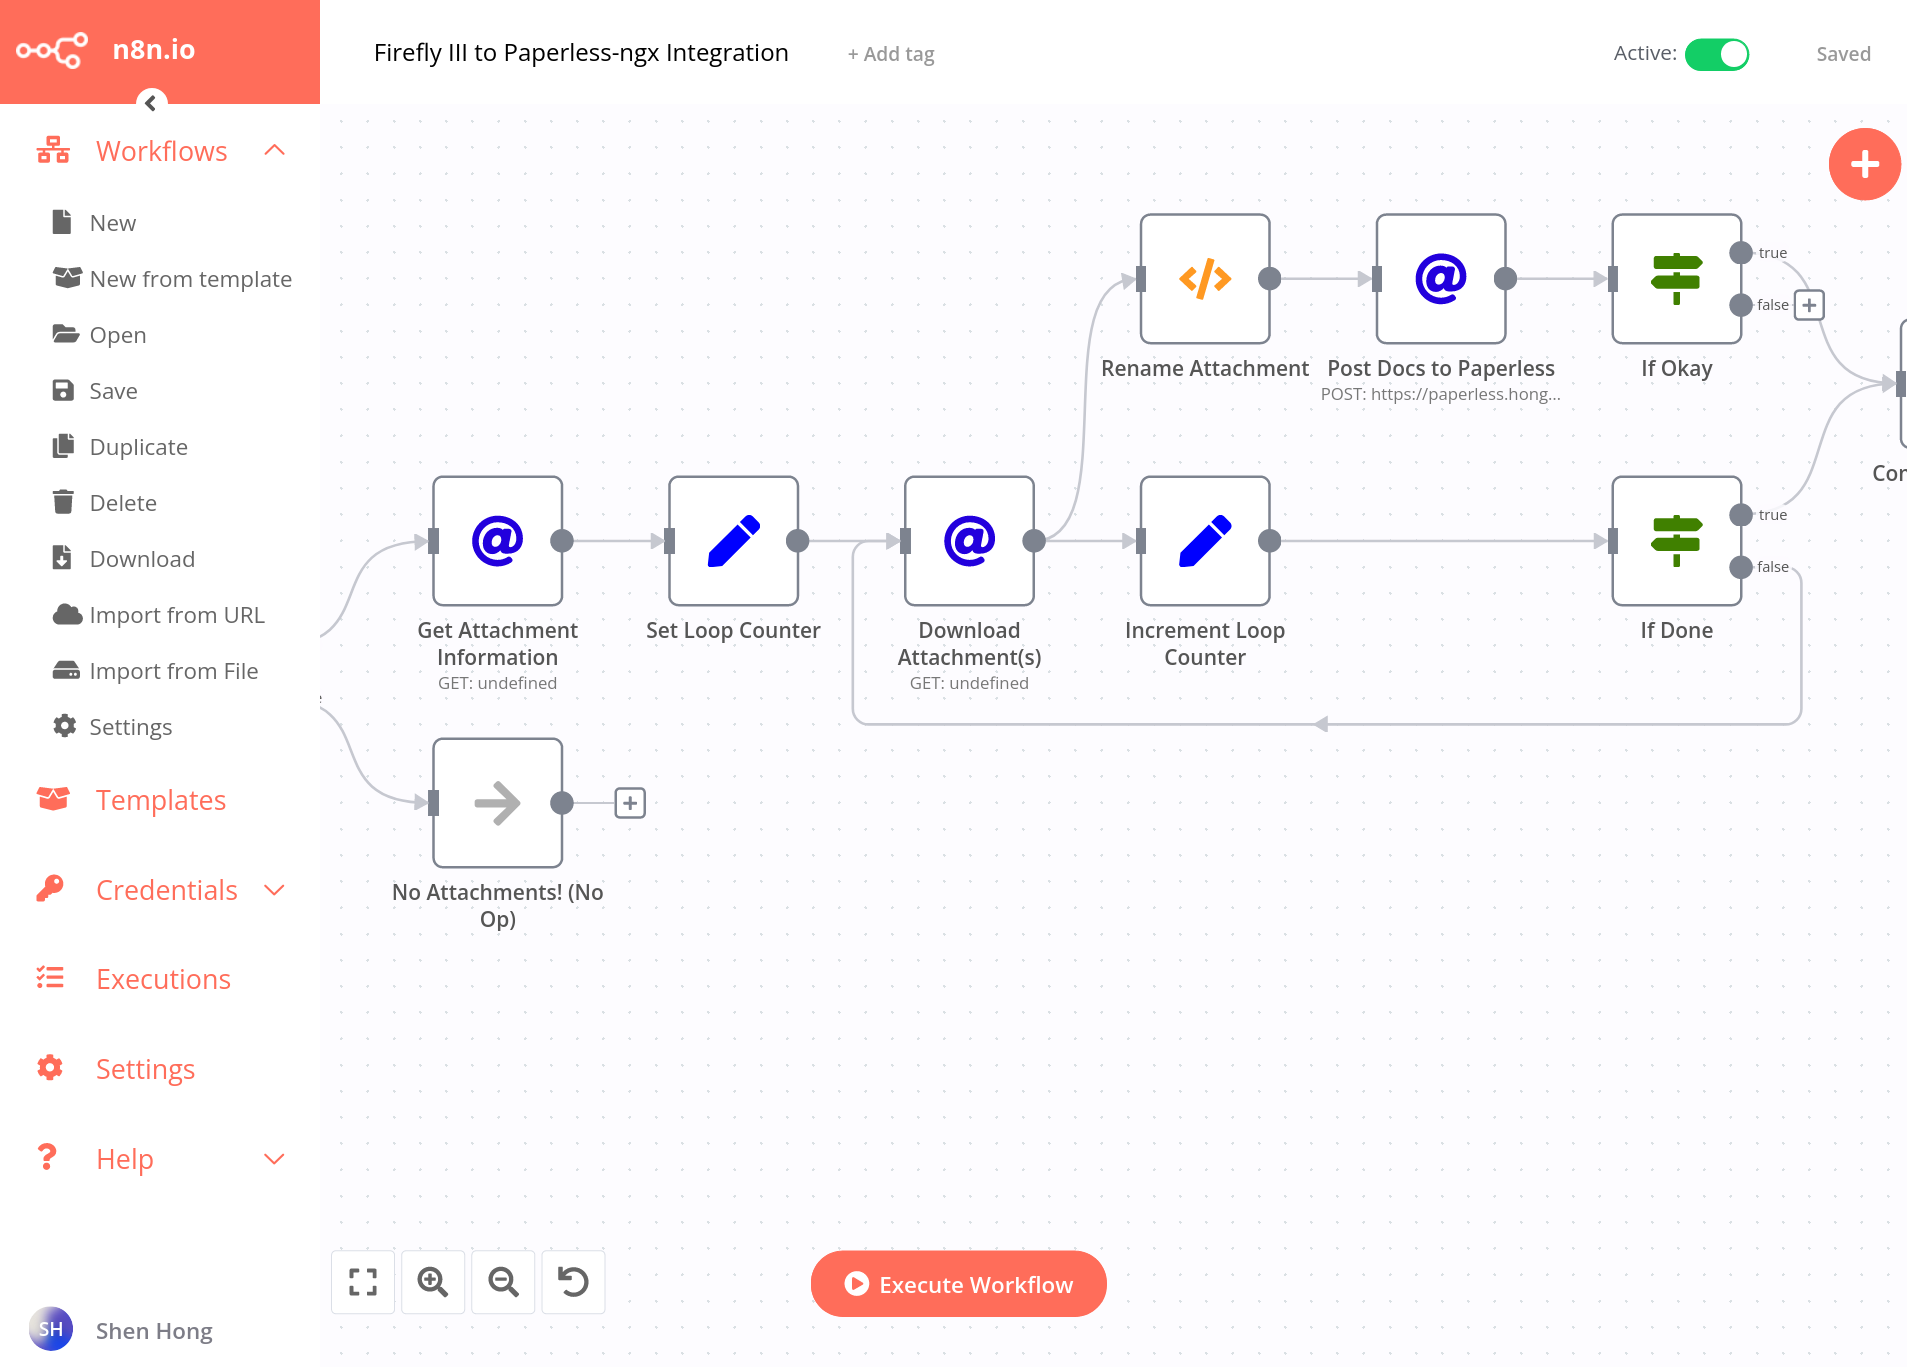
Building the n8n Workflow to Retrieve Attachments from Firefly and Upload them to Paperless-ngx
Now we must construct the automation workflow. The remainder of this article will be a tutorial that walks us through the main parts of building such a workflow. You are welcome to either follow along, or otherwise download the complete .json code for the workflow at the following link. Be aware that the code is not "plug-and-play" – you will have to edit it to specify your own URLs and endpoints.
Our goal is that every time a transaction is added (or updated) on Firefly, the new (or updated) transaction is checked for any attachments. If the transaction has attachments, it will be downloaded by n8n, and then uploaded to Paperless-ngx. This sounds like a simple, and completely linear task– however, there are two complexities that we must handle:
- The workflow must account for multiple attachments in the same transaction, and upload them all correctly to Paperless-ngx.
- The workflow must preserve the transaction description, and send it to Paperless-ngx.
In order to do the first, we must create a loop. In order to perform the second, we will be renaming the downloaded attachments before POST-ing them to Paperless.
I will walk us through the basic steps involved in building this workflow, as understanding the process will be helpful in creating future workflows. The bulk of the nodes that we use are to make HTTP requests (the ones with the blue '@'). Hence, the techniques we learn here are fairly universal and generally applicable to all services that have REST-ful APIs.
Retrieving New or Updated Transactions, and Checking them for Attachments
First, every time a webhook fires, we must retrieve the transaction that was associated with the webhook. Remember, Firefly will only send data to n8n if a transaction is added or updated. However, the information that it sends is only a reference to what transaction was added/updated, and does not contain much information on the transaction itself. Hence, the first step that we must take, is to retrieve the full information of the webhook transaction.
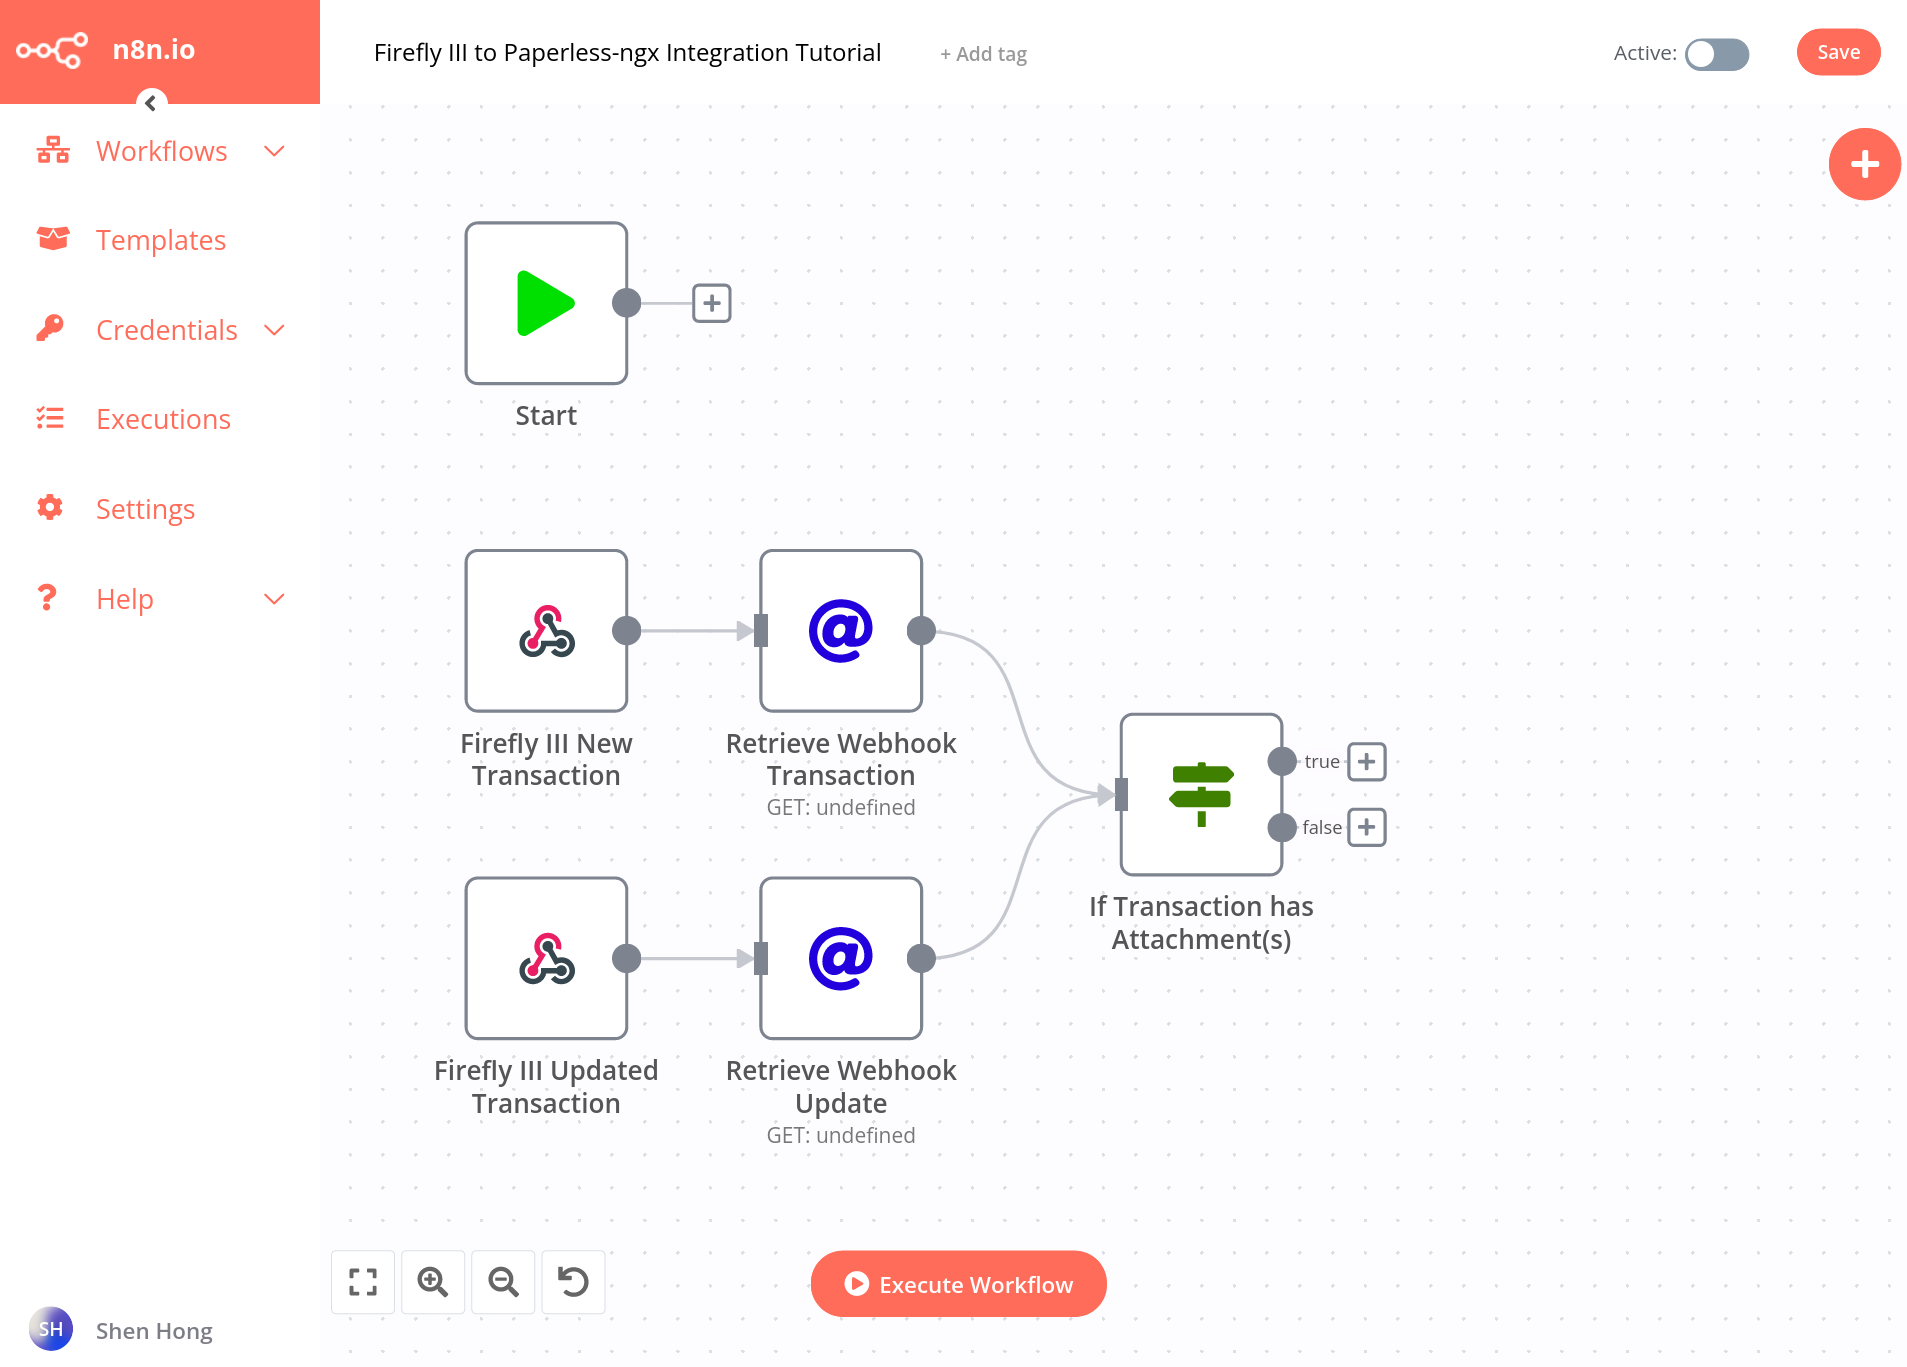
To do this, we add two new HTTP Get nodes (which have the blue '@'). Then, click on the node itself, and configure it to use the header authentication credentials that we added earlier.
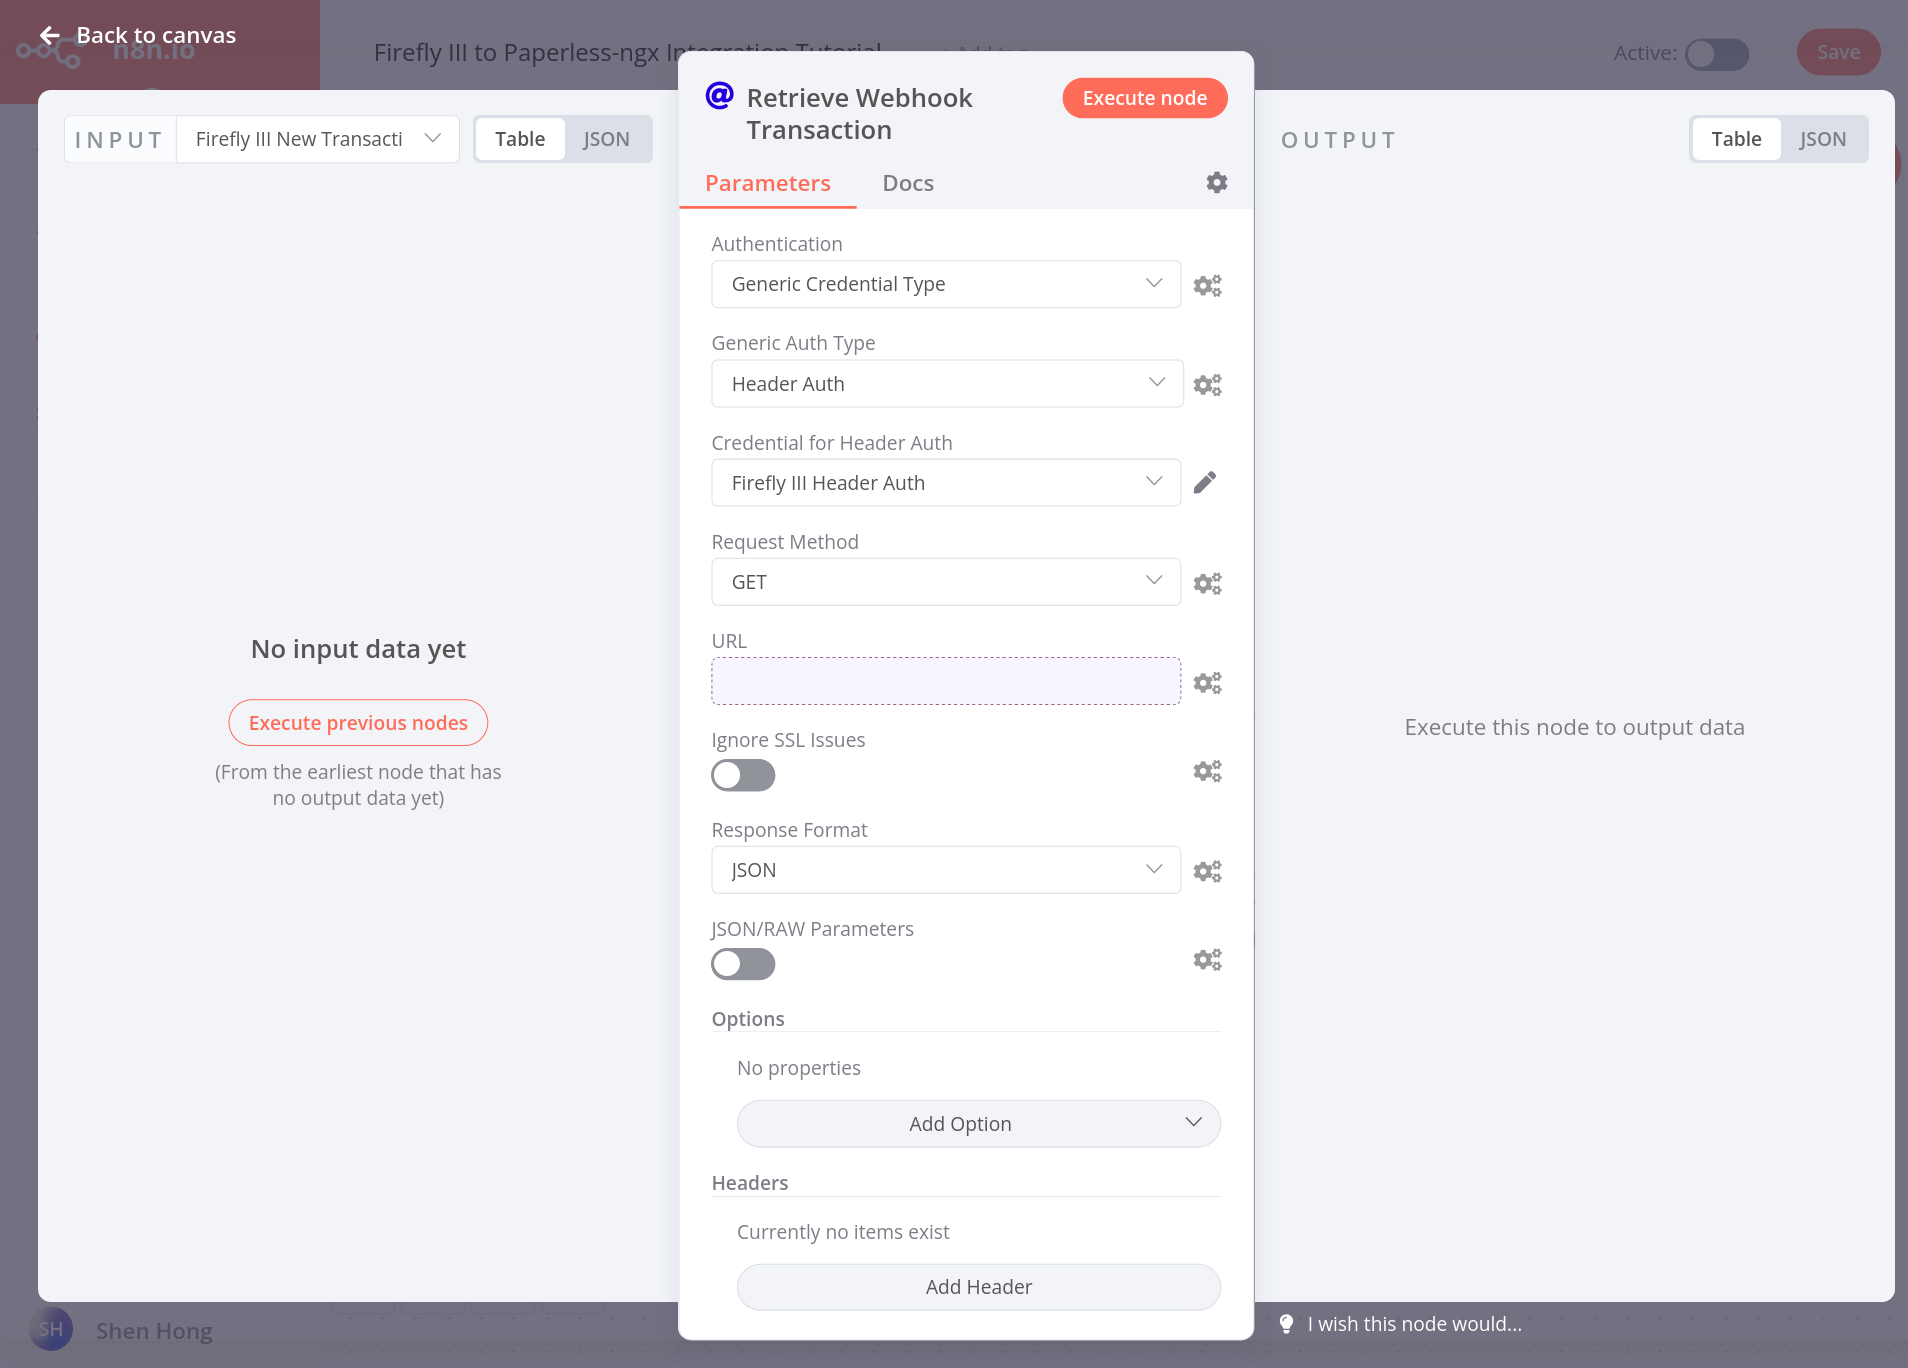
Now, when this node makes an HTTP request towards the Firefly III API, it will have the right credentials to be authenticated. What kind of request should this node make? This is the moment when we get into the heart of building automation workflows. We must consult the Firefly III API to see what kinds of information can be retrieved:
In our case, we must retrieve the information associated with the transaction that triggered the webhook. According to the Transactions section of the Firefly III API Reference, a request made to the following endpoint:
https://[Firefly III domain]/api/v1/transactions/{id}Will return with the JSON-formatted information associated with the transaction bearing the ID of {id}. Hence, that's the call that we must make.
At this point, we still don't know what information is given to us by the webhooks. Hence, we need to call the webhook at least once, in order to capture it's input. Press the large, orange "Execute Workflow" button at the bottom of the n8n editor so we may begin capturing data. Now go ahead and create a new (test) transaction on Firefly III. If you registered the webhooks correctly, the following information should be sent to your HTTP node.
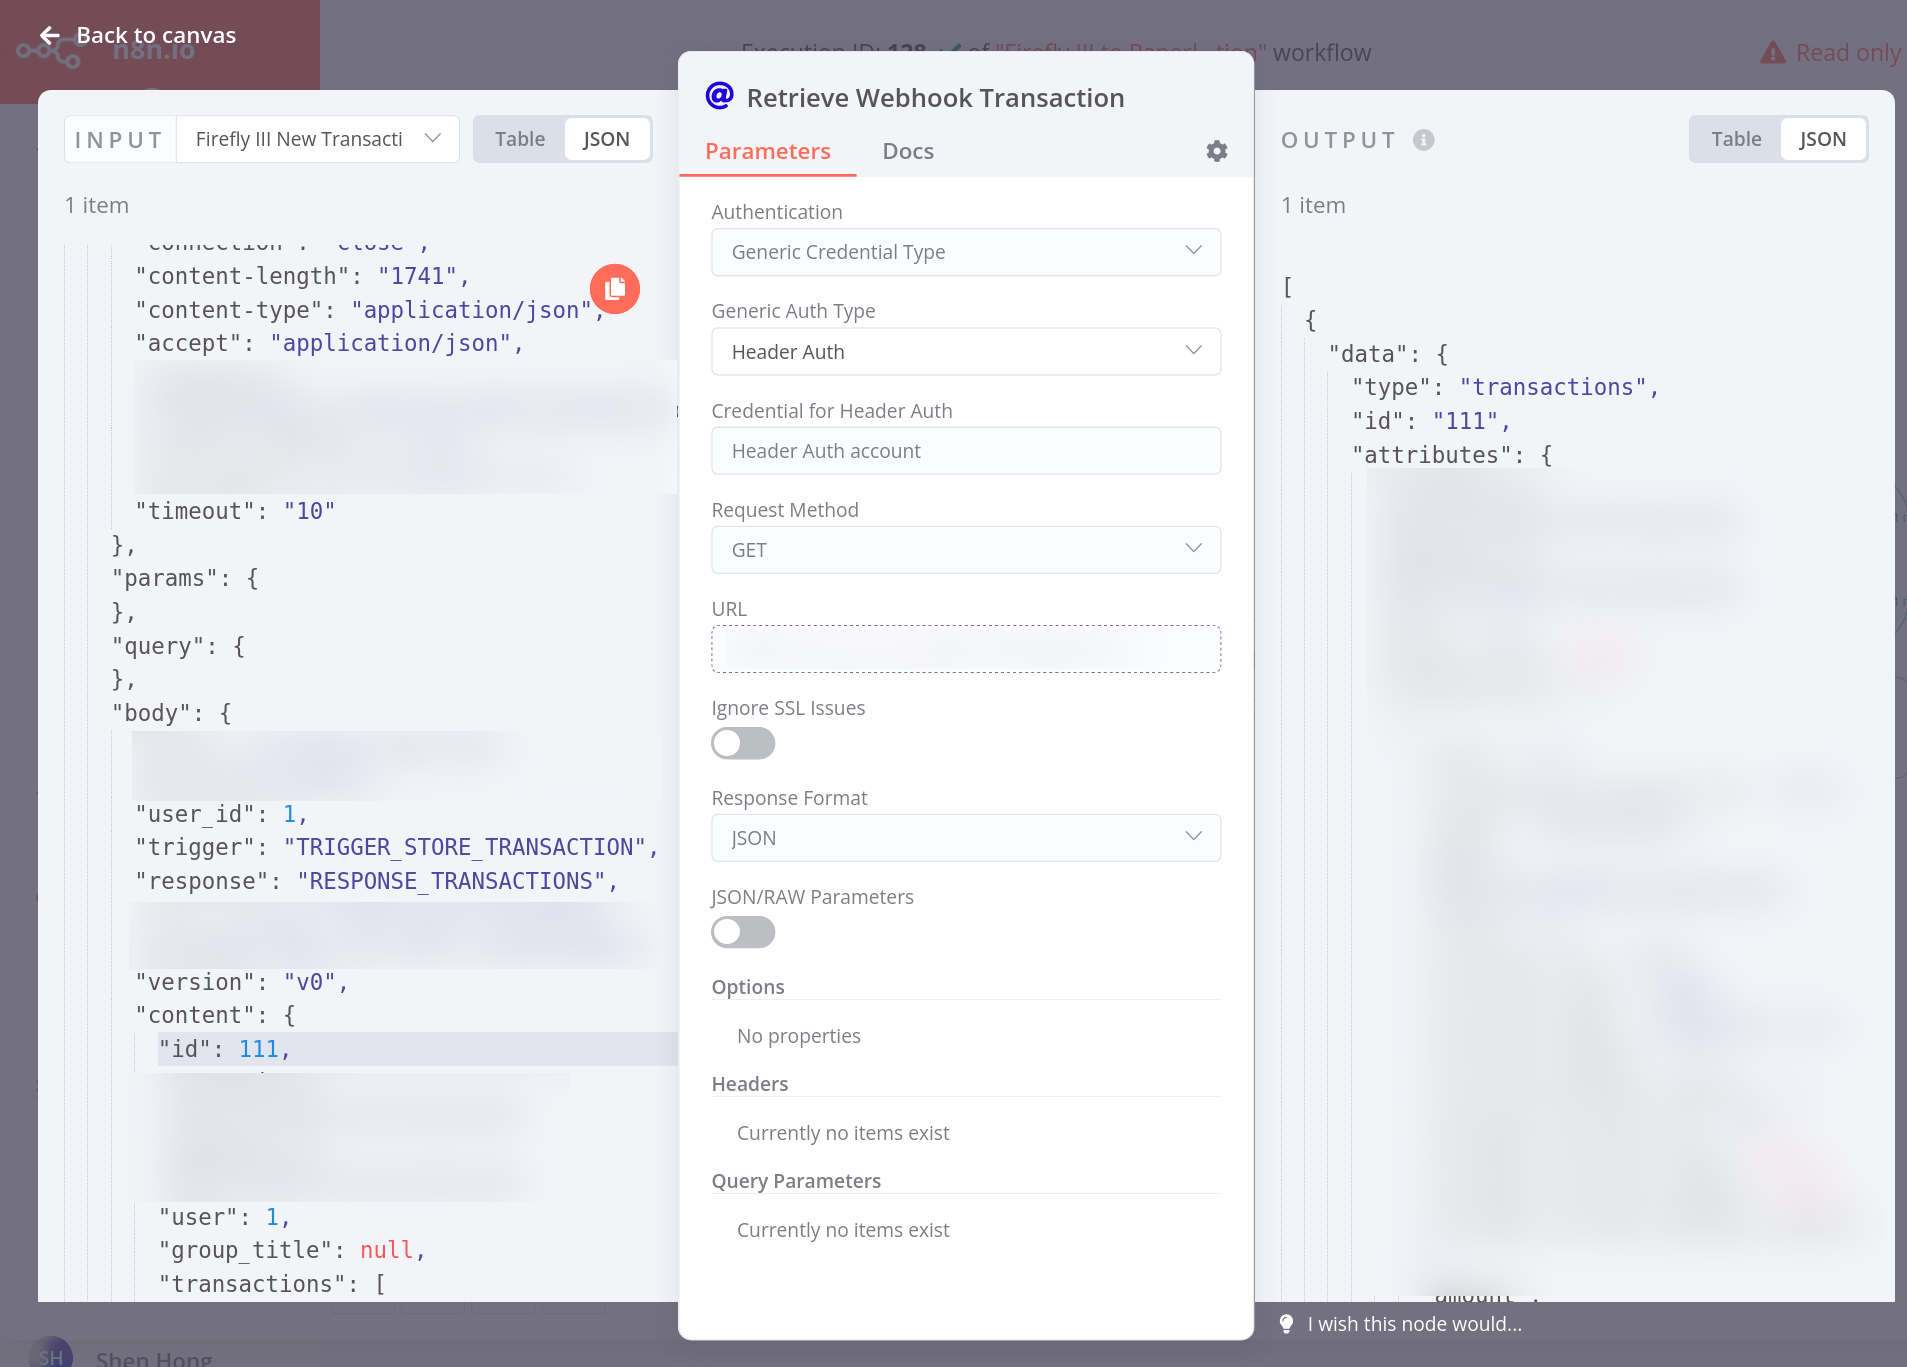
One of the JSON fields that the Webhook gives us is the id of the transaction. We now have the information that we need to make the request! Now, all we have to do is to craft an expression in the URL field. We do this by clicking on the grey gear icon to the right of the URL field (not visible in the above screenshot), and clicking "Add expression."
The window that now opens up is n8n's expression editor. Here, using a combination of JavaScript and templating, you can craft expressions that take information from nodes which feed into your current node, or any node executed so far.

In order to find the right values to insert into the expression, browse the expandable value list to the left of the expression editor. Find the value labeled id and click on it– it will insert the appropriate expression into the editor. You should see the value become highlighted in green (unlike my screenshot), and the resulting substitution will be displayed on the Result field of the screen.
Finally, combine the outputs of both nodes into an IF node, to check if the transactions contain attachments. If they do, then we must get the attachment information, and begin downloading all attachments from the transaction. To do this, you will also use the expression editor– taking the value from the inputs of the IF node and comparing if there has_attachments attribute is true. The expression that I used is:
{{$json["data"]["attributes"]["transactions"][0]["has_attachments"]}}This process of creating expressions in different nodes forms the core of the n8n workflow creation process. Feel free to experiment and understand the expression editor! You will use it in ways greater or less to create all the remaining nodes of the workflow.
Downloading Attachment(s) from the Transaction in a Loop.
After getting the information about the attachment on the Firefly III transaction, we must be able to download the attachment and send it on to Paperless-ngx. However, there can be multiple attachments in a transaction – hence we must create a loop that downloads every attachment in the transaction.
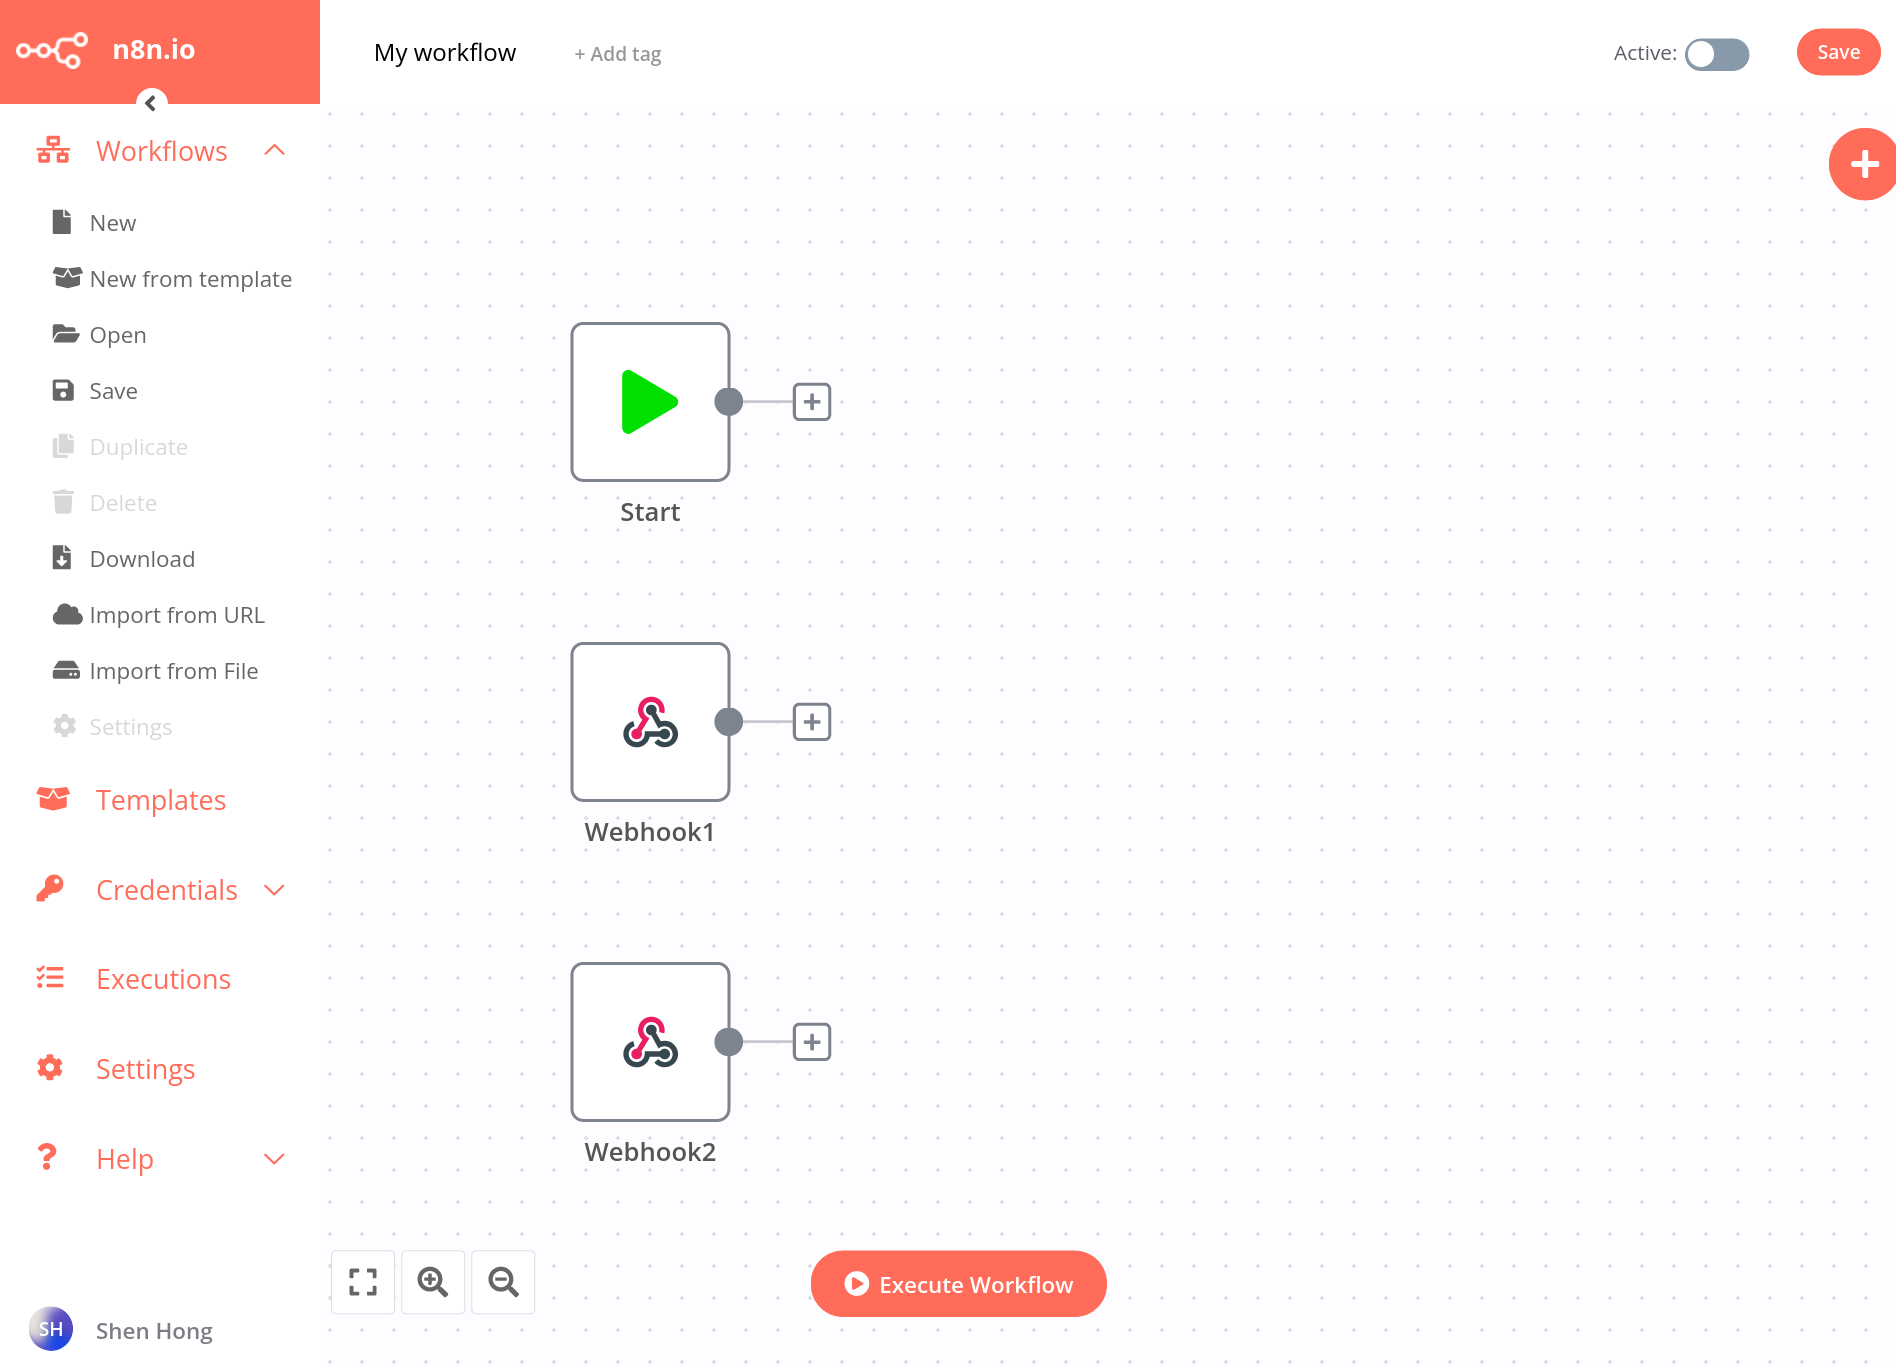
Just like in regular programming, every loop in n8n has three elements:
- A
Setnode (with the blue pencil icon) which sets a loop counter before the loop. - A second
Setnode which increments the counter for every iteration of the loop. - An
IFnode which checks whether the counter is greater than a chosen value. If false, it repeats the loop.
Here's a screenshot of how a simplified loop looks like. We would implement the actual "business logic" of what we want the loop do in the middle of it.
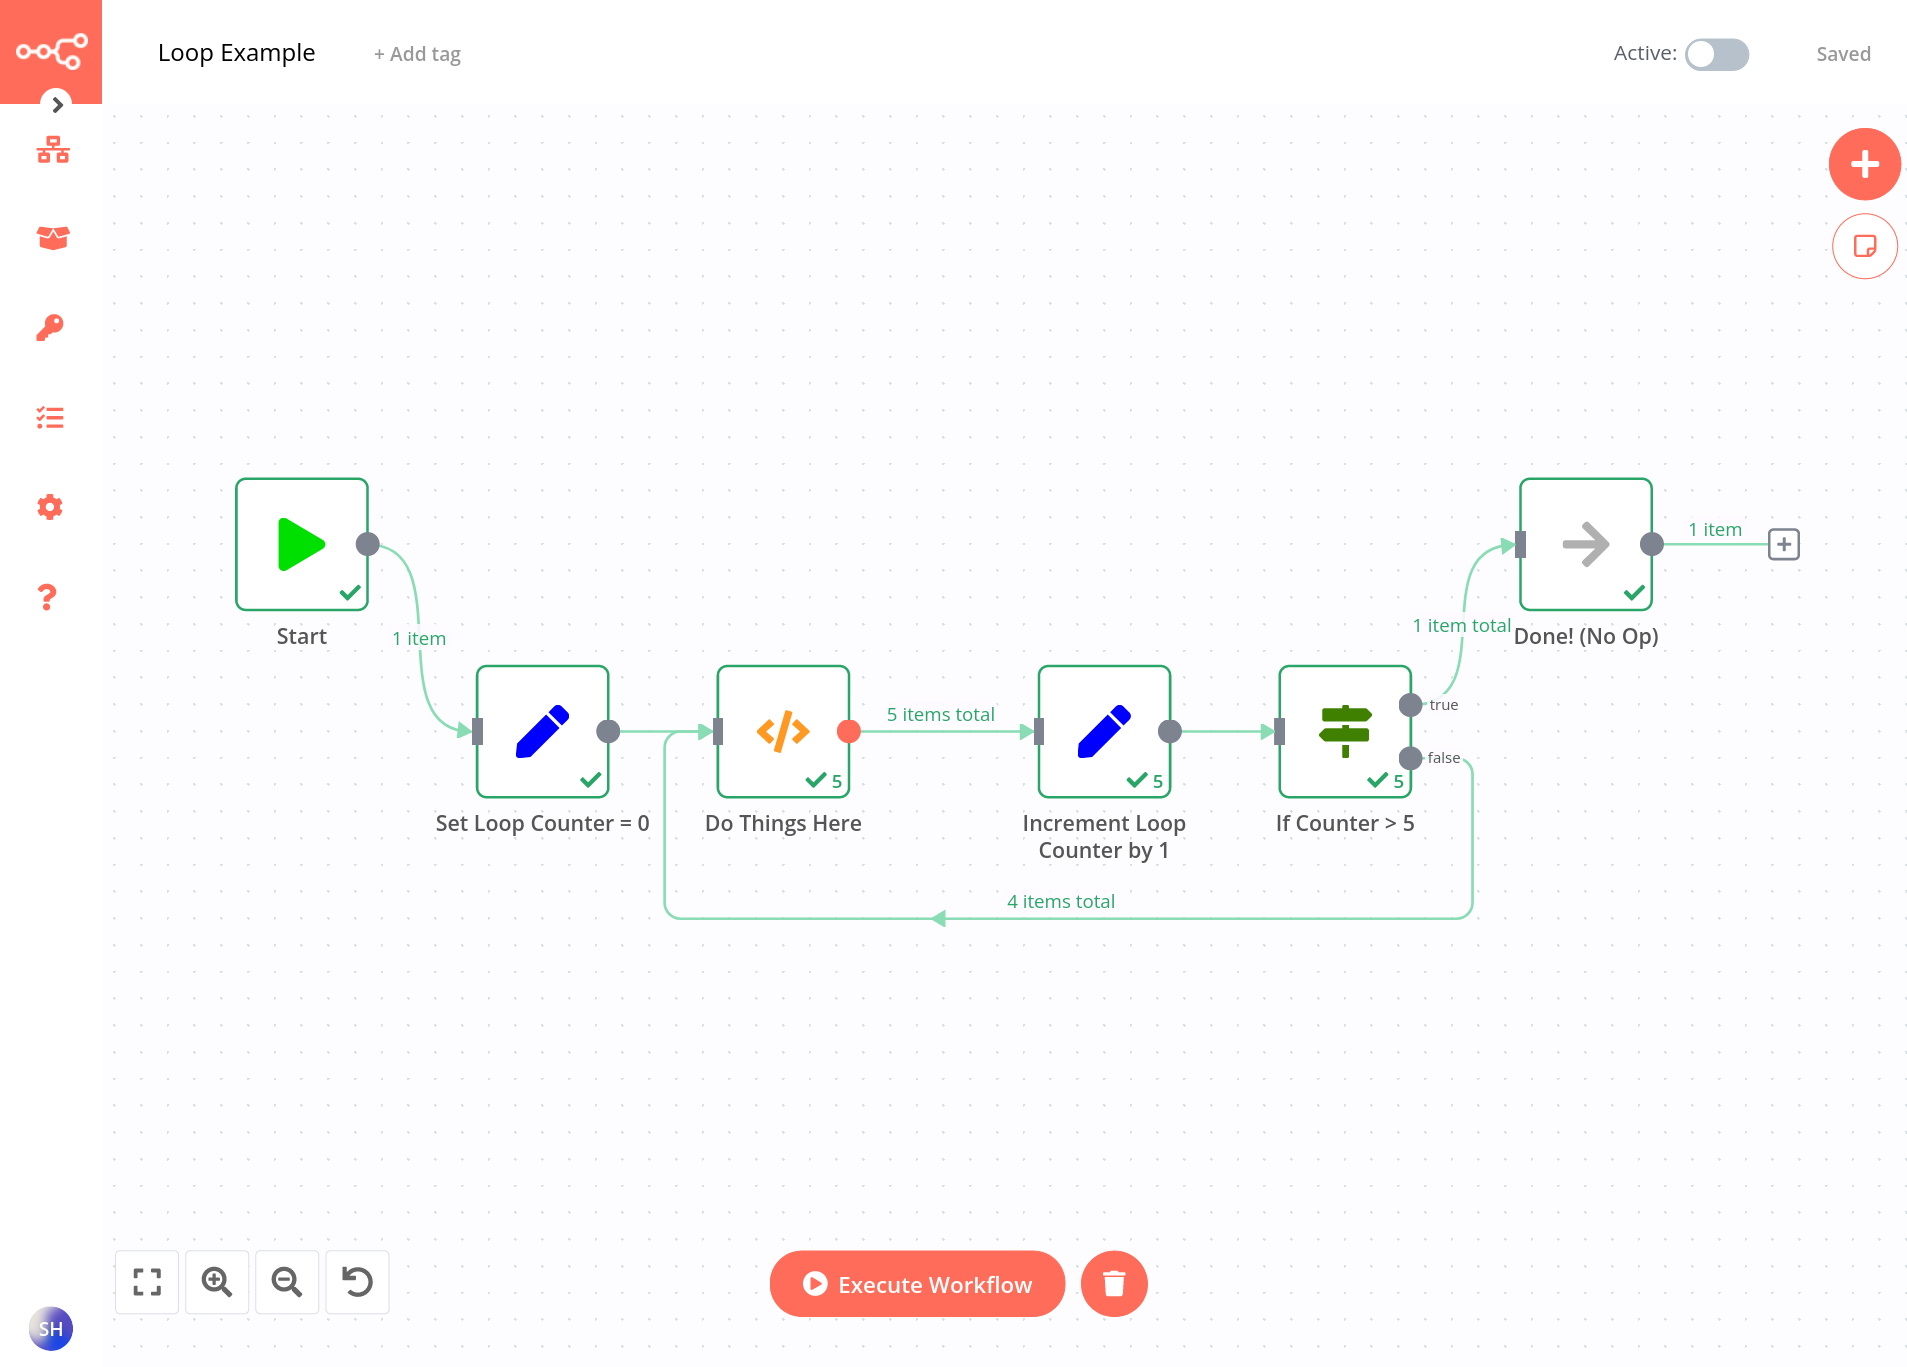
Do you see the similarity between the loop above, and the loop in our workflow implementation? The only flourish that our workflow contains is that a second path branches out from the Download Attachment(s) node.
Our loop instructs the Download Attachment(s) node to download every i-th attachment, starting from 0, until all attachments have been downloaded. This is accomplished by having the If Done node compare the current value of the counter, against the overall length of the attachment information array, returned by the Get Attachment Information node.
Renaming Attachments Using a Function Node
For every attachment, we utilise a function node to rename the attachment, before POST-ing them to Paperless. A function node basically receives information from the preceeding nodes as an JavaScript object, to which we can modify with code.
- Function node documentation.
- "How to modify filename?" n8n community forum post.
Our renaming code has some logic to check if this attachment is the only attachment of the transaction, or if it is only one of a series. Depending on the condition, it appends an appropriate suffix.
// Rename the input binary file to new_file_name. Contains some logic to determine how to
// name the files, depending on if there are multiple attachments.
if ($node["Get Attachment Information"].json["data"].length === 1) {
  // If the transaction only has one attachment
  var new_file_name =
  $node["If Transaction has Attachment(s)"].json["data"]["attributes"]["transactions"][0]["description"];
} else {
  // Else if the transaction has multiple attachments
  // We will name each file with a number, starting from 1. The number comes from the counter.
  let suffix = String($json["counter"] + 1);
  var new_file_name =
  $node["If Transaction has Attachment(s)"].json["data"]["attributes"]["transactions"][0]["description"]
  + " " + suffix;
}

const data = Object.assign(items[0].binary.data, {fileName:new_file_name});
return [
  {
    json:{},
    binary: {
      data:data
    }
  }
]
Code used to rename attachments inside the Function node.
Posting Renamed Documents to Paperless-ngx
Finally, the attachment is sent to Paperless using a POST request. The way that this is done in n8n is slightly non-intuitive, so it's helpful for us to consult the documentation first to understand how POST requests are made.
- HTTP Request Node, n8n documentation
- Send a binary file to an API endpoint, n8n documentation
We will use the same HTTP Request Node, but instead of a GET request, we must use a POST request. Additionally, as per the example in the documentation, set the JSON/RAW Parameters toggle to true (green), and select Form-Data Multipart for the body content type. Also set the Send Binary Data toggle to true (Green).
Finally, add document:data into the Binary Property field. Note that this does not have to be a expression, just the string document:data.

POST-ing a binary document to the Paperless API.Now all that remains is to test out the workflow. Click on the orange "Execute Workflow" button once more, and create a test transaction on Firefly III with an attachment. You should see the workflow trigger, and your attachment automatically appear on Paperless-ngx!
Once you have verified that the workflow works correctly in Development mode, you must activate it on n8n so it runs automatically upon triggers. Then, you must update the webhook URLs on Firefly III to point towards the production URL, instead of the test URL. To do this, simply use the update command listed earlier.
Conclusion
We have created an n8n automation workflow which allows attachments to be automatically uploaded to Paperless-ngx. I hope my tutorial was helpful in covering the steps towards creating such workflows. As of always, the the complete .json code for the workflow at the following link.
Tools like n8n are useful for automating mundane tasks, and I hope that the time it saves us will allow us to do more purposeful, and interesting things.
Thank you for reading my tutorial. For further content, feel free to subscribe to my RSS feed. If you have any thoughts, feedback, or got stuck in any way, feel free to contact me. I always enjoy meeting interesting strangers! Be sure to check out my other content: I also write about Galileo, Special Relativity, and NixOS.